Home Pages
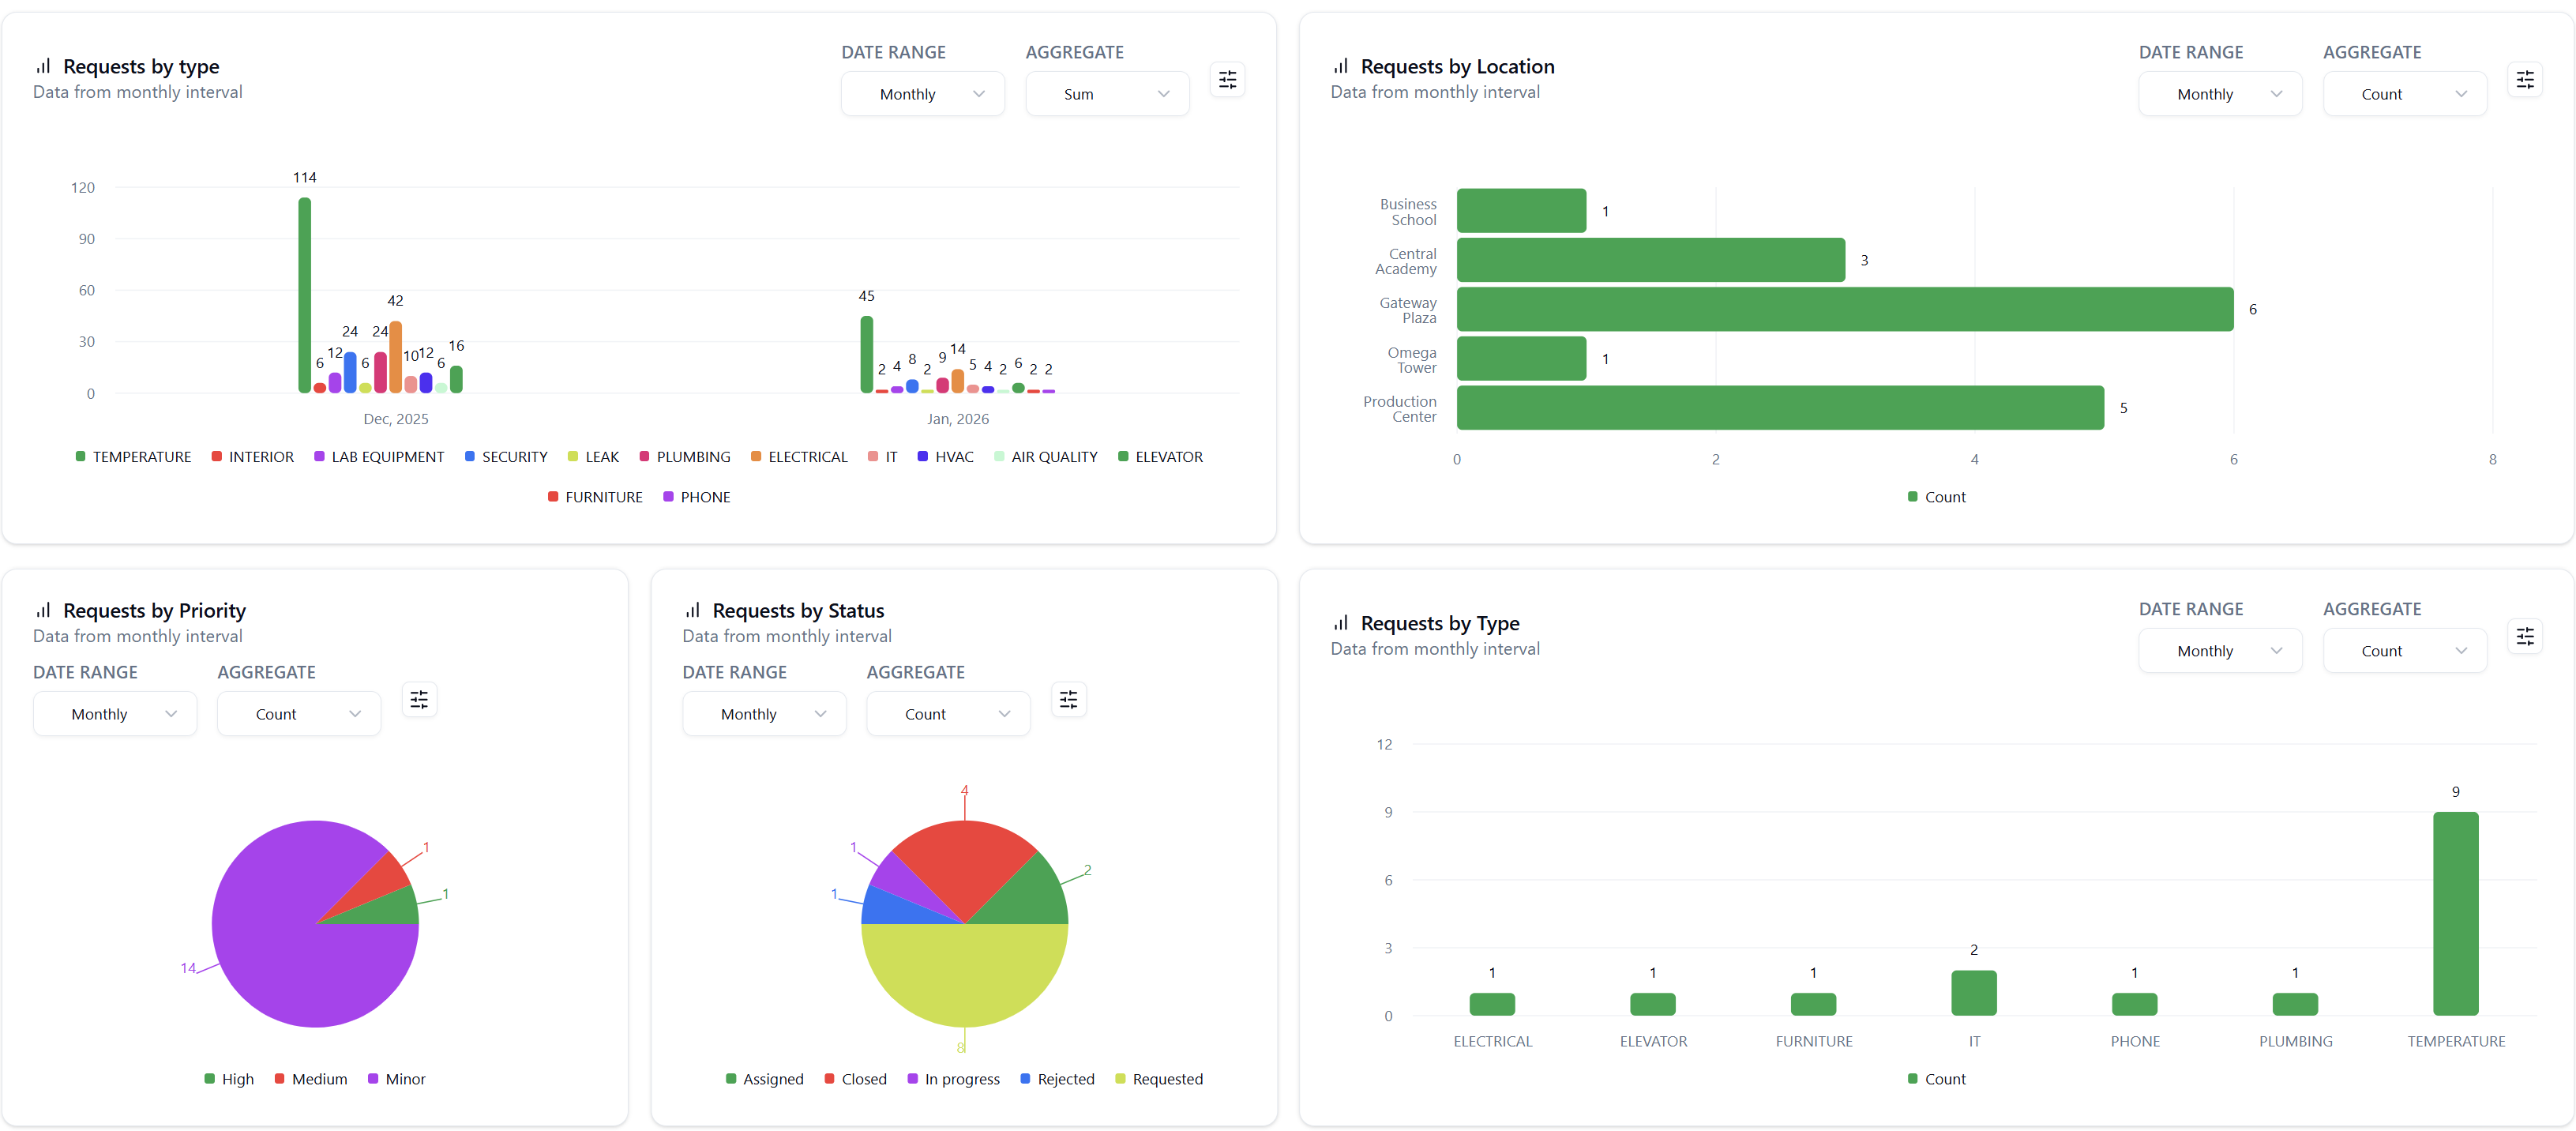
Home Pages in SignalSync provide customizable dashboard views that display key metrics, workflow status, and business intelligence through configurable widgets. Each home page can be assigned to specific user profiles, giving different roles tailored views of the information most relevant to them.
The Home Pages feature is currently in active development. This documentation covers the basic functionality available now. Additional features including enhanced widget types, real-time data updates, interactive drill-down capabilities, and improved layout management will be released throughout 2026.
Overview
Home Pages serve as personalized dashboards where users can:
- Monitor KPIs: Display key performance indicators through various chart types
- Track Workflow Status: View real-time counts and trends of workflow instances
- Analyze Trends: Visualize data over time with line charts and time-series analysis
- Compare Metrics: Use bar charts, pie charts, and other visualizations to compare values
- Customize Views: Different user roles can have different home pages based on their needs
Each home page is built using widgets that display data from Metrics you've defined or entities. Users see their assigned home page immediately upon logging in, unless a Default URL is configured on one of their profiles.
If any of the user's assigned profiles has a Default URL configured, that URL takes priority and the user will be redirected there upon sign-in instead of seeing their home page. Home pages are only displayed when no Default URL is defined on any of the user's profiles.
Default URLs are typically management consoles (built with the Graphical Workflow Engine) where users can initiate and manage workflows, while Home Pages are dashboard views with widgets displaying metrics and analytics.
Accessing Home Page Designer
To access the Home Page Designer:
- Navigate to Settings in the left sidebar
- Click Home Pages
- Select the desired home page
- Click Designer in the breadcrumb or navigation
- You'll see the Home Page Designer interface with existing widgets
The Designer view shows:
- All widgets configured for the current home page
- Action buttons: Save widgets, New widget
- Each widget displays a preview of its visualization
Creating Widgets
Widgets are the building blocks of home pages. Each widget displays data from one or more metrics.
Creating a New Widget
- Click the New widget button
- Configure the widget using the tabs at the top:
- Standard: Basic widget properties
- Metrics: Select metrics and configure data display
- Workflow: Choose one or multiple workflows to display in the widget.
- Alerts: Configure alert-based widgets (future functionality)
Standard Tab
Title (required)
Display name for the widget shown on the home page.
Card Type (required)
Choose the visualization type for your widget:
- Score Card: Single number display with optional comparison indicators
- Table: Tabular data display
- Bar Chart (Vertical): Traditional vertical bar chart
- Bar Chart (Horizontal): Traditional horizontal bar chart
- Line Chart: Time-series trend visualization
- Area Chart: Filled line chart for cumulative or stacked data
- Stacked Area Chart: Multiple data series stacked on top of each other
- Pie Chart: Circular chart showing proportions
- Donut Chart: Pie chart with a hollow center
- Radial Chart: Circular chart with labeled segments radiating from the center, ideal for displaying categorical data with proportional values
Metrics Tab
The Metrics tab is where you configure the data sources for your widget.
Metrics (required)
Select one or more metrics to display in the widget. Click the + (Add) button to add additional metrics.
Each selected metric can be individually configured:
Interval
How to group the data over time:
- Daily: Show daily data points
- Weekly: Aggregate data by week
- Monthly: Aggregate data by month
- Yearly: Aggregate data by year
The Interval options will be renamed in a future release to be more intuitive:
- Today
- Last week
- Last month
- Last quarter
- Last year
Aggregate as
The calculation method for the metric data:
- Count: Number of records
- Average: Mean value
- Sum: Total sum
- Max: Maximum value
- Min: Minimum value
Workflow Tab
The Workflow tab allows you to create interactive workflow cards that enable users to initiate and manage workflows directly from the home page.
Title (required)
Display name for the workflow widget shown on the home page.
Select workflows (required)
Choose one or multiple workflows to display in the widget. Available workflows appear as selectable options with their names and version status (e.g., "Latest").
How Workflow Widgets Work:
When you select workflows, the widget automatically creates visual cards for each workflow, displaying:
- Workflow name (e.g., "Preventive Maintenance", "Corrective Maintenance")
- Descriptive image or icon representing the workflow
- Action menu (⋮) with options:
- Create: Opens the workflow initiation form to start a new workflow instance
- Manage: Opens the management console to view and manage existing workflow instances
User Interaction:
Users interact with workflow widgets to:
- Initiate new workflows: Click the "Create" option to open the workflow's data entry form (built in GWE) and submit a new request
- Manage existing workflows: Click the "Manage" option to access the management console (Default URL) where they can view, filter, and take actions on workflow instances
This provides a convenient launchpad for users to access their most common workflows without navigating through multiple menus.
Group related workflows together in a single widget. For example, create a "Maintenance Workflows" widget containing both Preventive and Corrective Maintenance workflows, giving users quick access to all maintenance-related processes.
Alerts Tab
The Alerts tab will allow you to create widgets that display active alerts, notifications, and threshold violations based on metric values. This functionality is planned for a future release.
Managing Widgets
Editing a Widget
To modify an existing widget:
- Click the three-dot menu (⋮) on the widget
- Select Edit
- Modify the settings in the widget configuration dialog
- Click Save changes
Duplicating a Widget
To create a copy of an existing widget:
- Click the three-dot menu (⋮) on the widget
- Select Duplicate
- A copy of the widget is created with the same configuration
- Edit the duplicate to customize it as needed
Deleting a Widget
To remove a widget from the home page:
- Click the three-dot menu (⋮) on the widget
- Select Delete
- Confirm the deletion
Arranging Widgets
Widgets on the home page can be fully customized to suit your layout preferences:
Moving Widgets
Click and drag any widget to reposition it on the home page canvas. Widgets will automatically adjust their positions as you move them around.
Resizing Widgets
Hover over any corner of a widget until you see the resize cursor, then click and drag to adjust the widget's size. This allows you to emphasize important metrics by making their widgets larger, or fit more widgets on the page by making some smaller.
Layout Tips
- Larger widgets are ideal for detailed charts or tables that need more space
- Smaller widgets work well for simple score cards or key metrics
- Group related widgets near each other for easier comprehension
- Experiment with different layouts to find what works best for your users
Remember to click Save widgets after arranging your layout to preserve your changes.
Assigning Home Pages to Profiles
Home pages are assigned to Profiles, not directly to individual users. Once home pages are assigned to a profile, all users with that profile can select from the available home pages as their personal landing page.
Understanding Home Page Types
System Home Pages:
- Provided automatically with licensed products
- Created and maintained by SignalSync (Cloud Admin)
- Tenant Administrators can view but cannot modify System home page assignments to System profiles
Custom Home Pages:
- Created by Tenant Administrators to meet specific business needs
- Can display custom metrics, reports, and visualizations
- Example: "Maintenance", "Operations Dashboard"
- System Profiles: Only Cloud Admins can assign/unassign home pages. Tenant Admins can view assigned home pages but cannot modify them.
- Custom Profiles: Tenant Admins can freely assign and unassign home pages.
Viewing Home Pages Assigned to a Profile
To view which home pages are assigned to a specific profile:
- Navigate to Settings > Profiles
- Click the three-dot menu (⋮) next to the profile
- Select Homepages
- The home page assignment screen displays all currently assigned home pages with columns:
- Homepage - The home page name
- Homepage Type - Either "System" or "Custom"
Assigning Home Pages to Custom Profiles
To assign home pages to a Custom profile:
- Navigate to Settings > Profiles
- Click the three-dot menu (⋮) next to the Custom profile
- Select Homepages
- Click the Assign homepages button
- In the "Available Homepages" dialog:
- Browse the list of available home pages
- Filter by Homepage Type if needed (System or Custom)
- Use the search box to find specific home pages
- Check the boxes next to the home pages you want to assign
- Click Assign
The assigned home pages immediately become available for selection by all users with this profile.
You can assign multiple home pages to a single profile, giving users the flexibility to choose which dashboard view they prefer based on their current work focus.
Unassigning Home Pages from Custom Profiles
To remove home pages from a Custom profile:
- Navigate to the profile's Homepages screen
- Check the boxes next to the home pages you want to remove
- Click the Unassign (n) button
- Confirm the action
Users with this profile will no longer see the unassigned home pages in their available home page selection.
User Home Page Selection
Once home pages are assigned to their profiles, users can select their preferred home page as their default landing page.
How Users Select Their Home Page
- Click on the user menu (profile picture/name) in the top-right corner
- Select Manage Account
- Navigate to the Account tab
- In the Homepage dropdown, select from available home pages
- The dropdown shows all home pages assigned to any of the user's profiles
- If a user has multiple profiles, they see home pages from all assigned profiles combined
- Click Save changes
The selected home page becomes the user's default landing page upon next sign-in.
If a user has no home pages assigned to any of their profiles, the Homepage dropdown will be empty or show "Select a homepage" with no options available.
If any of the user's assigned profiles has a Default URL configured, that URL takes priority and the user will be redirected there upon sign-in instead of seeing their selected home page. Home pages are only displayed when no Default URL is defined on any of the user's profiles.
Home Page Assignment Best Practices
Match Home Pages to Roles
Assign home pages that display the most relevant information for each profile's typical responsibilities.
Provide Multiple Options
For profiles with diverse responsibilities, assign multiple home pages so users can choose the view most relevant to their current focus.
Use Descriptive Names
Name custom home pages clearly to indicate their purpose (e.g., "Maintenance Operations Dashboard", "Financial Overview").
Avoid Over-Assignment
Don't assign too many home pages to a single profile, as this can overwhelm users with choices. Typically, 2-4 home pages per profile is ideal.
Review Periodically
Regularly review home page assignments to ensure they still align with user needs and remove outdated home pages.
Test with Real Users
After assigning home pages, ask users for feedback to ensure the dashboards provide value and are easy to understand.
Best Practices
Design for Your Audience
Create home pages tailored to specific user roles. For example:
- Executives might need high-level KPI scorecards
- Operations teams might need detailed workflow status charts
- Maintenance staff might need location-based metrics
Use Appropriate Chart Types
Match visualization types to your data:
- Line charts for trends over time
- Pie/Donut charts for proportions and percentages
- Bar charts for comparing discrete categories
- Score cards for highlighting single important numbers
Don't Overcrowd
Limit each home page to 4-8 widgets to maintain clarity and usability. Create multiple home pages if you need to display more metrics.
Name Widgets Clearly
Use descriptive titles that immediately communicate what the widget displays (e.g., "Open Requests by Priority" instead of just "Requests").
Group Related Metrics
Organize widgets logically. For example, group all request-related widgets together, or all building-related metrics.
Test with Real Users
Get feedback from the users who will be using the home pages to ensure the widgets provide value and are easy to interpret.
Keep Metrics Updated
Ensure the underlying metrics are active and collecting data successfully. Widgets can only display data that metrics have collected.
Troubleshooting
Widget shows 'No data' or empty chart
Possible Causes:
- The selected metric has not collected any data yet
- The metric is disabled (Active toggle is off)
- The metric's last execution resulted in an error
- Filter conditions on the metric are excluding all records
- The selected Interval doesn't match any collected data points
Resolution:
- Navigate to Settings > Metrics and verify the metric is Active
- Check the metric's Execution status for errors
- Open the metric's Metric records to confirm data has been collected
- Verify the metric's Recurrence setting matches your expected data frequency
- Edit the widget and try a different Interval setting
- Wait for the next metric collection cycle if the metric was just created
Widget displays but shows outdated data
Possible Causes:
- The underlying metric's recurrence interval hasn't triggered yet
- The metric execution failed during the last scheduled run
- System jobs for metric collection are not running properly
- Caching is preventing the widget from displaying updated data
Resolution:
- Check the metric's Last exec. date in Settings > Metrics
- Verify the Execution status is "Success"
- Confirm the current time is past the expected collection time based on Recurrence
- Try refreshing the browser page (Ctrl+F5 / Cmd+Shift+R to force refresh)
- Contact your system administrator if scheduled metric jobs are not running
Cannot select metrics when creating a widget
Possible Causes:
- No metrics have been defined yet
- All defined metrics are disabled (Active toggle off)
- User permissions don't allow viewing available metrics
- Metrics exist but are in error state
Resolution:
- Navigate to Settings > Metrics to verify metrics exist
- Ensure at least one metric has Active enabled
- Check that you have appropriate permissions to view and use metrics
- Verify metrics have successfully collected data at least once
- Contact your system administrator if you should have access to specific metrics
Widget configuration changes are not saved
Possible Causes:
- Required fields are missing (Title, Card Type, Metrics)
- Browser validation errors are preventing form submission
- Network connectivity issues
- Session timeout requiring re-authentication
Resolution:
- Verify all required fields are filled in (indicated by red borders or asterisks)
- Check browser console for validation error messages
- Ensure you're clicking Save changes (not just closing the dialog)
- Try refreshing the page and editing the widget again
- Check your network connection
- Re-authenticate if your session has expired
Home page is not assigned as default for user profile
Possible Causes:
- Homepage setting not saved in user profile configuration
- User is assigned to a different profile than expected
- User has a personal homepage override setting
- Permission restrictions preventing homepage assignment
Resolution:
- Verify the user profile configuration has the correct Homepage selected
- Confirm the user is assigned to the correct profile
- Check if the user has any personal overrides in their account settings
- Ensure you have permissions to modify user profile settings
- Have the user log out and log back in to refresh their session
Frequently Asked Questions
Q: Can I create multiple home pages for different purposes?
A: Yes, you can create multiple home pages (e.g., one for Maintenance, one for Operations, one for Management) and assign different pages to different user profiles.
Q: Can users customize their own home pages?
A: Not currently. Home pages are configured by administrators and assigned to user profiles.
Q: How many widgets can I add to a single home page?
A: There is no hard limit, but for optimal performance and usability, we recommend limiting each home page to 4-8 widgets.
Q: Can widgets display real-time data?
A: It depends on the widget type. Metric widgets display data based on the collection schedule of the underlying metrics (daily, weekly, or monthly), so they are not real-time.
Q: Can I export widget data to Excel or PDF?
A: Direct export from widgets is not currently available. You can export data from the underlying Metric records view in Settings > Metrics. Enhanced export capabilities are planned for future releases.
Q: Can widgets display data from multiple metrics at once?
A: Yes, you can add multiple metrics to a single widget. This is useful for comparative analysis or displaying related KPIs together.
Q: What happens if I delete a metric that's being used in a widget?
A: The widget will display "No data" or an error message. It's recommended to remove or update widgets before deleting metrics they depend on.
Q: Can I control who sees which widgets on a shared home page?
A: Not currently. All widgets on a home page are visible to all users who have access to that home page.
Q: Can I add filters or date range selectors directly on widgets?
A: Yes. Widgets support several filtering options:
- Time Interval: Select Daily, Weekly, Monthly, or Yearly to control the data timeframe (these options will be renamed to "Today", "Last week", "Last month", "Last quarter", "Last year" in a future release)
- Entity & Workflow: Filter data by selecting specific entities and workflows
- Custom Conditions: Create detailed filters to restrict displayed data (e.g., show only "Electrical" requests, or filter by specific locations, priorities, or any entity field)
- Date Field: Choose which date field to use for time-based filtering (e.g., Date Requested, Date Completed)
- Group by Field: Group results by specific fields like Building, Type, Status, etc.
These filters are configured when creating or editing the widget in the Standard tab, allowing you to create highly targeted visualizations without needing to create separate metrics for each filtered view.