Product Hierarchy
Overview
Product Hierarchy is a powerful feature in SignalSync that allows Tenant Administrators to organize and customize the application's navigation structure. This feature enables you to manage products, processes, and tasks to align the system with your organization's specific business needs and workflows.
The Product Hierarchy consists of three levels:
- Products - Licensed applications available to your organization
- Processes - Logical groupings of related tasks shown in the process navigator
- Tasks - Individual menu items that users can access to perform specific functions
Accessing Product Hierarchy
Product Hierarchy is exclusively available to users with the Tenant Administrator role. To access this feature:
- Navigate to the left sidebar menu
- Expand Settings
- Under Customers and Products section, select Products
The Product Hierarchy interface displays three tabs: Products, Processes, and Tasks.
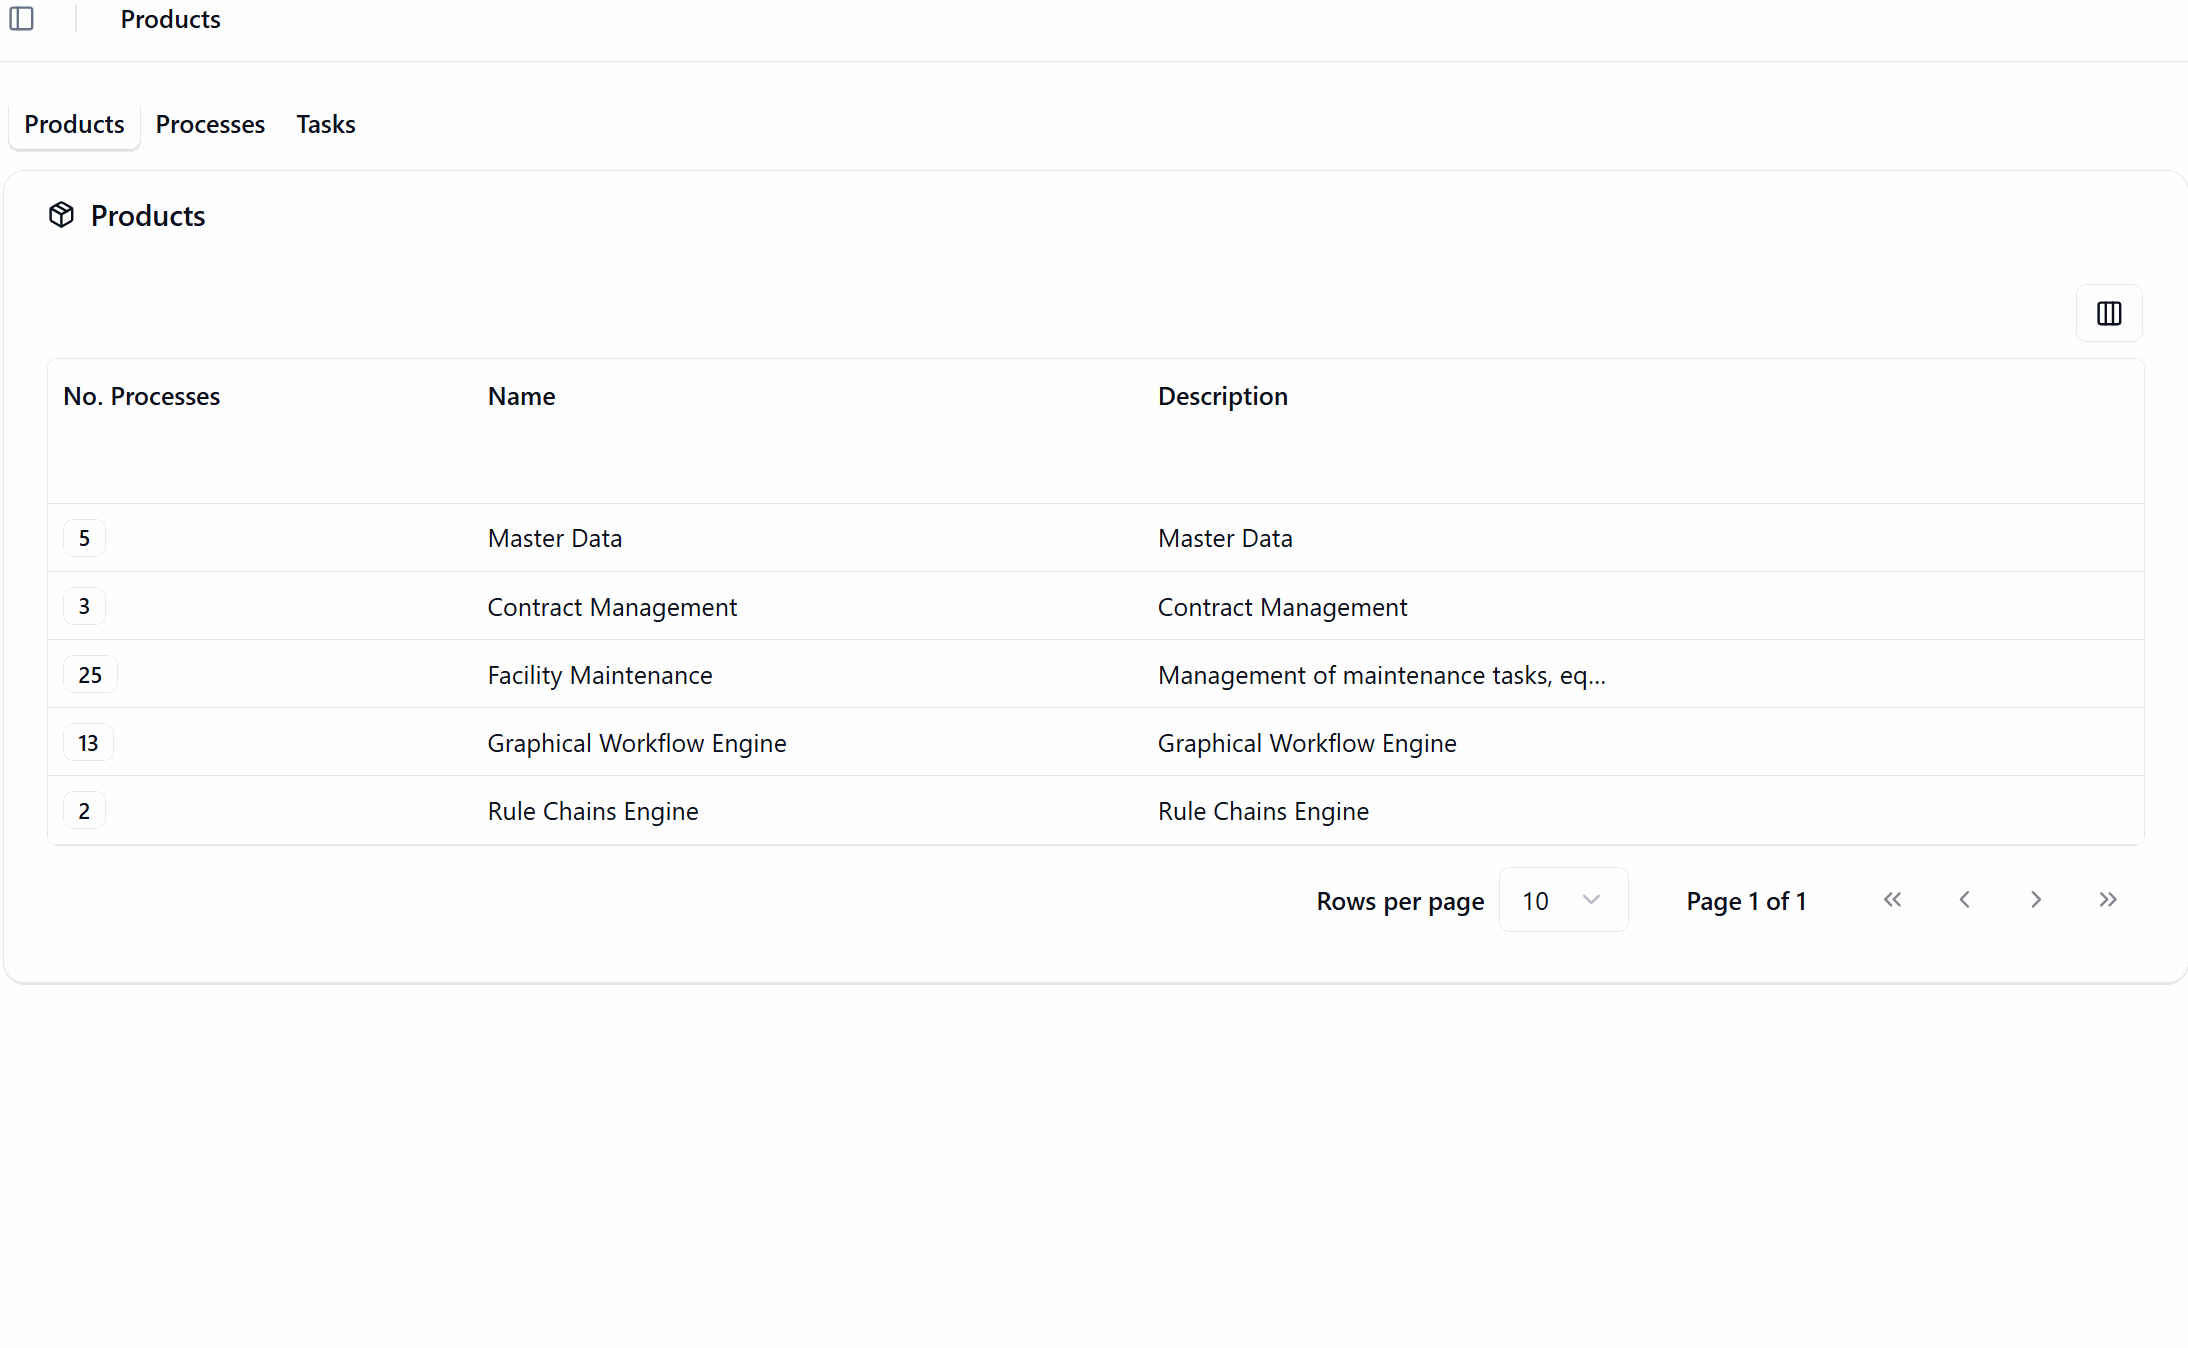
Products Tab
Understanding Products
Products represent the licensed applications available to your organization in SignalSync. Examples include Facility Maintenance, Master Data, and Graphical Workflow Engine.
Product Display
The Products tab shows a table with the following information:
- No. Processes - The number of processes defined within the product
- Name - The product name
- Description - A brief description of the product's purpose
Product Management Restrictions
Products are read-only for Tenant Administrators. You cannot add, modify, activate, or deactivate products through the tenant interface.
Product licensing is managed exclusively by SignalSync Cloud Administrators based on:
- Contract agreements
- License expiration dates
- Organizational requirements
To request changes to your product portfolio, contact your 8SignalSync Cloud Administrator* or account representative.
Processes Tab
Understanding Processes
Processes are logical groupings of tasks that appear in the application's left navigation menu. Each process can contain multiple tasks organized in a hierarchical structure, making it easier for users to find and access related functionality.
Process Types
SignalSync supports two types of processes:
- Default Processes
- Custom Processes
Default processes are system-defined processes that come preconfigured with each licensed product. These processes represent standard workflows and best practices for using the application.
Characteristics:
- Created and maintained by SignalSync
- Cannot be deleted or deactivated
- Can be edited (name, description, icon, order)
- Automatically provided when a product license is activated
Custom processes are tenant-defined processes created by Tenant Administrators to meet specific organizational needs.
Characteristics:
- Created by Tenant Administrators
- Fully customizable
- Can be deleted or deactivated
- Can combine tasks from different products and processes
Process Attributes
When creating or editing a process, you can configure the following attributes:
- Product - The product to which the process belongs (dropdown selection)
- Name - The display name of the process in the navigator
- Description - A detailed explanation of the process's purpose
- Process Type - Either "Default" (system-defined) or "Custom" (tenant-defined)
- Icon - A visual icon from the Lucide Icons library displayed next to the process name
- Order - A numeric value controlling the sequence of processes in the navigation menu (lower numbers appear first)
- Active - A toggle to enable or disable the process
Creating a New Process
To create a new custom process:
- Navigate to the Processes tab
- Click the New process button
- In the "Edit process" dialog:
- Select the Product from the dropdown
- Enter a descriptive Name
- Provide a Description of the process's purpose
- Leave Process Type as "Custom" (default for new processes)
- Select an Icon to visually represent the process
- Set the Order to control placement in the navigation menu
- Ensure Active is toggled on
- Click Save Changes
The new process will appear in the navigation menu according to its order value.
Editing a Process
You can edit both Default and Custom processes, though with different levels of control.
For Default Processes:
- Click the menu icon (⋯) next to the process
- Select Edit from the context menu
- Modify: Name, Description, Icon, Order
- Click Save Changes
For Custom Processes:
- Click the menu icon (⋯) next to the process
- Select Edit from the context menu
- Modify any attribute including Process Type, Icon, Order, and Active status
- Click Save Changes
While you cannot delete Default processes, you can customize their appearance to better match your organization's terminology. For example, you might rename "Background Data" to "Master Data Configuration" to align with your internal vocabulary.
Deactivating a Process
To deactivate a Custom process:
- Click the menu icon (⋯) next to the process
- Select Edit
- Toggle Active to off
- Click Save Changes
When you deactivate a process, both the process and all its tasks are immediately hidden from the navigation menu for all users. This change takes effect immediately and affects all users who have access to the process through their assigned profiles.
Before deactivating a process, ensure that:
- Users are notified about the change
- Alternative workflows are in place if needed
- The process is not critical for ongoing operations
Deleting a Process
Only Custom processes can be deleted. To delete a Custom process:
- Click the menu icon (⋯) next to the process
- Select Edit
- Click the Delete button (trash icon) in the dialog
- Confirm the deletion
Deleting a process is permanent and cannot be undone. All tasks within the process will also be removed from the navigation menu. Ensure you have documented the process structure if you may need to recreate it later.
Process Ordering in Navigation
The Order field determines where a process appears in the left navigation menu:
- Lower numbers appear higher in the menu
- Processes with the same order value are sorted alphabetically
- Order affects the visual hierarchy users see when navigating the application
Best Practice: Use increments of 5 or 10 (e.g., 10, 20, 30) to leave room for inserting new processes between existing ones without renumbering everything.
Tasks Tab
Understanding Tasks
Tasks are the individual menu items that appear within processes in the navigation menu. When users click a task, they are directed to a specific function, page, or URL within SignalSync.
Task Types
SignalSync supports three task types:
- Label Task
- Internal URL
- External URL
Label tasks display as non-clickable text in the navigation menu. They serve as section headers or category markers to organize other tasks visually.
Use Cases:
- Creating visual separations between groups of related tasks
- Adding hierarchical structure to long lists of tasks
- Organizing tasks by functional area (e.g., "Resources", "Classification", "Preventive Maintenance")
Example from Facility Maintenance:The Background Data process uses labels like "Resources", "Classification", and "Preventive Maintenance" to organize its tasks into logical groups, making it easier for users to find specific functionality.
Internal URL tasks link to predefined application URLs that already exist within SignalSync. When creating an Internal URL task, you select an existing task's destination from a dropdown list.
Use Cases:
- Reusing existing functionality in a different process
- Creating shortcuts to frequently accessed screens
- Building custom processes that combine tasks from multiple products
How It Works:
- Select "Internal URL" as the Task Type
- The system displays a dropdown of existing tasks organized by process
- Select the destination task
- The URL field is automatically populated with the selected task's destination
Example Use Case:A Facility Manager who also handles contract management might create a custom "My Dashboard" process containing:
- "Work Orders" task from the Facility Maintenance product
- "Contract Renewals" task from the Contract Management product
- "Vendor Contacts" task from the Supplier Management process.
This consolidates frequently used tasks from different products into a single, convenient location.
External URL tasks link to custom URLs outside of SignalSync's standard navigation structure. You manually specify the complete URL.
Use Cases:
- Linking to external systems (e.g., corporate intranet, third-party tools)
- Creating quick access to frequently used web applications
- Integrating related business systems into the SignalSync navigation
Security Considerations:
When creating External URL tasks:
- Always use HTTPS URLs to ensure secure connections
- Avoid linking to suspicious or untrusted websites
- Be aware that Cloud Administrators can deactivate External URL tasks if they pose security risks
- Test external links regularly to ensure they remain valid
External URLs should only point to legitimate business systems and trusted web applications.
Task Attributes
When creating or editing a task, you can configure the following attributes:
- Process - The process to which the task belongs (dropdown selection)
- Name - The display name of the task in the navigator
- Description - A detailed explanation of the task's purpose
- Task Type - One of: Label, Internal URL, or External URL
- URL - For Internal URL: selected from existing tasks; for External URL: manually entered
- Icon - A visual icon from the Lucide Icons library displayed next to the task name
- Order - A numeric value controlling the sequence of tasks within the process
- Active - A toggle to enable or disable the task
Creating a New Task
To create a new task:
- Navigate to the Tasks tab
- Click the New task button
- In the "Edit task" dialog:
- Select the Process from the dropdown
- Enter a descriptive Name
- Provide a Description of the task's purpose
- Select the Task Type (Label, Internal URL, or External URL)
- If Internal URL: Select an existing task from the dropdown
- If External URL: Enter the complete URL (including https://)
- Select an Icon to visually represent the task
- Set the Order to control placement within the process
- Ensure Active is toggled on
- Click Create Task
Editing a Task
Task editing permissions depend on the process type:
For Tasks in Default Processes:
- Click the menu icon (⋯) next to the task
- Select Edit from the context menu
- Modify: Name, Description, Icon, Order
- Cannot change: Task Type, URL, Active status
- Cannot delete the task
- Click Save Changes
For Tasks in Custom Processes:
- Click the menu icon (⋯) next to the task
- Select Edit from the context menu
- Modify any attribute including Task Type, URL, Icon, Order, and Active status
- Can delete the task using the delete button
- Click Save Changes
Moving Tasks Between Processes
Tasks can only be moved between processes if they belong to a Custom process. Tasks within Default processes cannot be moved to different processes.
To achieve a similar result with Default process tasks:
- Create a new task in your Custom process
- Configure it as an Internal URL pointing to the desired Default process task
- This creates a reference to the original task while keeping it in the Custom process
Deactivating a Task
To deactivate a task in a Custom process:
- Click the menu icon (⋯) next to the task
- Select Edit
- Toggle Active to off
- Click Save Changes
The task is immediately hidden from the navigation menu for all users.
Deleting a Task
Only tasks in Custom processes can be deleted. To delete a task:
- Click the menu icon (⋯) next to the task
- Select Edit
- Click the Delete button (trash icon) in the dialog
- Confirm the deletion
Icon Selection
Available Icons
SignalSync uses the Lucide Icons library (via Shadcn UI) for all process and task icons. This library provides hundreds of consistent, modern icons covering common business and technical concepts.
Selecting an Icon
When editing a process or task:
- Click the Icon dropdown
- Browse or search for an appropriate icon
- Select the icon that best represents the process or task
Icon Selection Best Practices:
- Choose icons that clearly represent the function or content
- Maintain consistency across related processes and tasks
- Consider using similar icon styles for related items
- Test icon visibility with different screen sizes and user preferences
Tenant Administrators cannot upload custom icons to SignalSync. Only icons from the predefined Lucide Icons library are available. If you need a specific icon that's not available, contact SignalSync support to request its addition to the library.
Common Use Cases
Use Case 1: Creating a Role-Based Custom Process
Scenario: Your organization has Facility Managers who also handle supplier relationships and contract management.
Solution:
- Create a Custom process called "Facility Manager Dashboard"
- Add Internal URL task: "Maintenance Console" from Facility Maintenance
- Add Internal URL task: "Procedure Scheduling" from Facility Maintenance
- Add Internal URL task: "Locations" from Master Data
- Add Internal URL task: "Active Contracts" from Contract Management
- Set appropriate order values to organize tasks logically
- Assign this process to the Facility Manager profile
Benefit: Users access all their daily tasks from a single, consolidated process without navigating between different products.
Use Case 2: Reorganizing Default Process Task Order
Scenario: The default task order in a product doesn't match your organization's workflow sequence.
Solution:
- Navigate to the Tasks tab
- Filter by the relevant process
- Edit each task and adjust the Order values to reflect your preferred sequence
- Save changes
Benefit: Users see tasks in the order they typically perform them, improving efficiency and reducing cognitive load.
Use Case 3: Adding External System Links
Scenario: Your team frequently accesses an external work order system that complements SignalSync.
Solution:
- Create a Custom process called "External Systems"
- Add an External URL task with Name: "Legacy Work Order System"
- Set Task Type: External URL
- Set URL: https://order_system_URL.company.com
- Select icon: External Link icon
- Activate the process
Benefit: Users have quick access to related external systems without leaving the SignalSync interface, creating a unified work environment.
Use Case 4: Simplifying Navigation with Labels
Scenario: A process contains many tasks that would benefit from visual organization.
Solution:
- Edit the process
- Create Label task: Order 10, Name "Configuration", Task Type Label
- Add configuration-related tasks with Order 20-25
- Create Label task: Order 30, Name "Operations", Task Type Label
- Add operations-related tasks with Order 31-39
- Create Label task: Order 40, Name "Reports", Task Type Label
- Add reporting tasks with Order 41-49
Benefit: Users can quickly scan organized sections instead of scrolling through a flat list of tasks, improving navigation speed and user experience.
Filtering and Searching
Products Tab Filters
The Products tab provides basic filtering capabilities:
- No specific filters are available as products are generally few in number
Processes Tab Filters
Use the following filters to find specific processes:
- Product - Filter processes by product
- Process Type - Filter by Default or Custom processes
- Active - Show only active or inactive processes
Tasks Tab Filters
Use the following filters to find specific tasks:
- Product - Filter tasks by product
- Process - Filter tasks by process
- Task Type - Filter by Label, Internal URL, or External URL tasks
- Active - Show only active or inactive tasks
Search Functionality
Both the Processes and Tasks tabs provide search fields:
- Name search - Type in the Name column search box to find processes or tasks by name
Best Practices
Process Organization
- Logical Grouping - Group related tasks together in processes that reflect actual workflows
- Consistent Naming - Use clear, descriptive names that users will understand immediately
- Order Strategically - Place frequently used processes and tasks higher in the navigation hierarchy
- Avoid Duplication - Before creating a Custom process, check if existing processes can be modified to meet your needs
Task Management
- Use Labels Wisely - Label tasks should create clear visual sections without cluttering the menu
- Test External URLs - Verify external links work correctly before activating tasks
- Document Custom Tasks - Keep internal documentation of custom processes and tasks for future reference
- Review Regularly - Periodically review and remove unused Custom processes and tasks
Icon Selection
- Be Consistent - Use similar icon styles for related processes and tasks
- Choose Recognizable Icons - Select icons that clearly represent the function
- Consider Color Blind Users - Don't rely solely on icons; ensure names are descriptive
Change Management
- Plan Changes - Don't deactivate or delete processes during business hours without planning
- Communicate with Users - Notify users before making significant navigation changes
- Test in Development - If available, test Custom processes in a development environment first
- Document Decisions - Keep records of why Custom processes were created and what business need they serve
Troubleshooting
Process Not Appearing in Navigation
Problem: A newly created process doesn't appear in the navigation menu.
Solutions:
- Verify the Active toggle is turned on
- Check that the process has at least one active task
- Ensure the process is assigned to at least one profile that users have
- Confirm the product license is active
Task Links Not Working
Problem: Clicking a task doesn't navigate to the expected location.
Solutions:
- For Internal URL tasks: Verify the selected source task still exists and is active
- For External URL tasks: Check the URL is correctly formatted and includes https://
- Clear browser cache and try again
- Test the URL directly in a browser to confirm it works
Custom Process Lost After Update
Problem: A Custom process disappeared after a system update.
Solutions:
- Check if the process was accidentally deactivated (filter by inactive processes)
- Verify the associated product license is still active
- Contact your Cloud Administrator to confirm no administrative changes were made
- Restore from backup documentation if needed
Cannot Delete Default Process
Problem: The delete button is not available for a process.
Solution: This is expected behavior. Default processes cannot be deleted as they are system-defined. If you don't want users to see a Default process:
- Remove it from all user profiles
- Alternatively, create Custom processes that better meet your needs and assign those to profiles instead
Summary
Product Hierarchy is a powerful tool for Tenant Administrators to customize SignalSync's navigation structure to match organizational workflows. By understanding the relationship between Products, Processes, and Tasks, and leveraging the three task types (Label, Internal URL, External URL), you can create an intuitive navigation experience that helps users access the functionality they need quickly and efficiently.
Remember that while products are managed at the cloud level, processes and tasks provide significant flexibility to adapt the system to your specific business requirements. Use Custom processes to combine functionality from multiple products, leverage Labels to organize complex menus, and take advantage of both Internal and External URLs to create comprehensive navigation structures that serve your users' daily needs.