Customers & Users
This page explains how to create and manage Customers and their Users in SignalSync. Customers represent distinct business entities or departments within your organization, and each User must belong to a Customer.
Overview
Before creating users, you must first create at least one Customer. The typical workflow is:
- Create a Customer (business entity/department)
- Add Users to the Customer
- Assign Profiles to Users to grant access
- Users receive activation emails to set their passwords
Accessing Customer Management
To access the Customer management interface:
- Open the Process Navigator (left sidebar)
- In the Customers and Products section
- Click on Customers
This opens the Customers grid where you can view all existing customers and their details.
Creating a New Customer
Step 1: Open the New Customer Form
From the Customers grid, click the + New Customer button in the top-right corner.
Step 2: Enter Customer Details
The customer form appears on the right side of the screen with the following fields:
| Field | Required | Description |
|---|---|---|
| Title | Yes | The name of the customer (e.g., "Supervisors", "Facility Managers", "IT Department") |
| No | Optional contact email for the customer entity | |
| City | No | City where the customer is located |
| Address | No | Primary street address |
| Address2 | No | Additional address information |
| Postal Code | No | Postal or ZIP code |
| Country | No | Country location |
Only the Title field is mandatory. You can create a customer with just a title and add additional details later as needed.
Step 3: Save the Customer
Click the Save Changes button at the bottom-right of the form.
The new customer will appear in the Customers grid, showing:
- Customer title
- Email (if provided)
- Number of users (counts the number of users)
- City and Address (if provided)
Managing Customer Users
Once a customer is created, you can add users who belong to that customer.
Accessing Customer Users
- From the Customers grid, click the ••• (more options) menu for the customer
- Select Manage customer users or click directly on the customer row
- Alternatively, when editing a customer, click the Manage customer users link at the top-right
This opens the Customer Users grid showing:
- Email - User's email address (login credential)
- Name - User's full name
- Profiles - Assigned profiles that determine access rights
Creating a New User
Step 1: Open the New User Form
From the Customer Users grid, click the + New user button.
Step 2: Enter User Details
Fill in the required information:
| Field | Required | Description |
|---|---|---|
| Name | Yes | User's full name (e.g., "John Doe") |
| Yes | User's email address - must be unique across the entire tenant | |
| Profiles | Yes | One or more profiles that grant access to processes and tasks |
Each email address must be unique within the tenant. You cannot create two users with the same email address, even if they belong to different customers.
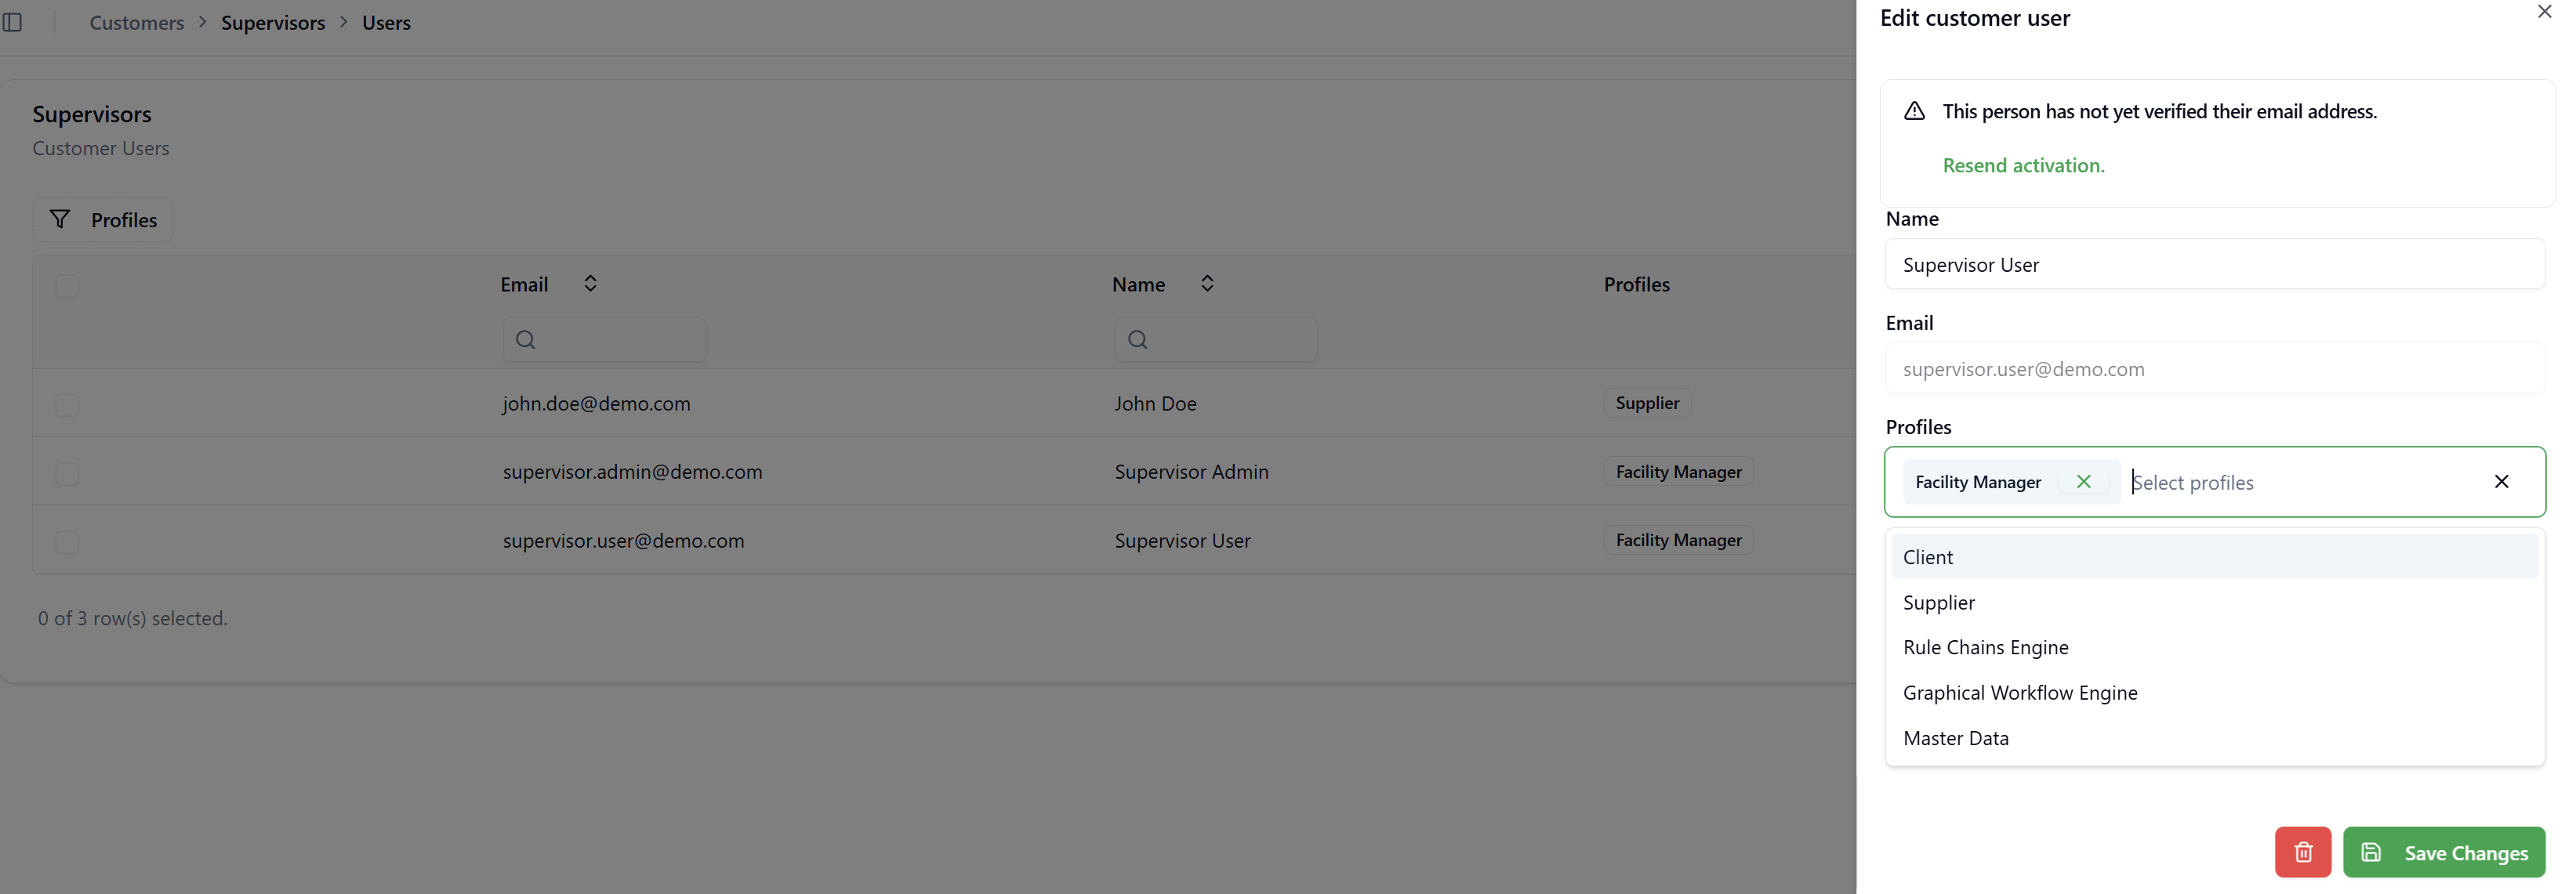
Step 3: Assign Profiles
- Click in the Profiles field
- A dropdown appears showing all available profiles
- Select one or more profiles to assign to the user
- Selected profiles appear as tags that can be removed with the × icon
Available Profile Types:
- System Profiles - Predefined profiles based on licensed products (e.g., "Facility Manager", "Supplier", "Client")
- Custom Profiles - Profiles created by the Tenant Admin with mixed processes
For detailed information about profiles, see Managing Profiles.
Step 4: Save the User
Click the Save Changes button at the bottom-right of the form.
User Activation Process
When a new user is created, SignalSync automatically sends an activation email to the user's email address.
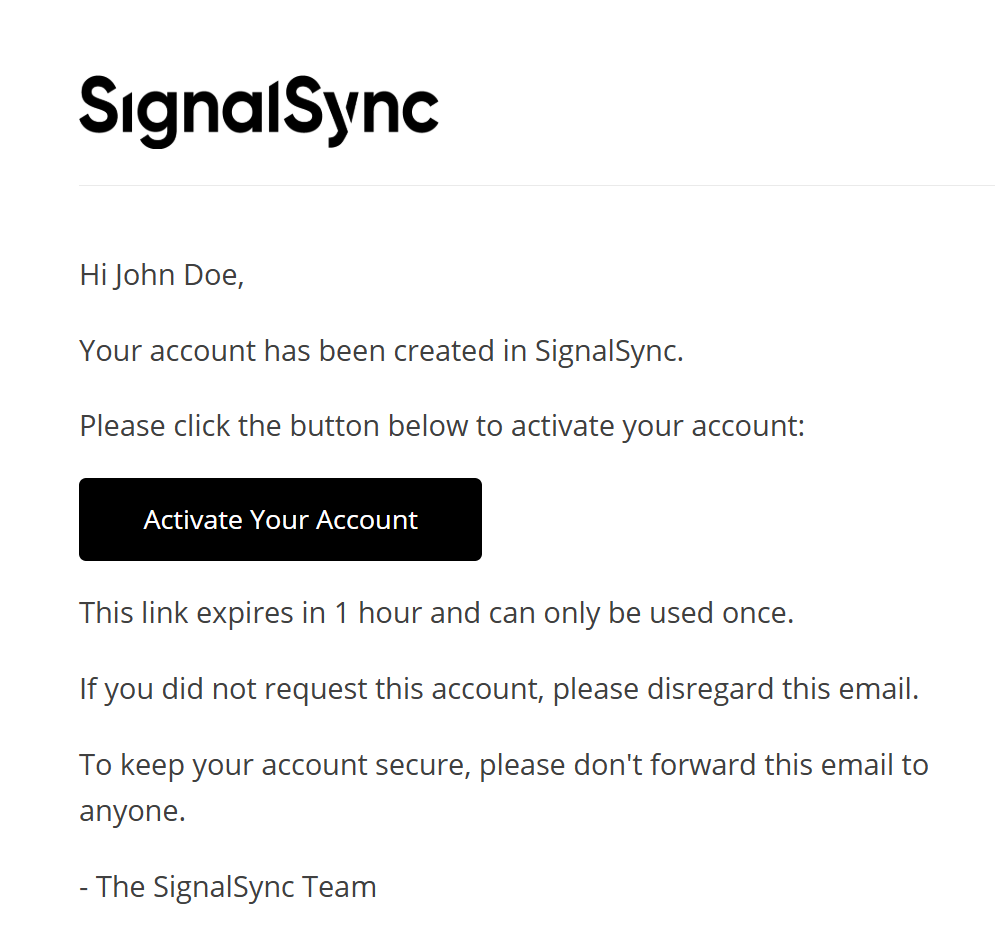
Activation Email
The user receives an email with:
- Greeting with their name
- Confirmation that their account has been created
- "Activate Your Account" button
- Security information about link expiration
Important Notes About Activation
The activation link expires in 1 hour and can only be used once. If the link expires, the Tenant Admin can resend the activation email.
Resending Activation
If a user hasn't activated their account, you can resend the activation email:
- From the Customer Users grid, click ••• (more options) for the user
- Select Edit
- You'll see a warning: "This person has not yet verified their email address."
- Click the Resend activation link
The user will receive a new activation email with a fresh link.
Editing Users
To modify an existing user:
- From the Customer Users grid, click ••• (more options) for the user
- Select Edit
- Modify the user's:
- Name
- Profiles (add or remove)
- Click Save Changes
Once a user is created, their email address cannot be changed. If you need to change a user's email, you must delete the user and create a new one.
Bulk Profile Assignment
You can assign profiles to multiple users at once, which is useful when onboarding several users or updating access rights.
Step 1: Select Users
From the Customer Users grid:
- Check the checkboxes on the left side of the rows for users you want to update
- The number of selected users appears at the bottom, e.g. "3 of 3 row(s) selected"
Step 2: Open Assign Profiles
Click the Assign Profiles button that appears in the top-right when users are selected.
Step 3: Select Profiles
In the "Assign Profiles" dialog:
- The dialog shows: "The selected profiles will be applied to the selected customer users."
- Click in the Profiles field
- Select one or more profiles from the dropdown
- Selected profiles appear as tags
Step 4: Apply Changes
Click OK or the confirmation button to apply the selected profiles to all selected users.
Bulk profile assignment overwrites existing profiles. Make sure to select ALL profiles you want the users to have, not just the ones you want to add. Any profiles not included in your selection will be removed from the selected users.
Deleting Users
To remove a user:
- From the Customer Users grid, click ••• (more options) for the user
- Select Delete
- Confirm the deletion when prompted
Alternatively, you can select multiple users using checkboxes and click the Delete button to remove them in bulk.
Deleting a user is permanent. The user will lose all access to SignalSync immediately.
Authentication Methods
SignalSync supports multiple authentication methods:
Email/Password Authentication (Default)
When a user is created without OAuth2 configuration:
- User receives activation email
- User clicks "Activate Your Account"
- User creates their password
- User can sign in with email and password
OAuth2 Providers
SignalSync supports OAuth2 authentication providers (e.g., Microsoft Entra ID, Google Workspace) alongside traditional email/password authentication. This allows organizations to use enterprise identity providers for internal employees while maintaining SignalSync authentication for external users like suppliers.
Mixed Authentication Support: A tenant can configure multiple authentication methods simultaneously:
- OAuth2 (e.g., Microsoft Entra ID) - For internal employees who are part of your organization's directory
- SignalSync Email/Password - For external users (suppliers, contractors) who don't exist in your enterprise directory
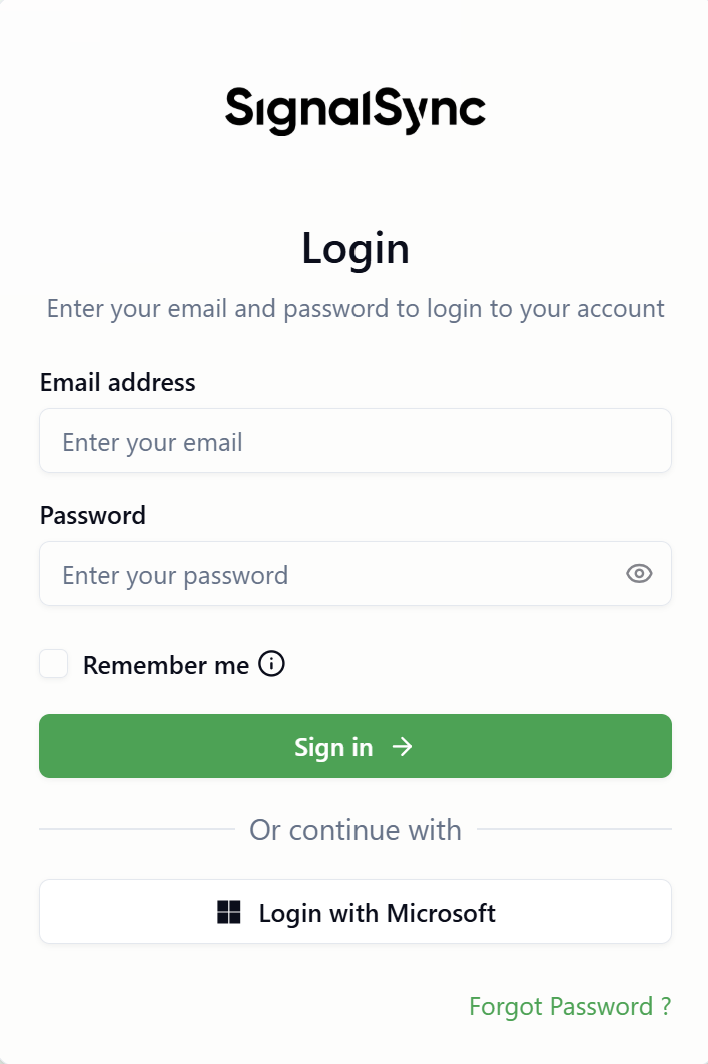
Login Experience:
When users navigate to the SignalSync login page, they will see:
- Traditional Email address and Password fields for SignalSync authentication
- "Or continue with" section showing configured OAuth2 providers
- "Login with Microsoft" button (or other provider names based on configuration)
OAuth2 Sign-In Process:
When a user clicks the OAuth2 provider button (e.g., "Login with Microsoft"):
- Application redirects to the configured OAuth2 provider (e.g., Microsoft Entra ID login page)
- User signs in with their organizational credentials
- Upon successful authentication, user is redirected back to SignalSync
- If the user doesn't exist in SignalSync:
- User account is automatically created based on provider information
- Email, name, and other attributes are populated from the OAuth2 provider
- No activation email is sent
- User gains immediate access to SignalSync
Automatic Profile Assignment:
The application can read security groups from the OAuth2 provider (e.g., Microsoft Entra ID security groups) and automatically assign corresponding SignalSync profiles based on group membership. This eliminates manual profile assignment for OAuth2 users.
No Password Management:
Users authenticating via OAuth2:
- Never set a password in SignalSync
- Cannot use traditional email/password login
- Must always use the OAuth2 provider button to sign in
- Password management is handled by the organization's identity provider
OAuth2 provider configuration, including:
- Client ID, Client Secret, and Tenant ID setup
- Security group mapping to SignalSync profiles
- Automatic user provisioning rules
- Field mapping (email, name, user ID, roles)
Is managed in the Security section under General Settings. See OAuth2 Authentication Configuration for detailed setup instructions.
Mixed authentication is ideal for organizations that need to:
- Provide access to internal employees using existing enterprise credentials (OAuth2)
- Grant access to external partners, suppliers, or contractors who aren't in the enterprise directory (SignalSync authentication)
- Maintain centralized control over internal users while managing external users separately
- Leverage existing security groups for internal employee access control
Example Scenario:
- Internal employees (Facility Managers, Supervisors) → Use "Login with Microsoft" → Automatically provisioned from Entra ID
- External suppliers (Maintenance contractors, vendors) → Use email/password → Manually created by Tenant Admin with Supplier profile
Once a user is created via OAuth2, they must always use the OAuth2 provider to sign in. Similarly, users created with email/password authentication cannot switch to OAuth2 login. The authentication method is determined by how the user account was initially created.
Best Practices
Customer Organization
- By Department: Create customers for each department (IT, Facilities, HR)
- By Location: Create customers for different offices or regions
- By Business Unit: Create customers for distinct business entities or subsidiaries
- Hybrid Approach: Combine strategies (e.g., "IT - East Region", "Facilities - West Region")
User Management
- Create customers first - Plan your organizational structure before adding users
- Assign meaningful customer titles - Use clear, descriptive names
- Verify email addresses - Ensure email addresses are correct before creating users
- Use bulk operations - Leverage bulk profile assignment for efficiency
- Document profile assignments - Keep track of which profiles are assigned to which user types
- Regular audits - Periodically review users and their profile assignments
Profile Assignment Strategy
- Start minimal - Assign only necessary profiles initially
- Use System Profiles - Leverage predefined profiles when possible
- Create Custom Profiles - For unique role combinations not covered by System Profiles
- Test access - Verify users can access required functionality after profile assignment
Common Workflows
Onboarding a New Department
- Create a new Customer for the department
- Add department manager as first user
- Assign appropriate management profiles
- Manager activates account and signs in
- Tenant Admin adds additional department users
- Assign profiles based on each user's role
Onboarding Multiple Users
- Ensure Customer exists
- Create all users individually (Name, Email, initial Profile)
- Use bulk profile assignment to add additional profiles to groups
- Users receive activation emails automatically
- Follow up with users who haven't activated within 24 hours
Changing User Roles
- Navigate to Customer Users
- Edit the user
- Remove old profiles (click × on profile tags)
- Add new profiles from dropdown
- Save changes
- User's access updates immediately (may require sign out/sign in)
Troubleshooting
User Didn't Receive Activation Email
Possible causes:
- Email in spam/junk folder
- Email address entered incorrectly
- Email server blocking the message
Solutions:
- Ask user to check spam/junk folders
- Verify the email address is correct in the user's profile
- Use "Resend activation" to send a new email
- Contact your email administrator if issues persist
User Can't Activate Account
Possible causes:
- Activation link expired (after 1 hour)
- Link already used
Solutions:
- Go to Edit User
- Click "Resend activation"
- User receives a new activation link
User Has No Access After Login
Possible causes:
- No profiles assigned
- Assigned profiles don't contain relevant processes
Solutions:
- Verify user has at least one profile assigned
- Review profile contents in Managing Profiles
- Assign appropriate profiles based on user's role
- User may need to sign out and sign in again
Email Already Exists Error
Cause: Another user in the tenant already has this email address.
Solutions:
- Search all customers for the existing user
- If user needs access to multiple customers, this is not supported - one user per customer
- If email was used by mistake, delete the incorrect user first
- Use a different email address for the new user