Notifications
The Notifications page lets you create and manage the email notification templates used by your workflows. Once defined, a notification can be assigned to any workflow action as an event — whenever that action is executed, the application automatically sends the email to the users of the selected role.
Path: Define → Notifications
Notifications List
The list displays all notifications defined for the tenant's Graphical Workflow Engine product.
Click to view Notifications interface
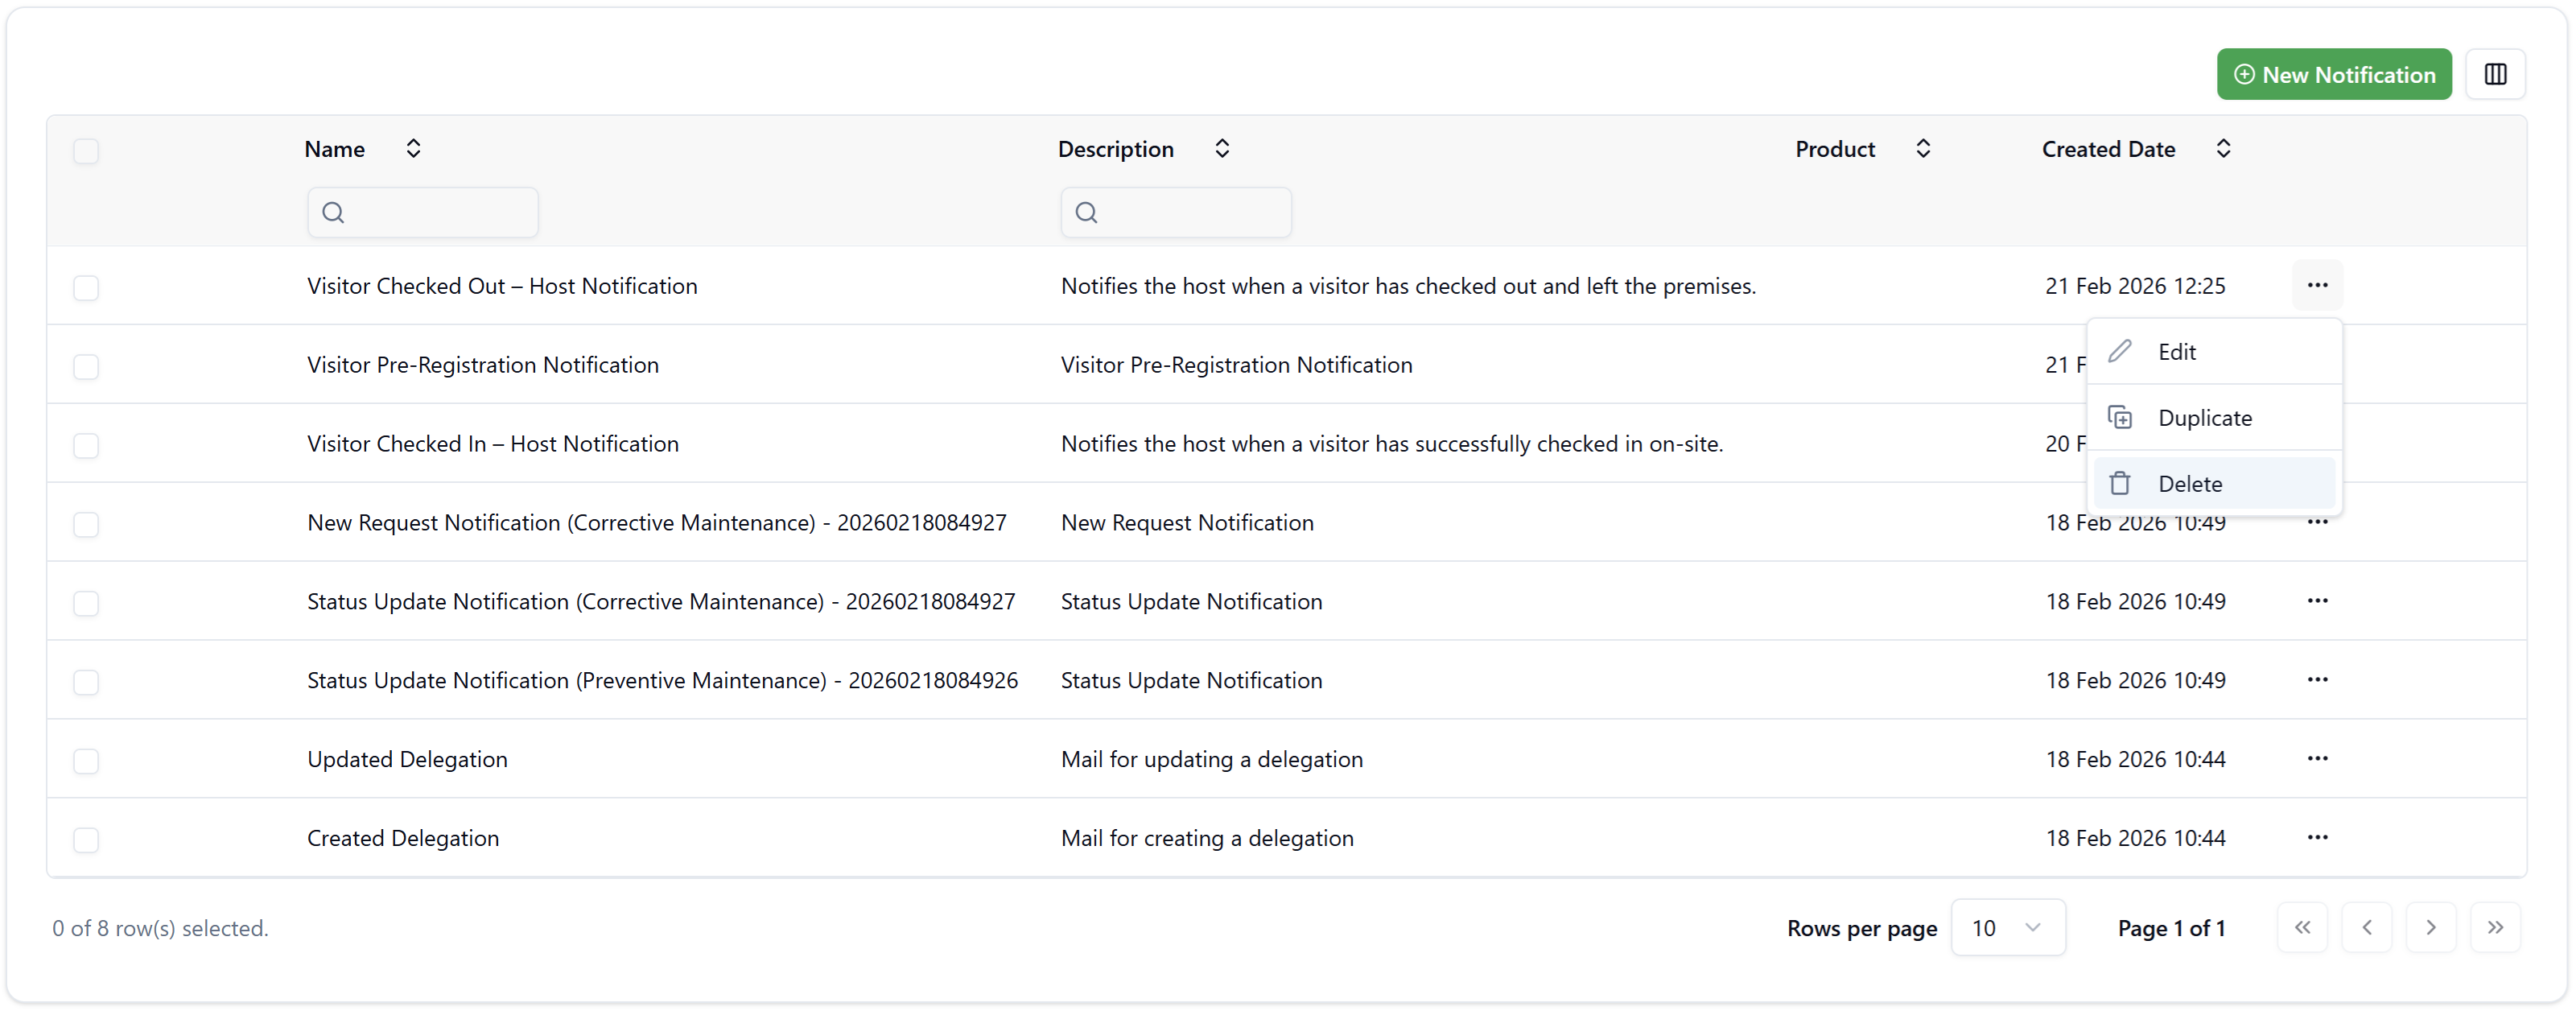
| Column | Description |
|---|---|
| Name | The notification's display name, used when selecting it in the Designer |
| Description | A short description of the notification's purpose |
| Product | The product this notification belongs to (e.g., Graphical Workflow Engine) |
| Created Date | The date and time the notification was created |
Use the search fields in the Name and Description columns to filter the list.
Actions
Click the ··· (three-dot) menu on any row to access:
- Edit — opens the notification for editing.
- Duplicate — creates a copy of the notification as a starting point for a new one.
- Delete — permanently removes the notification.
Creating a Notification
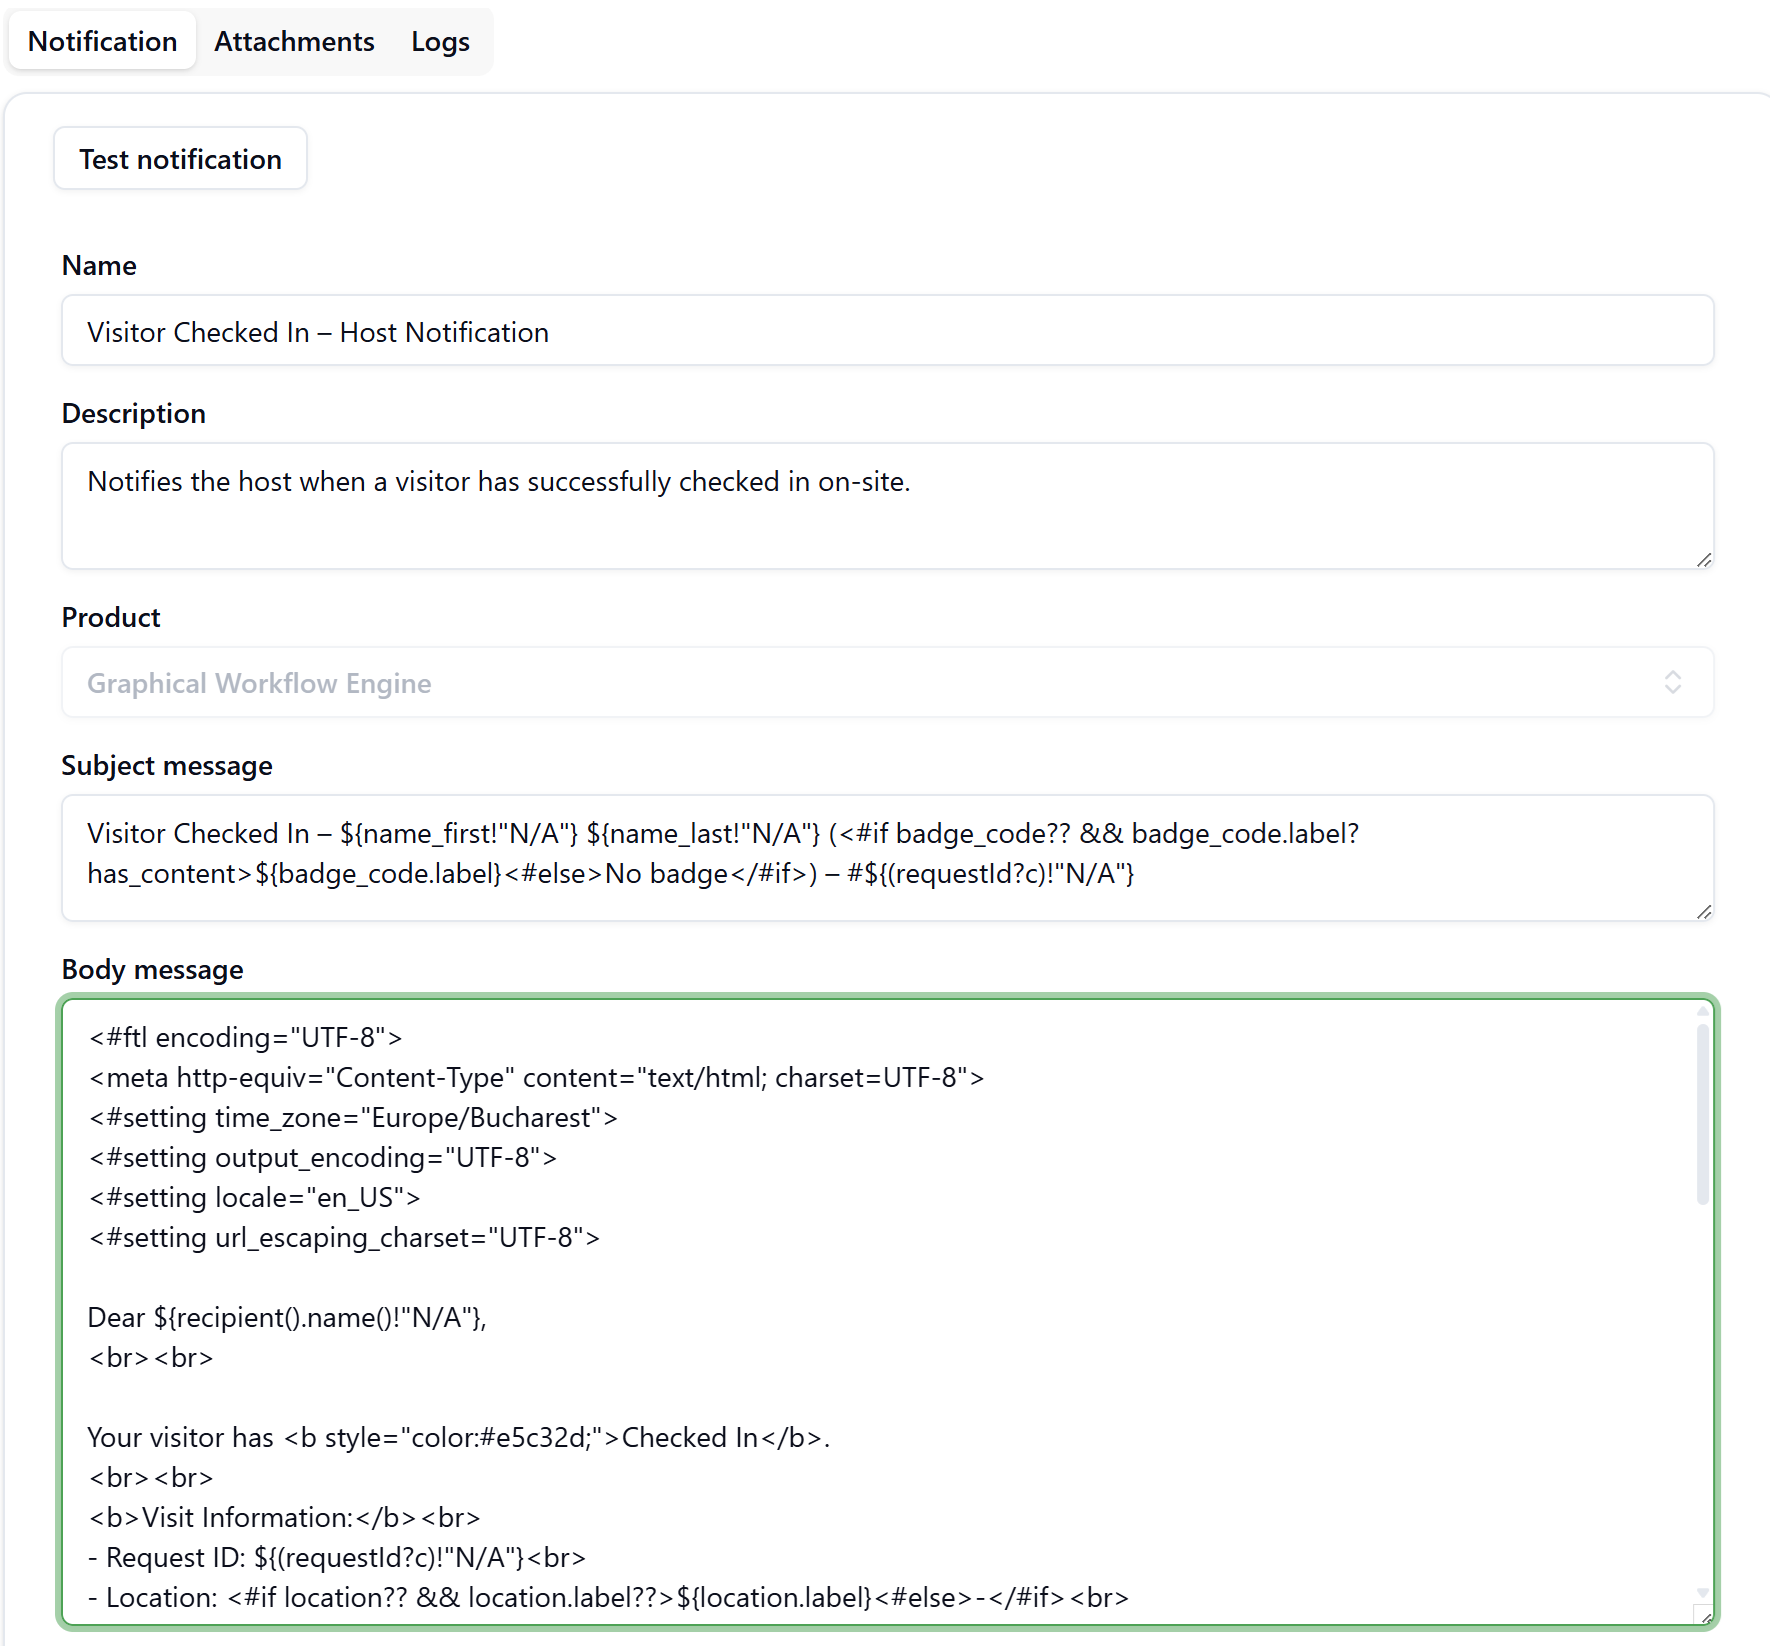
Click New Notification (top-right) to open a new notification form. Each notification has three tabs: Notification, Attachments, and Logs.
Notification Tab
The Notification tab is where you define the email content.
Click to view Notification Tab interface
| Field | Description |
|---|---|
| Name | The notification name shown in the Designer event selector |
| Description | Internal description of the notification's purpose |
| Product | The product context (read-only, defaults to Graphical Workflow Engine) |
| Subject message | The email subject line — supports FreeMarker binding expressions |
| Body message | The full HTML email body — supports FreeMarker binding expressions and HTML formatting |
Click Test notification to send a test email using the current template, allowing you to verify that the bindings resolve correctly before assigning the notification to a workflow.
Writing Notification Templates with FreeMarker
Both the subject and body are processed as FreeMarker templates. The data model available in expressions corresponds to the fields of the workflow request — the same JSON structure visible in the Logs tab's Data model column.
Subject Example
Click to view Subject example
Visitor Checked Out – ${name_first!"N/A"} ${name_last!"N/A"} (${(badge_code.label)!"No badge"}) – #${(requestId?c)!"N/A"}
This produces a subject like: Visitor Checked Out – Carlos Mendoza (AC-00013) – #2409
The !"N/A" pattern is a null-safety default — if the field is missing or null, the fallback value is shown instead of causing a template error.
Body Example
Click to view Body example
<#ftl encoding="UTF-8">
<meta http-equiv="Content-Type" content="text/html; charset=UTF-8">
<#setting time_zone="Europe/Bucharest">
<#setting output_encoding="UTF-8">
<#setting locale="en_US">
<#setting url_escaping_charset="UTF-8">

Dear ${recipient().name()!"N/A"},
<br><br>
Your visitor has <b style="color:#375eec;">Checked Out</b>.
<br><br>
<b>Visit Information:</b><br>
- Request ID: ${(requestId?c)!"N/A"}<br>
- Location: <#if location?? && location.label??>${location.label}<#else>-</#if><br>
- Visitor: ${name_first!"N/A"} ${name_last!"N/A"}<br>
- Visitor Type: ${visitor_type!"N/A"}<br>
- Badge: <#if badge_code?? && badge_code.label??>${badge_code.label}<#else>-</#if><br>

<#assign actualIn = (date_actual_in)!(details.date_actual_in)!"">
<#if actualIn?has_content>
  <#assign parsedDate = dateUtils.parse(actualIn)!>
  <#if parsedDate??>
- Checked In At: ${parsedDate?datetime?string("dd/MM/yyyy, HH:mm")}<br>
  <#else>
- Checked In At: N/A<br>
  </#if>
<#else>
- Checked In At: N/A<br>
</#if>

To view the record, click the link below:
<#if wfId?has_content && requestId?has_content>
  <a href="https://app.signalsync.cloud/apps/gwe/manage/${wfId}/${requestId?c}">Open Record</a>
<#else>
  <a href="https://app.signalsync.cloud">Open SignalSync</a>
</#if>
<br><br>
Best regards,<br>
SignalSync Team
<br><br>
<hr>
<span style="color: red;">
WARNING: This is an automatic message generated by the system.
Please do not reply to this email, as this email address is not monitored.
</span>
Key FreeMarker Patterns
| Pattern | Description |
|---|---|
${fieldName!"fallback"} | Outputs the field value, or the fallback if null/missing |
${requestId?c} | Converts a numeric value to a plain string (avoids locale formatting) |
${object.label!"fallback"} | Accesses the label property of an entity reference field |
${recipient().name()} | Returns the full name of the email recipient based on the assigned role |
<#if field?? && field.label??> ... </#if> | Null-safe check before accessing nested properties |
dateUtils.parse(dateString) | Parses an ISO date string into a FreeMarker date object for formatting |
${parsedDate?datetime?string("dd/MM/yyyy, HH:mm")} | Formats a parsed date with a custom pattern |
<#setting locale="en_US"> | Sets the locale for date and number formatting |
<#setting time_zone="Europe/Bucharest"> | Sets the time zone for date display |
Request fields that contain entity references (such as location, badge_code, host) are objects with label and value properties. Use ${location.label!"N/A"} to display the human-readable name. Use null-safety patterns (??) to avoid template errors when the field has not been filled in.
The Data model column in the Logs tab (see below) shows the exact JSON structure of any sent notification. Use this to understand what field names and paths are available in your FreeMarker expressions when building or debugging a template.
Attachments Tab
The Attachments tab allows you to attach documents to the notification email. Two options are available:
- Upload Attachments — upload a static file (e.g., a PDF document) to be included in every email sent by this notification.
- Workflow Templates — opens a selector dialog to choose one or more document templates defined in the workflow's Templates tab. When selected, the application generates the document dynamically at the time of sending, populated with the request's data, and attaches it to the email.
In the Workflow Templates selector:
- Browse templates across all workflows (columns: Workflow, Template Name).
- Use the preview icon (📄) to view the template before selecting.
- Check the rows you want to assign and click Assign.
The Attachments list shows each assigned attachment with its name and whether it is a dynamic Workflow Template (Yes) or a static uploaded file.
Logs Tab
The Logs tab provides a delivery history for every email sent using this notification template. This is useful for verifying delivery, diagnosing failures, and inspecting the exact data that was used to generate each message.
| Column | Description |
|---|---|
| Description | A description of when this notification fires (e.g., "Notifies the host when a visitor has checked out") |
| Type | The channel used — currently always EMAIL |
| Status | SUCCESS or ERROR |
| Date | Timestamp of when the email was sent |
| To | The recipient email address |
| Message | Click the document icon (📄) to view the full rendered email exactly as it was delivered |
| Data model | Click the eye icon (👁) to inspect the full JSON data model that was passed to the FreeMarker template at the time of sending |
Using the Data Model for Template Development
The Data model column shows the complete request JSON — every field, entity reference, nested object, and system property that was available to the template at send time. This is the primary tool for understanding what binding expressions to use when writing or troubleshooting notification templates.
For example, a visitor check-out notification's data model includes fields such as name_first, name_last, badge_code.label, location.label, date_actual_in, date_actual_out, requestId, wfId, and the full nested details and workflow objects.
Troubleshooting
How do I find out which field name to use in my template?
Open the Logs tab of the notification and click the eye icon (👁) in the Data model column of any recently sent log entry. The JSON shown is the exact data passed to FreeMarker at send time. The top-level keys are the field names you can use directly in expressions (e.g., ${name_first}, ${location.label}). Nested fields under details can be accessed as ${details.fieldName}.
Why is my binding expression showing 'N/A' instead of the actual value?
This happens when the field is null, missing from the data model, or has not been filled in on the form. Use the !"fallback" null-safety pattern (e.g., ${fieldName!"N/A"}) to handle this gracefully. Check the Data model in the Logs tab to confirm whether the field is present and what its actual value is.
Can I send the same notification to multiple roles?
Yes. Add the notification multiple times as separate events on the same action in the Designer — once per role. For example, you can notify both the Client and the Assigned Supervisor when a request status changes by creating two Notification events on the same connector, each targeting a different role.
How do I attach a dynamically generated document to a notification?
Use the Workflow Templates option in the Attachments tab. Select the template defined in the workflow's Templates tab — the application will generate the document automatically using the request data at send time and attach it to the email. This is useful for attaching forms, reports, or badges directly to status-change notifications.