Rule Chains
A Rule Chain is a named, ordered sequence of processing nodes that defines a specific integration or automation scenario. Each Rule Chain belongs to exactly one Collection and executes its nodes sequentially according to their configured execution order.
Adding a Rule Chain
To add a new Rule Chain to an existing Collection, hover over the Collection row in the tree and click the + icon that appears on the right. The Edit Rulechain drawer opens with empty fields — fill in the details and click Save Changes.
Editing a Rule Chain
Hover over a Rule Chain row and click the ✎ Edit icon. The Edit Rulechain drawer opens with all current values pre-filled across three collapsible sections: General Details, External API Configuration, and Shared Authentication.
Click to view the Edit Rulechain drawer
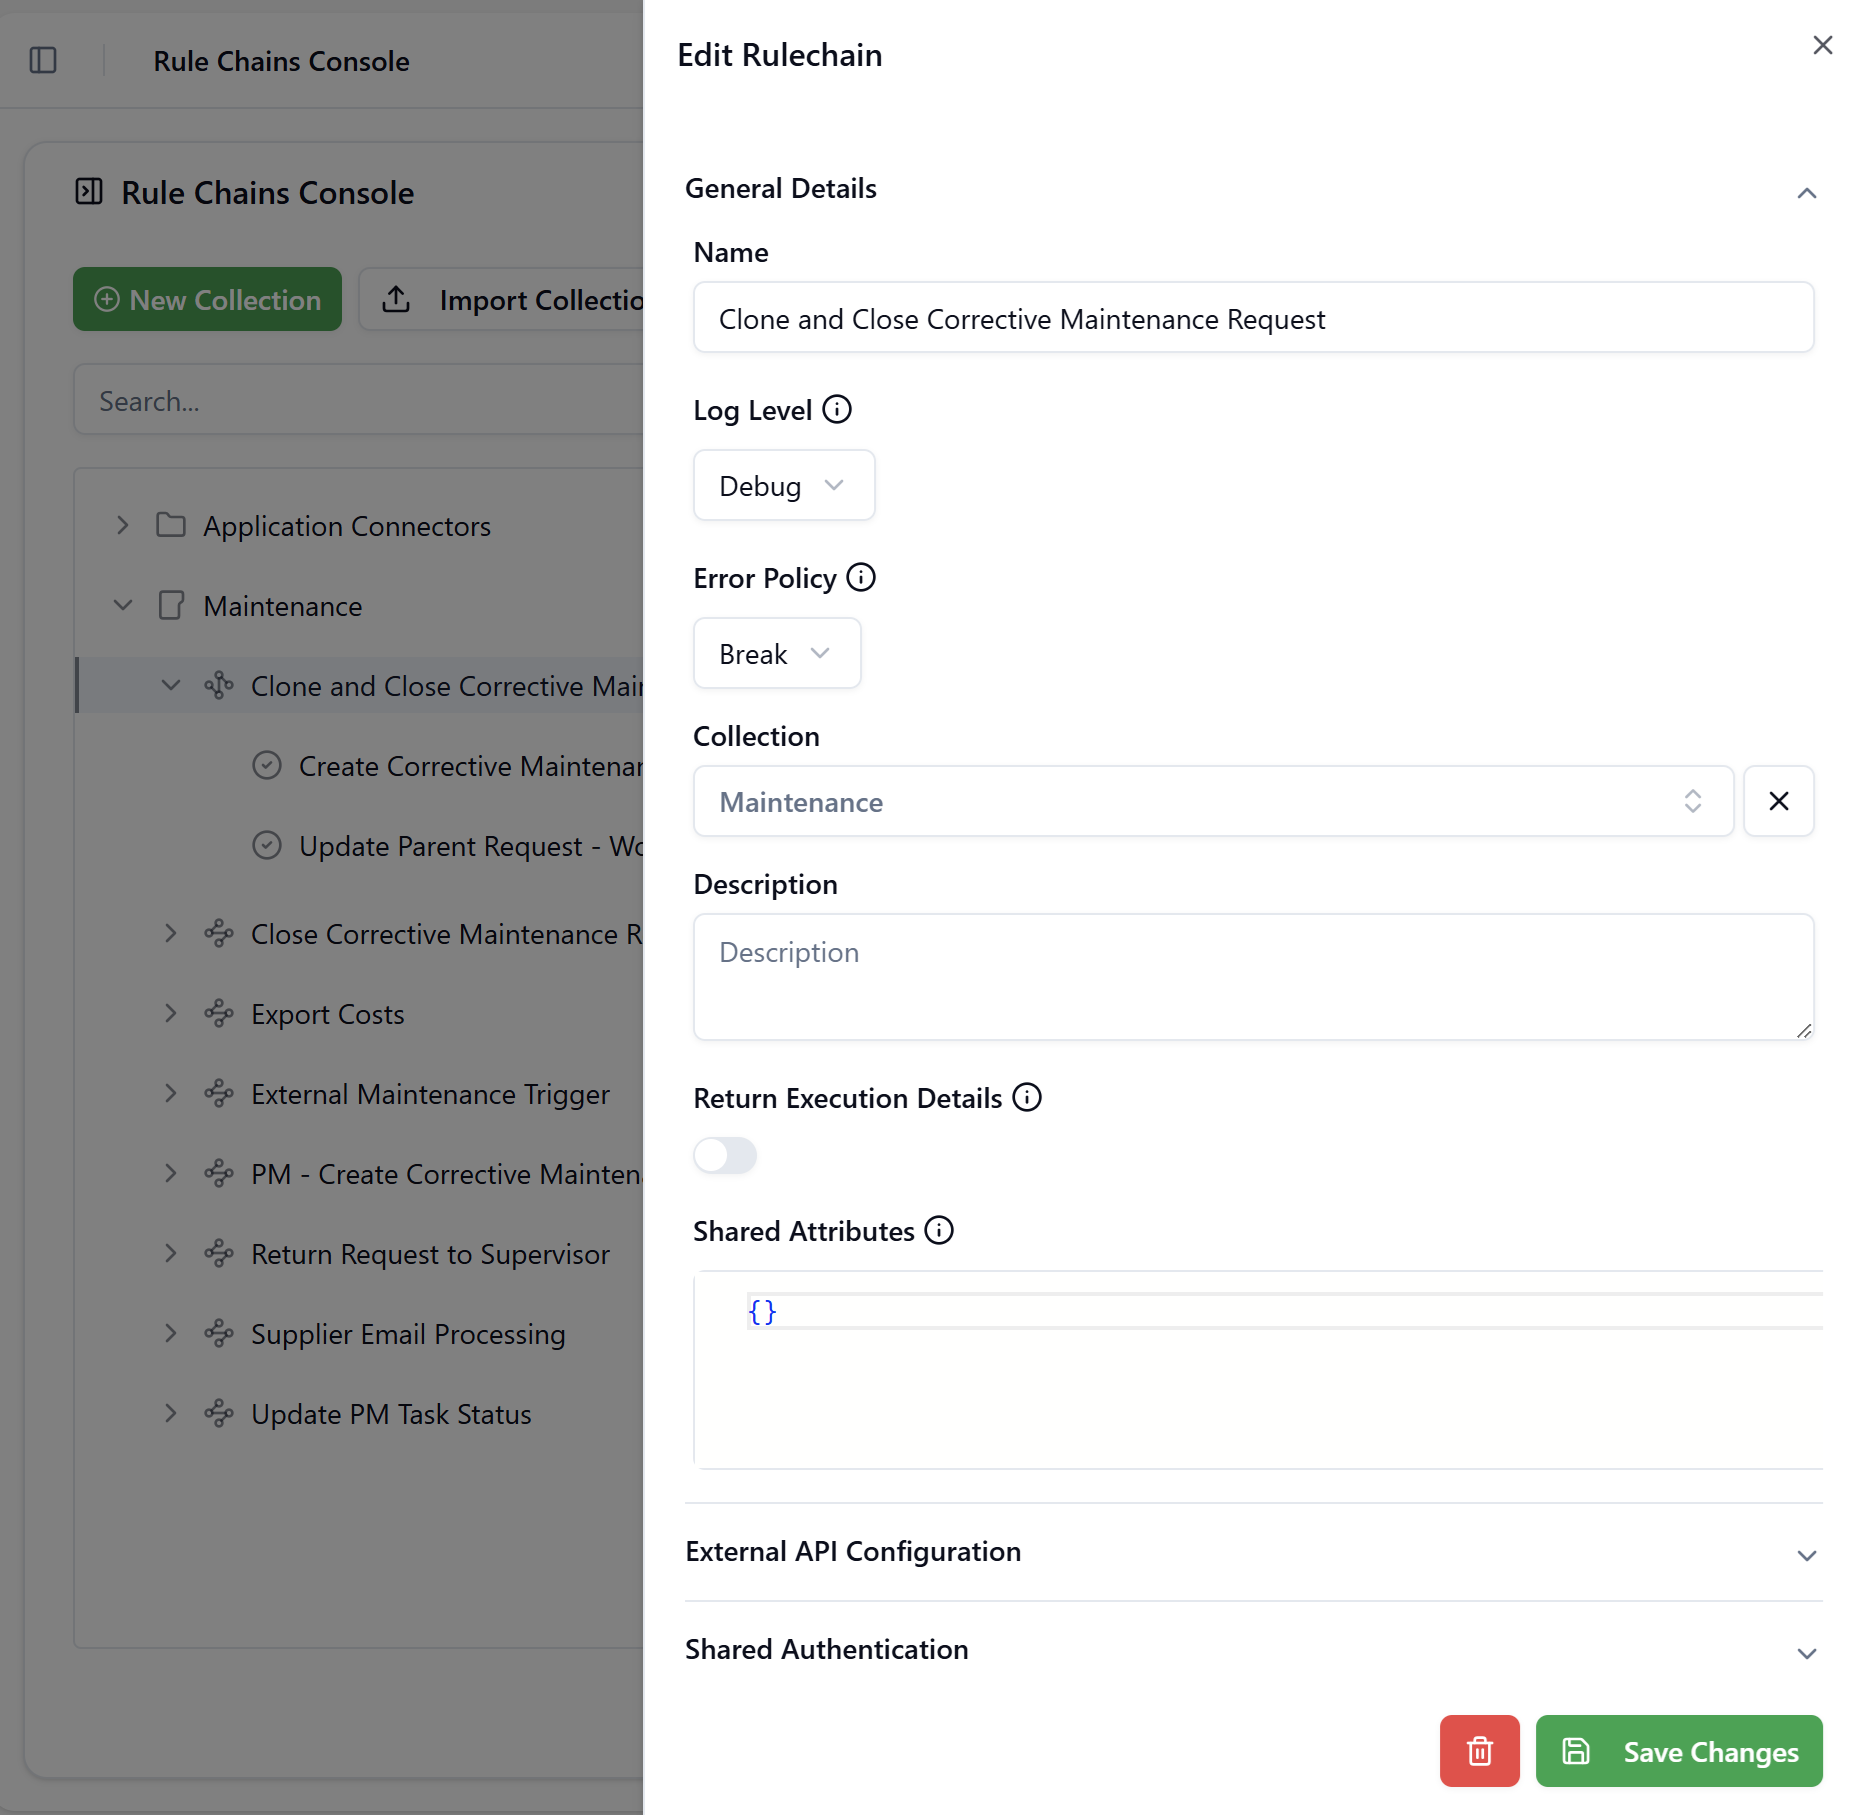
General Details
Name
The display name of the Rule Chain as shown in the tree. Choose a descriptive name that reflects the automation scenario — for example, Close Corrective Maintenance Request or Export Costs.
Log Level
Controls how much information is written to the Rule Chain execution log.
| Value | Behaviour |
|---|---|
| Error | Only errors are logged. Use in production to reduce log volume. |
| Debug | All execution steps, input/output payloads, and decisions are logged. Use during development and troubleshooting. |
When prototyping a new Rule Chain, it's useful to use the Debug log level with the Return Execution Details option turned on.
Error Policy
Controls what happens when a node in the chain encounters an error during execution.
| Value | Behaviour |
|---|---|
| Break | Execution stops immediately at the failing node. No subsequent nodes are executed. |
| Continue | The error is recorded but execution continues to the next node. Use with caution — downstream nodes may receive incomplete data. |
Collection
The Collection this Rule Chain belongs to. Use this field to reassign the Rule Chain to a different Collection without deleting and recreating it.
Description
A free-text description of what this Rule Chain does and when it is used. A well-written description helps other administrators understand the Rule Chain's purpose without having to inspect every node.
Return Execution Details
When enabled, the execution of this Rule Chain will return the result of the last node that was executed successfully. By default this option is off.
When enabled, the API response from this Rule Chain includes execution metadata alongside the result payload. The metadata contains the executionId, execution status, and the final payload produced by the last node.
This setting is relevant when the Rule Chain is called synchronously — either via the Execute button in the console or through its external REST endpoint — and the caller needs to know whether the execution succeeded and what data was returned.
Shared Attributes
A JSON object defining named constants that can be referenced anywhere within the Rule Chain's nodes using FreeMarker binding expressions.
{
  "MSG_ERROR_ROOM_MISSING": "[ValidationError] Room cannot be empty",
  "MSG_ERROR_FLOOR_MISSING": "[ValidationError] Floor cannot be empty",
  "MSG_ERROR_DETAILS_MISSING": "[ValidationError] Request details missing"
}
Shared Attributes are useful for centralizing values that are reused across multiple nodes — such as target system identifiers, status codes, or configuration parameters — so they can be changed in one place rather than updated node by node.
When you want the user to see the message as a validation error, it is important to prefix the message with [ValidationError].
Otherwise they will receive it as a generic server-side error in the UI.
When the shared attributes are a JSON object, like in the example above, they can be accessed simply like ${MSG_ERROR_ROOM_MISSING} in the nodes of the Rule Chain.
They may also be accessed as ${sharedAttributes.MSG_ERROR_ROOM_MISSING}, the expressions being equivalent.
For shared parameters that are not a JSON object (for example arrays, strings, numbers, or booleans), access them only via the reserved keyword ${sharedAttributes}.
For example, you might declare shared attributes as a list of users:
[
  {
    "name": "John Doe",
    "age": 27
  },
  {
    "name": "Jane Doe",
    "age": 25
  }
]
To access user properties you must use the 'sharedAttributes' keyword like this:
<#-- Freemarker uses a 0-based index for lists -->

${sharedAttributes[0].name} <#-- this will print John Doe -->

${sharedAttributes[1].age} <#-- this will print 25 -->
Similarly, you can make shared attributes a simple variable (i.e. strings, booleans, numbers) like this:
25
With usage inside nodes as:
It is ${(sharedAttributes > 30)?then("hot", "warm")} outside
Will evaluate to It is warm outside.
External API Configuration
This section exposes the Rule Chain as an inbound REST POST endpoint that external systems can call directly.
Click to view the External API Configuration section
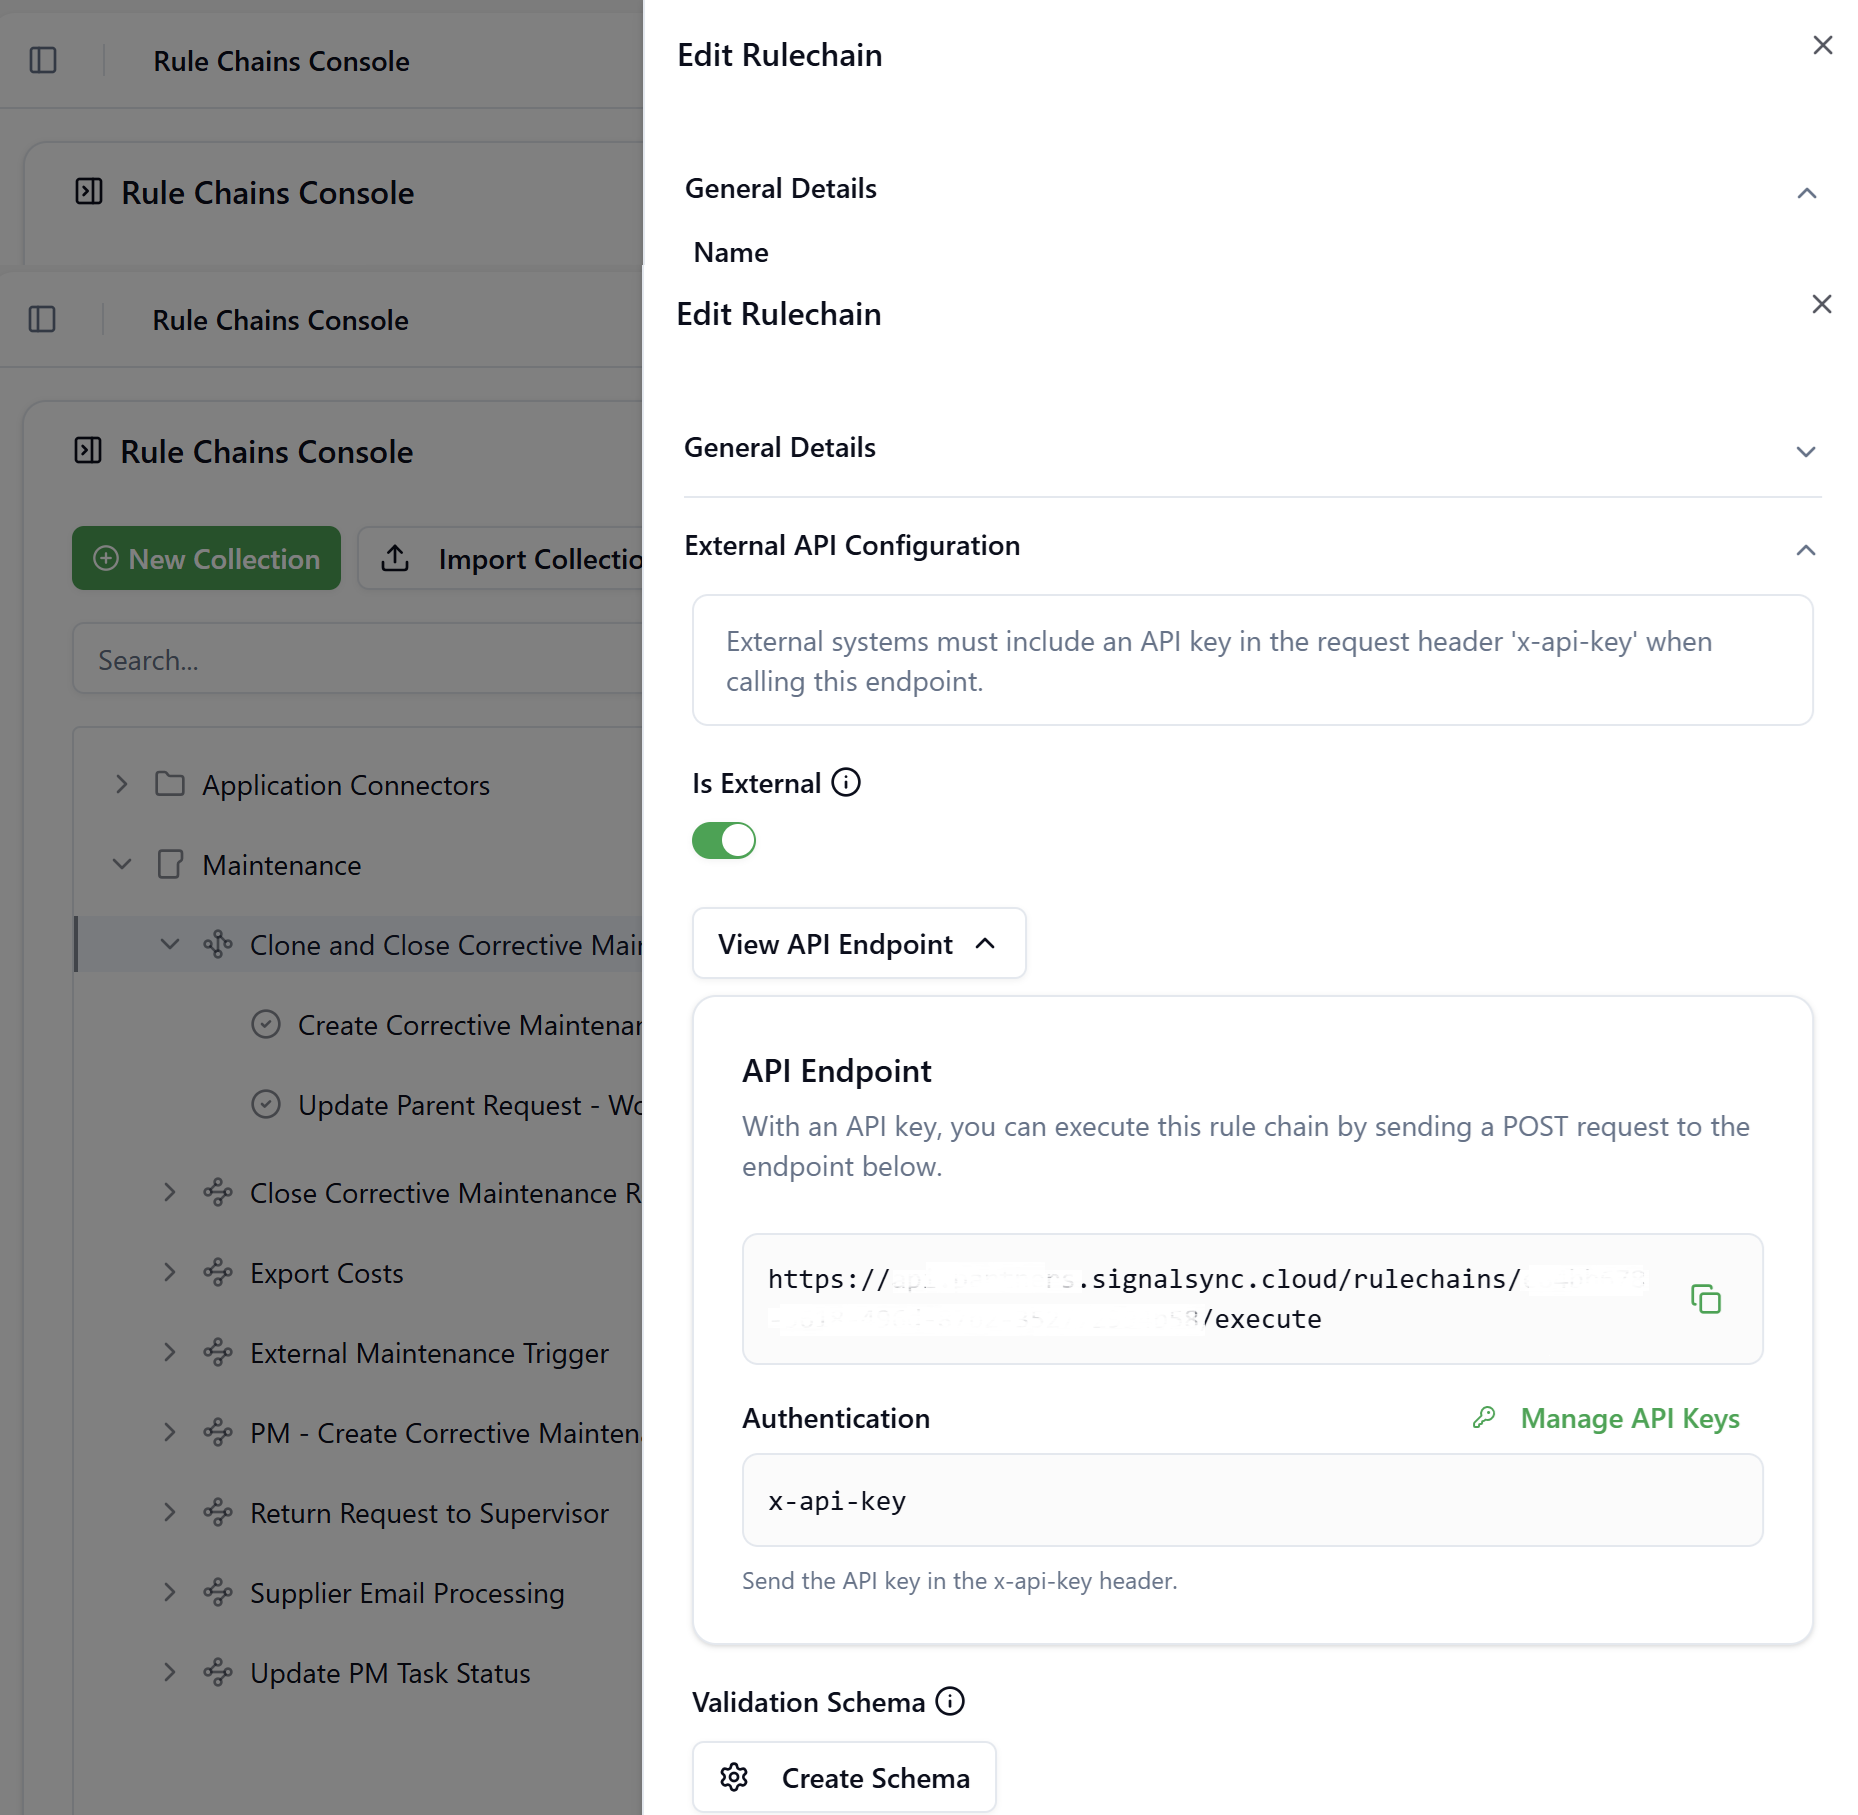
Is External
When this toggle is enabled, the Rule Chain is registered as a publicly accessible REST endpoint. External systems must include a valid API key in the x-api-key request header to authenticate.
Once enabled, the View API Endpoint control expands to show:
| Element | Description |
|---|---|
| API Endpoint URL | The full POST endpoint URL in the format https://api.{tenant}.signalsync.cloud/rulechains/{uuid}/execute. Use the copy icon to copy it to the clipboard. |
| Authentication | Displays the required header name (x-api-key). Click Manage API Keys to navigate to the API Keys Management page where keys can be created and revoked. |
API keys are managed separately from Rule Chain configuration. See API Keys Management for instructions on generating and managing keys.
Edit Schema
The Edit Schema button opens the JSON Schema Builder dialog, which allows you to define a validation schema for the payload that external callers must send to this endpoint. If a required field is missing or does not conform to the schema, the request will be rejected before execution begins.
Within the JSON Schema Builder, you define one or more Properties for the expected input object. Each property has the following configuration options:
| Field | Description |
|---|---|
| Property Name | The JSON field name expected in the incoming payload |
| Type | The data type: String, Number, Boolean, Object, or Array |
| Required | When enabled, the field must be present in every request |
| Description | Optional documentation for this property |
| Min / Max Length | For String type — enforces minimum and maximum character length |
| Format | For String type — pre-defined formats such as UUID, email, date, etc. |
| Pattern (Regex) | For String type — validates the value against a regular expression |
| Enum Values | For String type — restricts the value to a defined list of allowed entries |
Click Copy JSON Schema to copy the generated schema definition to the clipboard if you want to inspect the generated validation schema in an external editor like VS Code (for advanced users).
Click Save Changes to persist the schema.
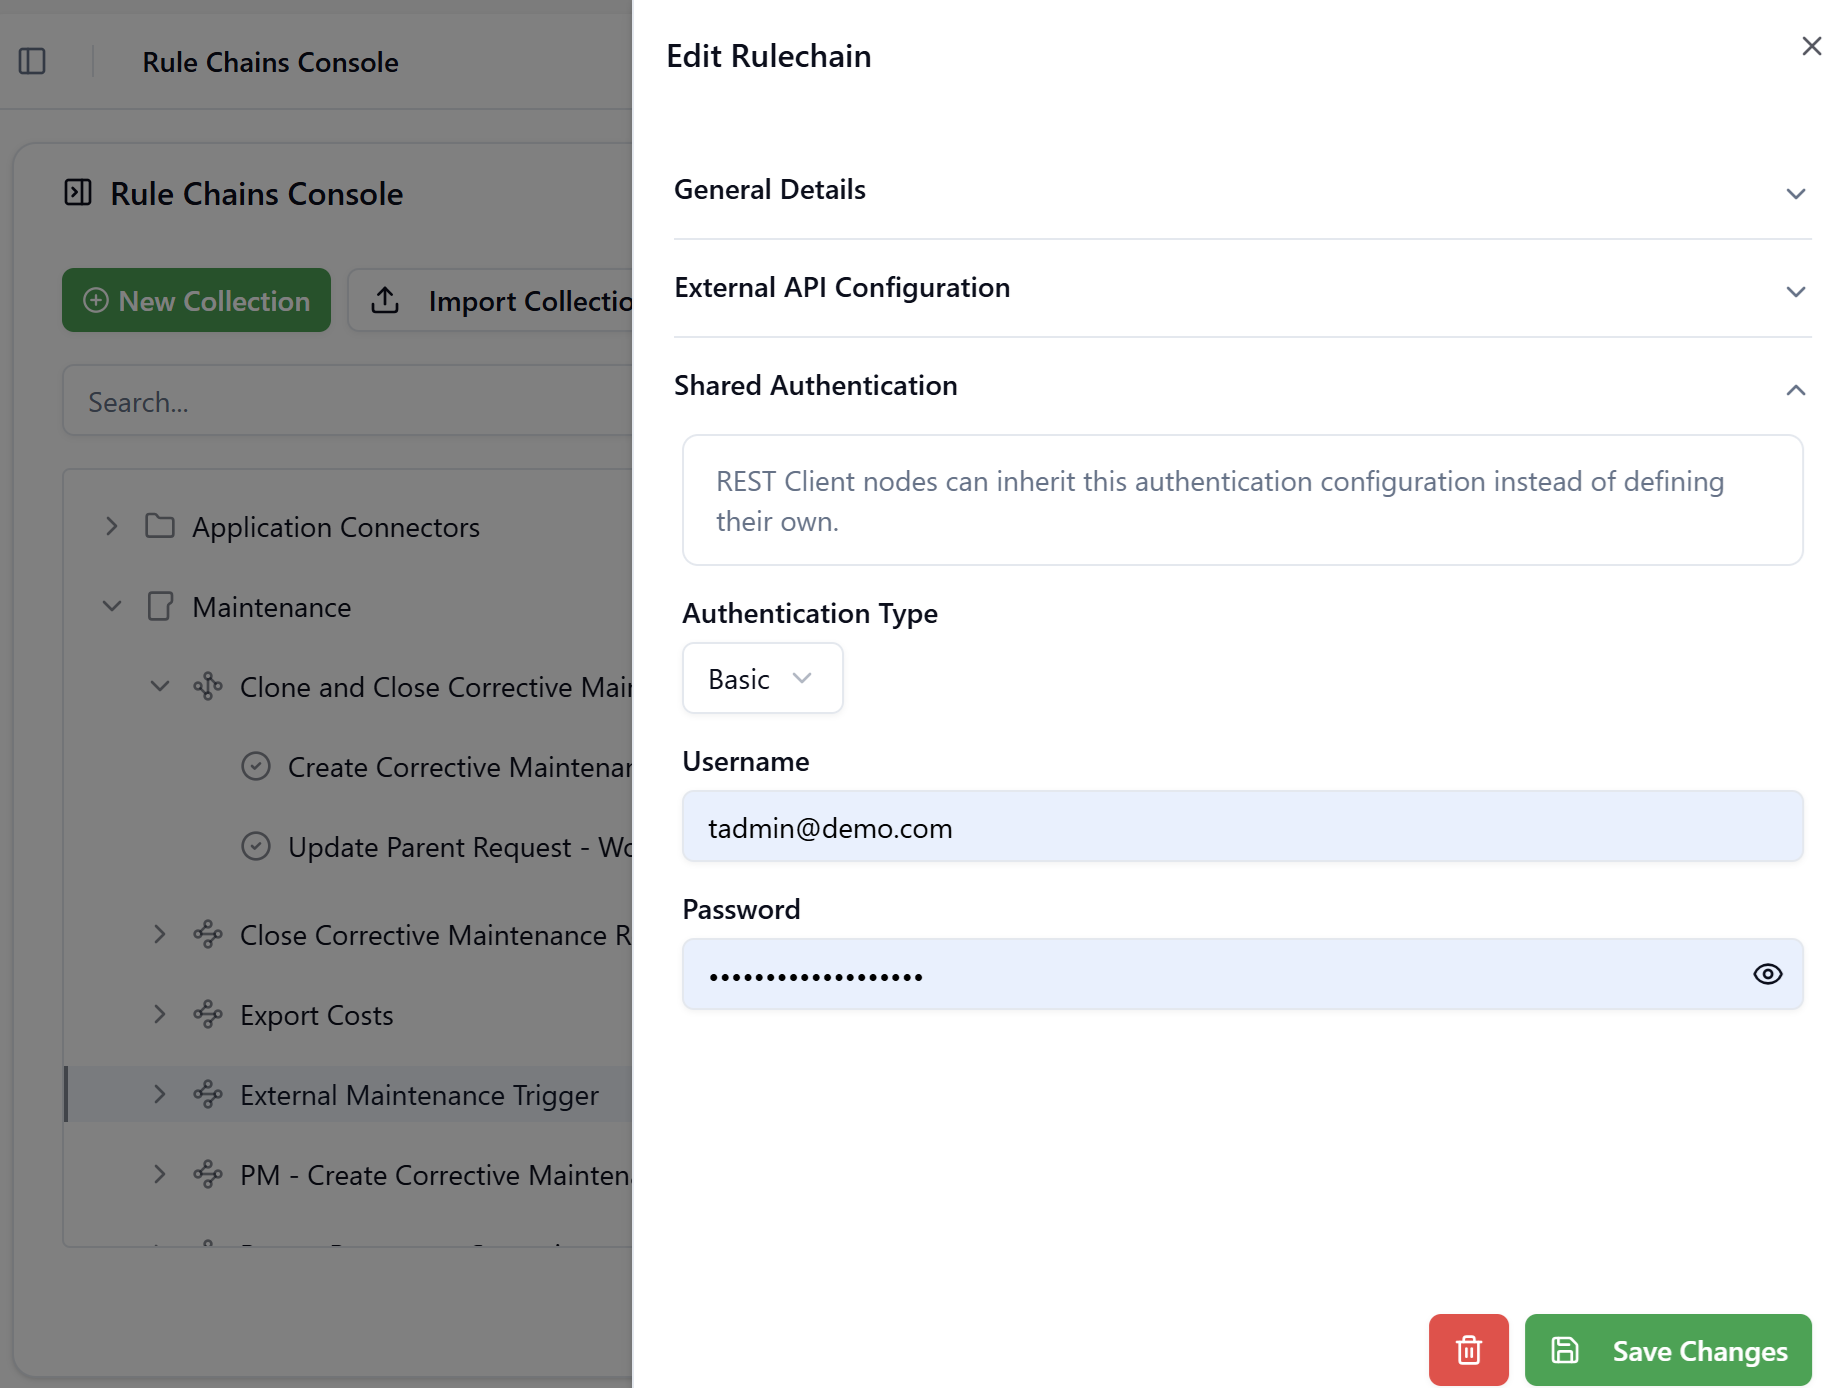
Shared Authentication
This section defines a single authentication configuration that can be inherited by any REST Call node within the Rule Chain. Nodes that have their Authentication Type set to Inherit will use this rule chain-level configuration instead of defining their own credentials.
This approach centralises credential management: when credentials need to be rotated, only the Rule Chain's Shared Authentication needs to be updated, rather than every individual node.
Click to view the Shared Authentication section
Authentication Type: None
No authentication is applied. REST Call nodes set to Inherit will send requests without any authentication header.
Authentication Type: Basic
Authenticates using a username and password pair sent as a Base64-encoded Authorization: Basic header.
| Field | Description |
|---|---|
| Username | The username for the target system |
| Password | The password (masked by default, with a show/hide toggle) |
Authentication Type: Token Bearer
Authenticates using a static bearer token sent in the Authorization: Bearer header.
| Field | Description |
|---|---|
| Token | The bearer token value to include in outbound requests |
Authentication Type: OAuth2
Authenticates using the OAuth 2.0 protocol. The platform will automatically acquire and refresh tokens using the provided credentials before each request.
| Field | Description |
|---|---|
| Grant Type | The OAuth2 grant flow — currently supports only the Client Credentials grant type |
| Prefix | The token prefix added to the Authorization header, typically Bearer |
| Token | The current access token (displayed if already acquired) |
| Token URL | The endpoint from which the platform requests access tokens |
| Client ID | The OAuth2 client identifier |
| Client Secret | The OAuth2 client secret (masked) |
| Scope | The requested access scope, e.g. read write |
| Add Token To | Specifies where to attach the token in outbound requests (headers or as query parameter) |
| Send Token Request As | Specifies how the token request body is encoded |
Authentication Type: Certificate
Authenticates using a client certificate for mutual TLS (mTLS) scenarios.
| Field | Description |
|---|---|
| Certificate File | Upload a certificate file via drag-and-drop or file picker. Maximum file size is 2 MB. |
Importing a Rule Chain
Select a collection from the tree by clicking on it. The Import Rule Chain button becomes enabled. Click Import Rule Chain in the toolbar to import a single Rule Chain from a previously exported JSON file. Use the Edit Rulechain drawer to reassign it to a different Collection if needed.
Exporting a Rule Chain
Select a Rule Chain row from the tree. The Export button in the toolbar updates to Export Rule Chain.
Click it to download the Rule Chain definition — including all its nodes — as a JSON file.
Deleting a Rule Chain
Hover over a Rule Chain row and click the 🗑 delete icon. A confirmation dialog warns that the action is irreversible and that all associated nodes and execution logs will be permanently removed. Click Delete to confirm.
Executing a Rule Chain
Select a Rule Chain row in the tree and click Execute in the toolbar. The Execute Rule Chain dialog opens with a JSON code editor. You may optionally enter an input payload that the Rule Chain's FreeMarker expressions can use during execution. Click Execute to run the chain immediately.
If you configured the Rule Chain to return the response, a new dialog will pop up after the execution is finished with the results.
Otherwise, you will be redirected to the Rule Chain execution logs page.
In all cases, execution results and any errors are recorded on the Rule Chain execution logs page, where you can review them at any time.