Workflow Details Tab
The Details tab provides the essential configuration for your workflow, including identification, appearance, and publication settings. This is the first tab you'll see when creating or editing a workflow.
Overview
The Details tab is organized into two main sections:
- Workflow Configuration - Basic workflow identification and settings
- Publish Workflow - Controls for making the workflow available to users
Path: Define → Workflows → [Select Workflow] → Details Tab
Click to view Workflow Details Tab interface
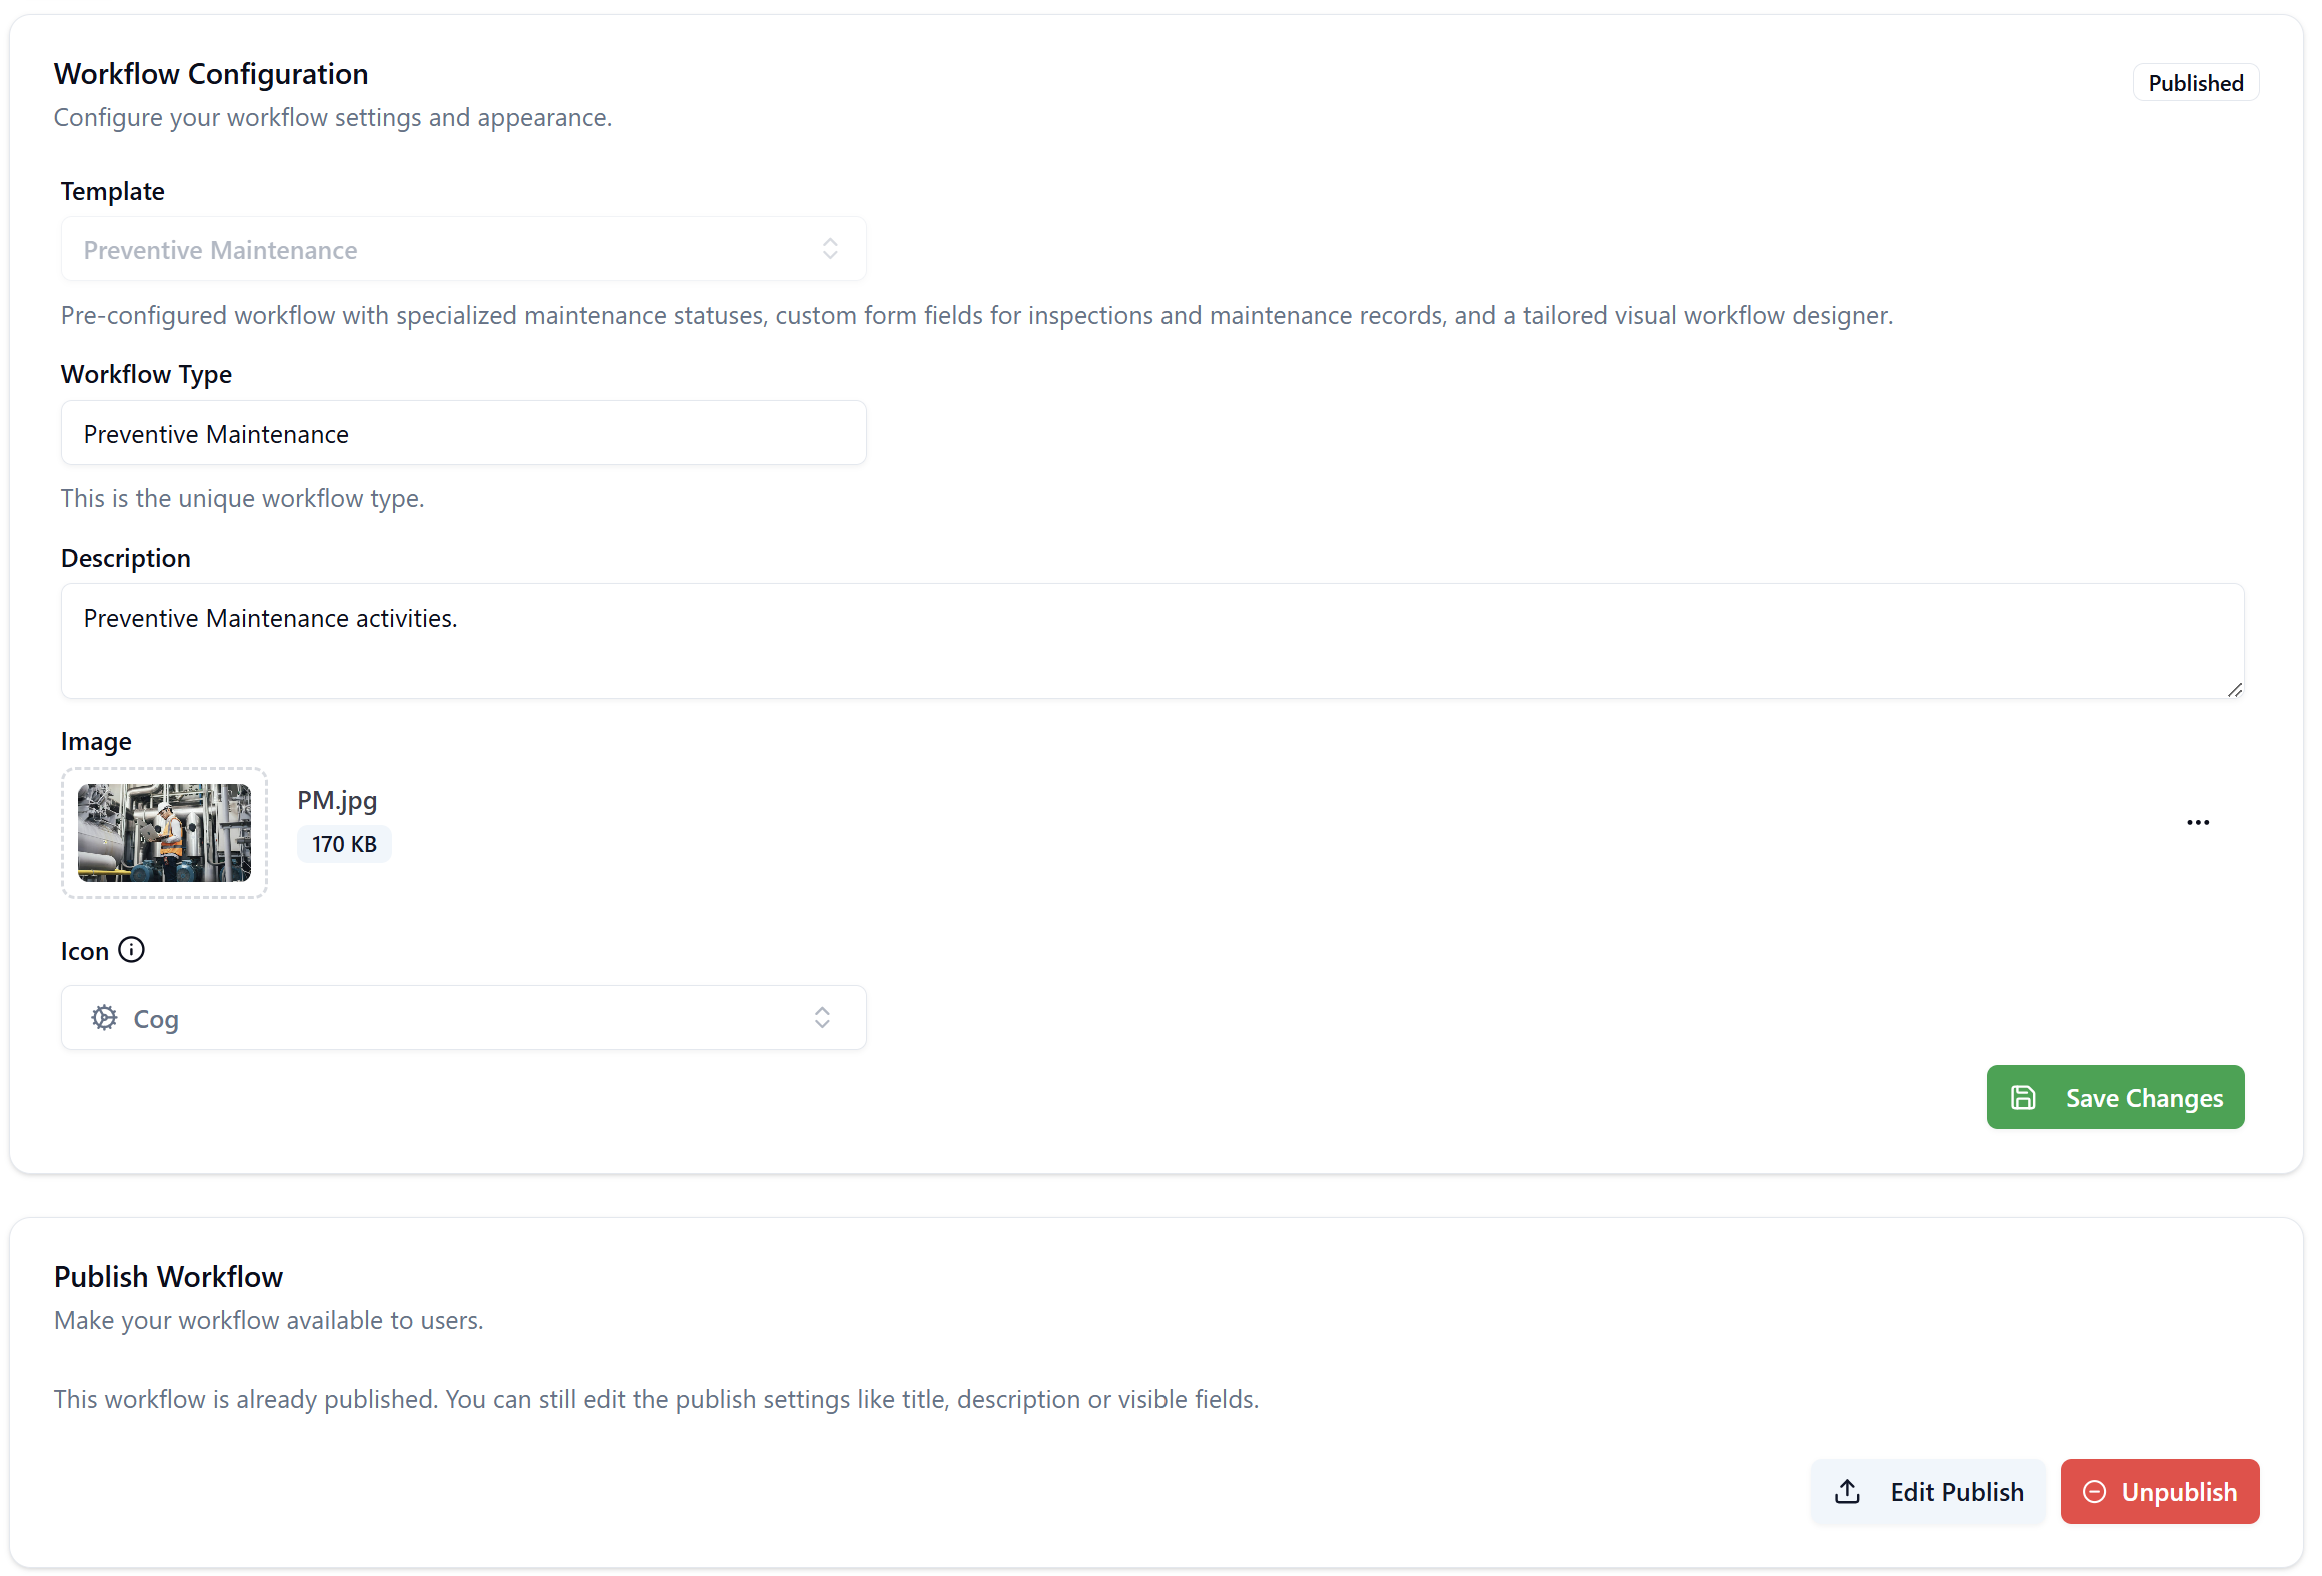
Workflow Configuration
Template
Select the base template for your workflow. Templates provide pre-configured form structures with mandatory fields specific to different business processes.
Field Type: Dropdown (read-only after creation)
Click to view Create Workflow dialog
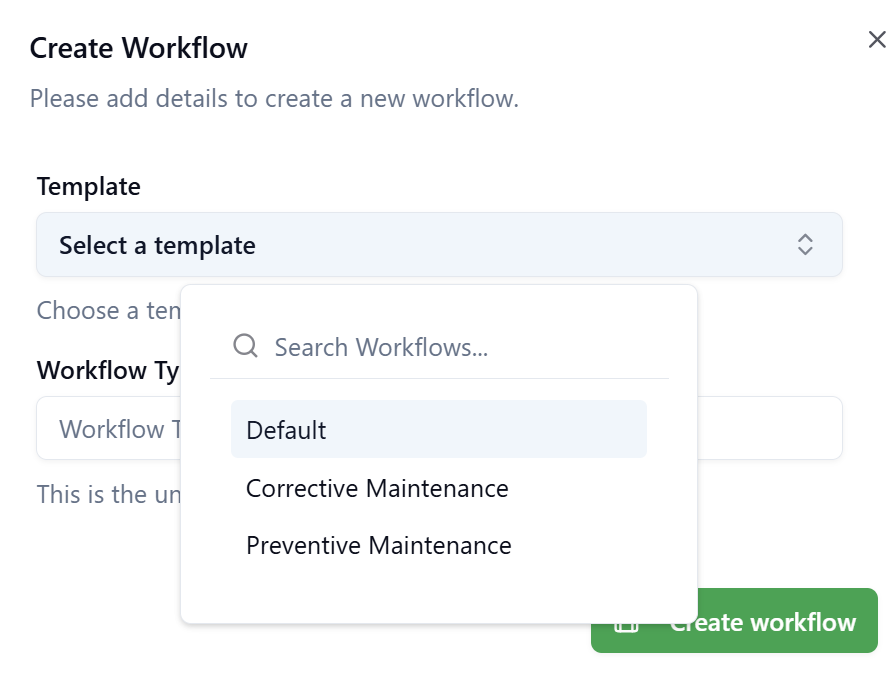
Available Templates:
-
Default - Standard workflow template with no mandatory form fields
- No form constraints
- Complete flexibility in form design
- Use for general business processes
-
Corrective Maintenance - Template for reactive maintenance and issue resolution
- Pre-configured with mandatory form fields
- Designed for repair work and incident response
- Mandatory fields cannot be removed (but additional fields can be added)
-
Preventive Maintenance - Template for scheduled maintenance activities
- Pre-configured with maintenance-specific mandatory fields
- Designed for routine inspections and preventive servicing
- Mandatory fields cannot be removed (but additional fields can be added)
Template Description:
The system displays a brief description of the selected template below the dropdown, explaining the template's purpose and pre-configured features.
Example for Preventive Maintenance:
"Pre-configured workflow with specialized maintenance statuses, custom form fields for inspections and maintenance records, and a tailored visual workflow designer."
Example for Corrective Maintenance:
"Choose a template for your workflow. Templates provide pre-configured fields for specific use cases."
Once a workflow is created with a specific template, the template cannot be changed. Choose carefully based on your business process requirements.
How Templates Work
Form Field Requirements:
Templates only affect the Forms tab by pre-populating mandatory fields. They do not restrict:
- Workflow statuses (Status tab)
- Process design (Designer tab)
- Roles and assignments
- SLA configurations
- Document templates
- Notifications
View mandatory Corrective Maintenance fields
Mandatory Fields (Cannot be removed):
Basic Information:
- Incident Type (
#_problem_type) - Select dropdown for categorizing the issue (e.g., Electrical, Mechanical, Plumbing, HVAC) - Priority (
#_priority) - Priority level (Low, Medium, High, Critical) - Equipment (
#_equipment) - Entity reference to equipment requiring maintenance - Building (
#_building) - Entity reference to building location - Floor (
#_floor) - Text field for floor identification - Room (
#_room) - Text field for room identification - Description (
#_description) - Text area for detailed issue description - Date Planned (
#_date_planned) - Date picker for scheduled work - Estimated Duration [h] (
#_estimated_duration) - Number field for estimated hours - Estimated Cost (
#_total_estimated_cost) - Number field for total estimated cost - Actual Cost (
#_total_actual_cost) - Number field for total actual cost
View mandatory Corrective Maintenance tables
Mandatory Tables (Cannot be removed):
Work Log Table:
- Section Title: Work Log
- Description: Work time reporting
- Columns:
- Date Start (
_work_date_start) - Date/time when work began - Date End (
_work_date_end) - Date/time when work ended - Hours Worked (
_work_hours) - Number of hours worked - Comments (
_work_comments) - Work log notes
- Date Start (
Parts and Supplies Table:
- Section Title: Parts and Supplies
- Description: Spare parts and consumables
- Columns:
- Part Code (
_parts_part_code) - Part identification code - Unit Cost (
_parts_cost_unit) - Cost per unit - Estimated Quantity (
_parts_est_qty) - Planned quantity needed - Estimated Cost (
_parts_est_cost) - Calculated estimated cost - Actual Quantity (
_parts_actual_qty) - Actual quantity used - Actual Cost (
_parts_actual_cost) - Actual total cost for parts
- Part Code (
Labor Details Table:
- Section Title: Labor Details
- Description: Trades and hours
- Columns:
- Trade Code (
_trades_trade_code) - Trade/skill identifier (e.g., Electrician, Plumber) - Hourly Rate (
_trades_hourly_rate) - Rate per hour for the trade - Estimated Effort (
_trades_est_qty) - Estimated hours needed - Estimated Cost (
_trades_est_cost) - Calculated estimated labor cost - Actual Effort (
_trades_actual_qty) - Actual hours worked - Actual Cost (
_trades_actual_cost) - Actual total labor cost
- Trade Code (
Services Table:
- Section Title: Services
- Description: Services performed to resolve the incident
- Columns:
- Service Code (
_services_service_code) - Service type identifier - Unit Cost (
_services_cost_unit) - Cost per service unit - Estimated Quantity (
_services_est_qty) - Estimated service quantity - Estimated Cost (
_services_est_cost) - Calculated estimated service cost - Actual Quantity (
_services_actual_qty) - Actual service quantity delivered - Actual Cost (
_services_actual_cost) - Actual total service cost
- Service Code (
Other Costs Table:
- Section Title: Other Costs
- Description: Other intervention-related costs
- Columns:
- Cost Type (
_other_cost_cost_type) - Category of additional cost - Description (
_other_cost_description) - Detailed explanation of the cost - Estimated Cost (
_other_cost_est_cost) - Estimated amount - Actual Cost (
_other_cost_actual_cost) - Actual amount spent - Document (
_other_cost_doc_id) - Reference to supporting documentation
- Cost Type (
The Estimated Cost and Actual Cost fields are automatically calculated using field calculator formulas that sum all cost components from the tables:
Estimated Cost Formula:
SUM(_parts._parts_est_cost) +
SUM(_trades._trades_est_cost) +
SUM(_services._services_est_cost) +
SUM(_other_cost._other_cost_est_cost)
Actual Cost Formula:
SUM(_parts._parts_actual_cost) +
SUM(_trades._trades_actual_cost) +
SUM(_services._services_actual_cost) +
SUM(_other_cost._other_cost_actual_cost)
These formulas automatically aggregate costs from all tables, providing real-time totals as users enter data. The fields update dynamically when table rows are added, modified, or removed.
The template provides comprehensive cost tracking by breaking down expenses into:
- Parts and Supplies - Material costs
- Labor Details - Human resource costs by trade
- Services - External service provider costs
- Other Costs - Miscellaneous expenses
Each category tracks both estimated and actual values, enabling accurate budget management and variance analysis.
Table Interaction:
- Each table section can be expanded/collapsed for better form navigation
- Users can add multiple rows to each table as needed
- Tables support sorting, filtering, and inline editing
- Row totals are automatically calculated where applicable
- New button allows adding rows to tables
- Export/import functionality available for bulk data entry
While mandatory template fields cannot be removed, you can:
- ✅ Add additional fields based on your business needs
- ✅ Modify field labels and help text
- ✅ Configure field validation rules
- ✅ Arrange field layout and ordering
Preventive Maintenance Template
Similar to Corrective Maintenance, the Preventive Maintenance template includes mandatory fields tailored for scheduled maintenance activities, inspections, and preventive servicing.
Choosing the Right Template
Use Corrective Maintenance Template when:
- Managing reactive maintenance and repairs
- Handling incident reports and issue resolution
- Tracking equipment failures and breakdowns
- Need standardized incident categorization (Incident Type)
- Require cost tracking for unplanned maintenance
- Process involves building/floor/room location tracking
Use Preventive Maintenance Template when:
- Managing scheduled maintenance activities
- Performing routine equipment inspections
- Implementing preventive maintenance programs
- Need standardized maintenance task categorization
- Following manufacturer maintenance schedules
- Tracking planned maintenance costs and durations
Use Default Template when:
- Building approval workflows
- Creating custom request processes
- Implementing document review workflows
- Designing change management processes
- Building HR workflows (leave requests, onboarding)
- Creating IT service desk workflows (non-maintenance)
- Any process that doesn't fit maintenance use cases
- Maximum flexibility is required
Template Selection Process
During Workflow Creation:
- Click + New Workflow button in Define → Workflows
- Create Workflow dialog appears
- Select template from dropdown:
- Search for templates using the search box
- Browse available templates
- Review template description
- Template selection is confirmed when you proceed
- Cannot be changed after workflow is created
Template Visibility:
Once selected, the template name appears in:
- Workflow Details tab (read-only)
- Workflow list view (if configured as visible column)
- Export package metadata
Templates exist to accelerate workflow creation by providing industry best-practice form structures, not to restrict workflow design. They ensure data consistency for common use cases while allowing complete process customization.
Workflow Type
The unique identifier and business name for this workflow.
Field Type: Text input (read-only for Published/Archived workflows)
Validation Rules:
- Required field
- Must be unique across all workflows in the tenant
- Recommended format: Use descriptive business process names
- Case-sensitive
Examples:
- "Preventive Maintenance"
- "Corrective Maintenance"
- "Purchase Request"
- "IT Service Request"
- "Change Request"
Versioning: The Workflow Type identifies the process across all versions. When you create a new version and publish it:
- The Workflow Type remains the same
- The version number increments automatically
- Previous published version becomes Archived
- New version becomes "Latest" and is used for new requests
Use clear, business-friendly names that describe the process. This name appears in:
- Workflow Portal cards
- Management consoles
- Navigation breadcrumbs
- Reports and analytics
Editability by Status:
- Draft: ✅ Fully editable
- Published: ❌ Read-only (use New Version to modify)
- Archived: ❌ Read-only
Description
Detailed explanation of the workflow's purpose, scope, and usage.
Field Type: Multi-line text area
Validation Rules:
- Optional field
- No character limit
- Supports plain text (no rich text formatting)
Content Guidelines:
Include information such as:
- Purpose of the workflow
- When to use this workflow
- Key steps in the process
- Responsible parties or roles
- Integration points with other systems
- Special instructions or prerequisites
Example:
Preventive Maintenance activities.

This workflow manages scheduled maintenance tasks for equipment and facilities,
including routine inspections, preventive servicing, and planned equipment care.
Use this workflow to ensure equipment reliability and prevent unexpected breakdowns.

Key activities:
- Schedule recurring maintenance tasks
- Document inspection findings
- Track maintenance completion
- Generate maintenance reports
- Escalate overdue tasks
Visibility:
- Displayed in Edit Publish dialog
- May be shown in Workflow Portal (depending on configuration)
- Available in management console views
Editability by Status:
- Draft: ✅ Fully editable
- Published: ✅ Editable (limited edit capability)
- Archived: ✅ Editable (but not displayed in portal since workflow is archived)
Image
Visual banner image for the workflow displayed in the Workflow Portal.
Field Type: Image upload
Specifications:
- Recommended size: 400 x 300 pixels (4:3 aspect ratio)
- Maximum file size: 5 MB
- Supported formats: JPG, JPEG, PNG, GIF, WEBP
- Display location: Workflow Portal card header
Upload Process:
- Click the current image or upload area
- Select image file from your computer
- Image preview displays immediately
- File name and size shown below thumbnail
Default Behavior: If no image is uploaded, a default placeholder or template-specific image may display.
Actions:
- Upload new image: Click to replace
- Remove image: Click the menu (⋯) icon and select delete
- Preview: Click to view full size
The image appears as a card banner in the Workflows Portal, helping users quickly identify and select the correct workflow visually.
Editability by Status:
- Draft: ✅ Fully editable
- Published: ✅ Editable (changes apply immediately to portal)
- Archived: ✅ Editable (but not displayed since Latest version is shown in portal)
Icon
Small icon displayed alongside the workflow name in various views.
Field Type: Icon selector dropdown
Available Icons: The system provides a library of icons organized by category:
- Tools and equipment (wrench, hammer, cog)
- Business and office (briefcase, document, folder)
- Communication (email, phone, message)
- Actions (check, close, arrow)
- Alerts (warning, info, error)
Selection Process:
- Click the icon dropdown
- Browse or search available icons
- Click to select
- Icon preview updates immediately
Editability by Status:
- Draft: ✅ Fully editable
- Published: ✅ Editable (changes apply immediately)
- Archived: ✅ Editable (but limited visibility)
Save Changes Button
Location: Bottom right of Workflow Configuration section
Behavior:
- Enabled when any field is modified
- Disabled if no changes made
- Saves all changes in the Details tab
- Shows success notification on save
- Validation errors prevent save
Validation Checks:
- Workflow Type is unique
- Required fields are populated
- Image file size within limits
Publish Workflow
This section controls the publication status and settings for making the workflow available to users.
Publication Status Indicator
Display: Top right corner shows current status
Possible Values:
- Published - Workflow is live and available to users
- (Blank) - Workflow is in Draft or Archived status
Publication Description
"Make your workflow available to users."
This section explains the purpose of workflow publication and provides context for the actions available.
Current Publication State
For Published Workflows:
The interface displays a message:
"This workflow is already published. You can still edit the publish settings like title, description or visible fields."
This indicates:
- Workflow is currently live in production
- Limited editing is available without creating a new version
- You can modify presentation settings without affecting functionality
- Structural changes require creating a new version
Publication Actions
Edit Publish Button
Availability: Only for Published workflows
Purpose: Modify management console display settings without creating a new version
Accessible Settings:
- Title - Management console display name
- Description - Explanation shown in management view
- Visible Fields - Columns displayed in management console table
- Field Order - Arrangement of columns
When to Use:
- Adjust which data fields users see in management console
- Reorder columns for better usability
- Update title or description for clarity
- Improve user experience without changing workflow logic
Process:
- Click Edit Publish button
- Modify settings in dialog
- Select/deselect visible fields
- Drag fields to reorder
- Click Save Changes
What Changes:
- ✅ Management console view updates immediately
- ✅ No impact on running workflow instances
- ✅ No version number change
- ❌ Cannot modify workflow structure or logic
Use Edit Publish for cosmetic and display changes. For functionality changes, create a New Version from the workflow list.
Unpublish Button
Availability: Only for Published workflows
Purpose: Return workflow to Draft status
DO NOT use Unpublish in production environments!
Unpublishing a workflow that has active requests can cause:
- Loss of workflow state for existing requests
- Broken user tasks and pending actions
- Data integrity issues
- Inability to complete in-progress requests
- Irreversible damage to request history
When to Use Unpublish:
- ✅ In UAT/testing environments for corrections
- ✅ During maintenance windows (after coordinating with users)
- ✅ For workflows with zero active requests
- ✅ In development environment only
When NOT to Use:
- ❌ Never in production with active requests
- ❌ During business hours
- ❌ Without database backup
- ❌ Without coordinating with all stakeholders
What Happens on Unpublish:
- Workflow status changes from Published to Draft
- Workflow removed from Workflows Portal
- Users cannot create new requests
- Existing active requests may become unstable
- Management console may show errors for existing requests
- Workflow becomes editable again
Alternative Approach:
Instead of unpublishing, use this safer process:
- Leave current version Published
- Create New Version from workflow list
- Edit the new Draft version
- Test in development environment
- Export and import to UAT
- Validate with business users
- Export and import to production
- Publish new version (automatically archives old version)
This approach ensures:
- Zero downtime
- No impact on active requests
- Clean version history
- Proper testing cycle
- Smooth transition
Confirmation Dialog:
When clicking Unpublish, the system displays a warning:
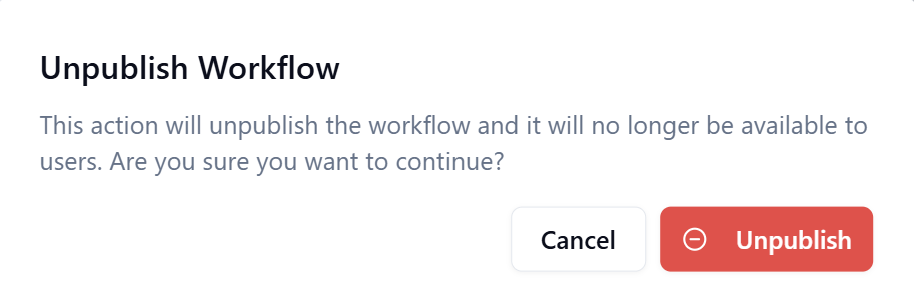
Workflow Lifecycle
Creating a New Workflow
- Navigate to Define → Workflows
- Click + New Workflow button
- Select template (cannot be changed later)
- Enter Workflow Type (unique identifier)
- Add description
- Upload image (optional)
- Select icon
- Click Save Changes
- Configure other tabs (Status, Forms, Designer, SLA, Templates)
- Return to workflow list and click Publish
Editing a Draft Workflow
- All fields fully editable
- Make changes across all tabs
- Save frequently
- Publish when ready for production
Editing a Published Workflow
Limited Edit (Details Tab Only):
- Edit description, image, icon
- Use Edit Publish for management view settings
- Cannot change: Template, Workflow Type, structure, logic
Full Edit (New Version Required):
- Go to workflow list (not Details tab)
- Click New Version action
- Edit the new Draft version across all tabs
- Test thoroughly
- Publish new version (archives current version)
Editing an Archived Workflow
- Can edit description, image, icon
- Changes won't display in portal
- Cannot publish directly
- Use Duplicate to create new Draft version if needed
Best Practices
Template Selection
✅ Do:
- Understand that templates only enforce mandatory form fields, not workflow design
- Use Corrective Maintenance template for reactive maintenance and incident response
- Use Preventive Maintenance template for scheduled maintenance activities
- Use Default template when you want complete form design flexibility
- Review the mandatory fields before selecting a maintenance template
- Consider whether your process benefits from standardized data collection
❌ Don't:
- Select wrong template (cannot change later)
- Choose a maintenance template if you don't need the mandatory fields
- Assume templates restrict workflow design beyond forms
- Select a template without understanding its mandatory field requirements
Workflow Type Naming
✅ Do:
- Use clear, business-friendly names
- Follow consistent naming conventions
- Keep names concise but descriptive
- Use title case (e.g., "Purchase Request")
❌ Don't:
- Use technical codes or abbreviations
- Create duplicate names
- Use special characters excessively
- Make names too long (>50 characters)
Description Content
✅ Do:
- Explain workflow purpose clearly
- List key process steps
- Include usage guidelines
- Document prerequisites
- Note integration points
- Keep updated as process evolves
❌ Don't:
- Leave blank
- Use vague descriptions
- Include confidential information
- Write excessively long text (>500 words)
Image Selection
✅ Do:
- Use high-quality images
- Choose relevant visuals
- Maintain consistent style across workflows
- Optimize file size (< 500 KB recommended)
- Use 4:3 aspect ratio
- Test appearance in Workflow Portal
❌ Don't:
- Use low-resolution images
- Upload files larger than 5 MB
- Use copyrighted images without permission
- Choose unrelated or confusing visuals
Icon Selection
✅ Do:
- Select icons matching workflow purpose
- Use consistent icon style
- Choose recognizable symbols
- Test visibility at small sizes
❌ Don't:
- Pick arbitrary icons
- Mix icon styles
- Use overly complex icons
Publication Management
✅ Do:
- Test thoroughly before publishing
- Use Edit Publish for display changes
- Create New Version for structural changes
- Document version differences
- Coordinate with users before major changes
- Maintain published workflows for active requests
❌ Don't:
- Unpublish workflows with active requests
- Make structural changes to published workflows
- Skip testing in UAT environment
- Publish untested workflows directly to production
Troubleshooting
Cannot Edit Workflow Type
Issue: Workflow Type field is read-only
Cause: Workflow is Published or Archived
Solution:
- For Published: Create New Version to modify
- For Archived: Cannot modify (use Duplicate to create new Draft)
Image Upload Fails
Issue: Image upload returns an error
Possible Causes & Solutions:
File too large:
- Reduce file size to under 5 MB
- Use image compression tools
- Convert to more efficient format (e.g., JPG instead of PNG for photos)
Unsupported format:
- Convert to JPG, JPEG, PNG, GIF, or WEBP
- Check file extension matches actual format
Browser issues:
- Clear browser cache
- Try different browser
- Check browser console for errors
Changes Not Saving
Issue: Save Changes button doesn't work
Possible Causes & Solutions:
Validation errors:
- Check for required field warnings
- Ensure Workflow Type is unique
- Verify all mandatory fields completed
Browser issues:
- Refresh page
- Check internet connection
- Check browser console for JavaScript errors
Session timeout:
- Re-login to application
- Return to workflow and re-enter changes
Unpublish Caused Issues
Issue: Unpublishing broke existing requests
Prevention:
- Never unpublish workflows with active requests in production
- Use New Version instead for making changes to published workflows
- Always export workflow before making significant changes - This creates a backup you can import if issues occur
Recovery (if it happens):
-
Quick Recovery (Recommended):
- Import the previously exported workflow package
- This restores the workflow to its last working state
- See Define → Workflows → Import button
-
Database Recovery (If no export available):
- Contact support if data loss occurred
Before editing any published workflow or performing potentially risky operations:
- Go to Define → Workflows
- Click the ⋯ menu on the workflow row
- Select Export
- Save the ZIP package to a safe location
- Proceed with your changes
If something breaks, you can use Import to restore the exported version quickly without database intervention.
Summary
The Details tab provides essential workflow configuration:
- Template selection (permanent choice)
- Workflow Type identification (unique name)
- Description for documentation
- Image for visual identification in portal
- Icon for UI elements
- Publication controls for making workflow available
Key Takeaways:
- Template selection is permanent - choose carefully
- Workflow Type must be unique across tenant
- Published workflows have limited editing - use New Version for structural changes
- Never unpublish workflows with active requests in production
- Use Edit Publish for display changes without versioning
- Keep descriptions current and informative
- Choose appropriate images and icons for user experience