Workflow Designer
The Designer tab is the core of the Graphical Workflow Engine. It provides a visual BPMN-based canvas where you build your business process by placing and connecting elements, configuring actions, defining events, and setting up routing logic. The result is a fully executable workflow that drives how requests move through your organization.
Path: Define → Workflows → [Select Workflow] → Designer Tab
Designer Layout
The Designer is composed of three main areas:
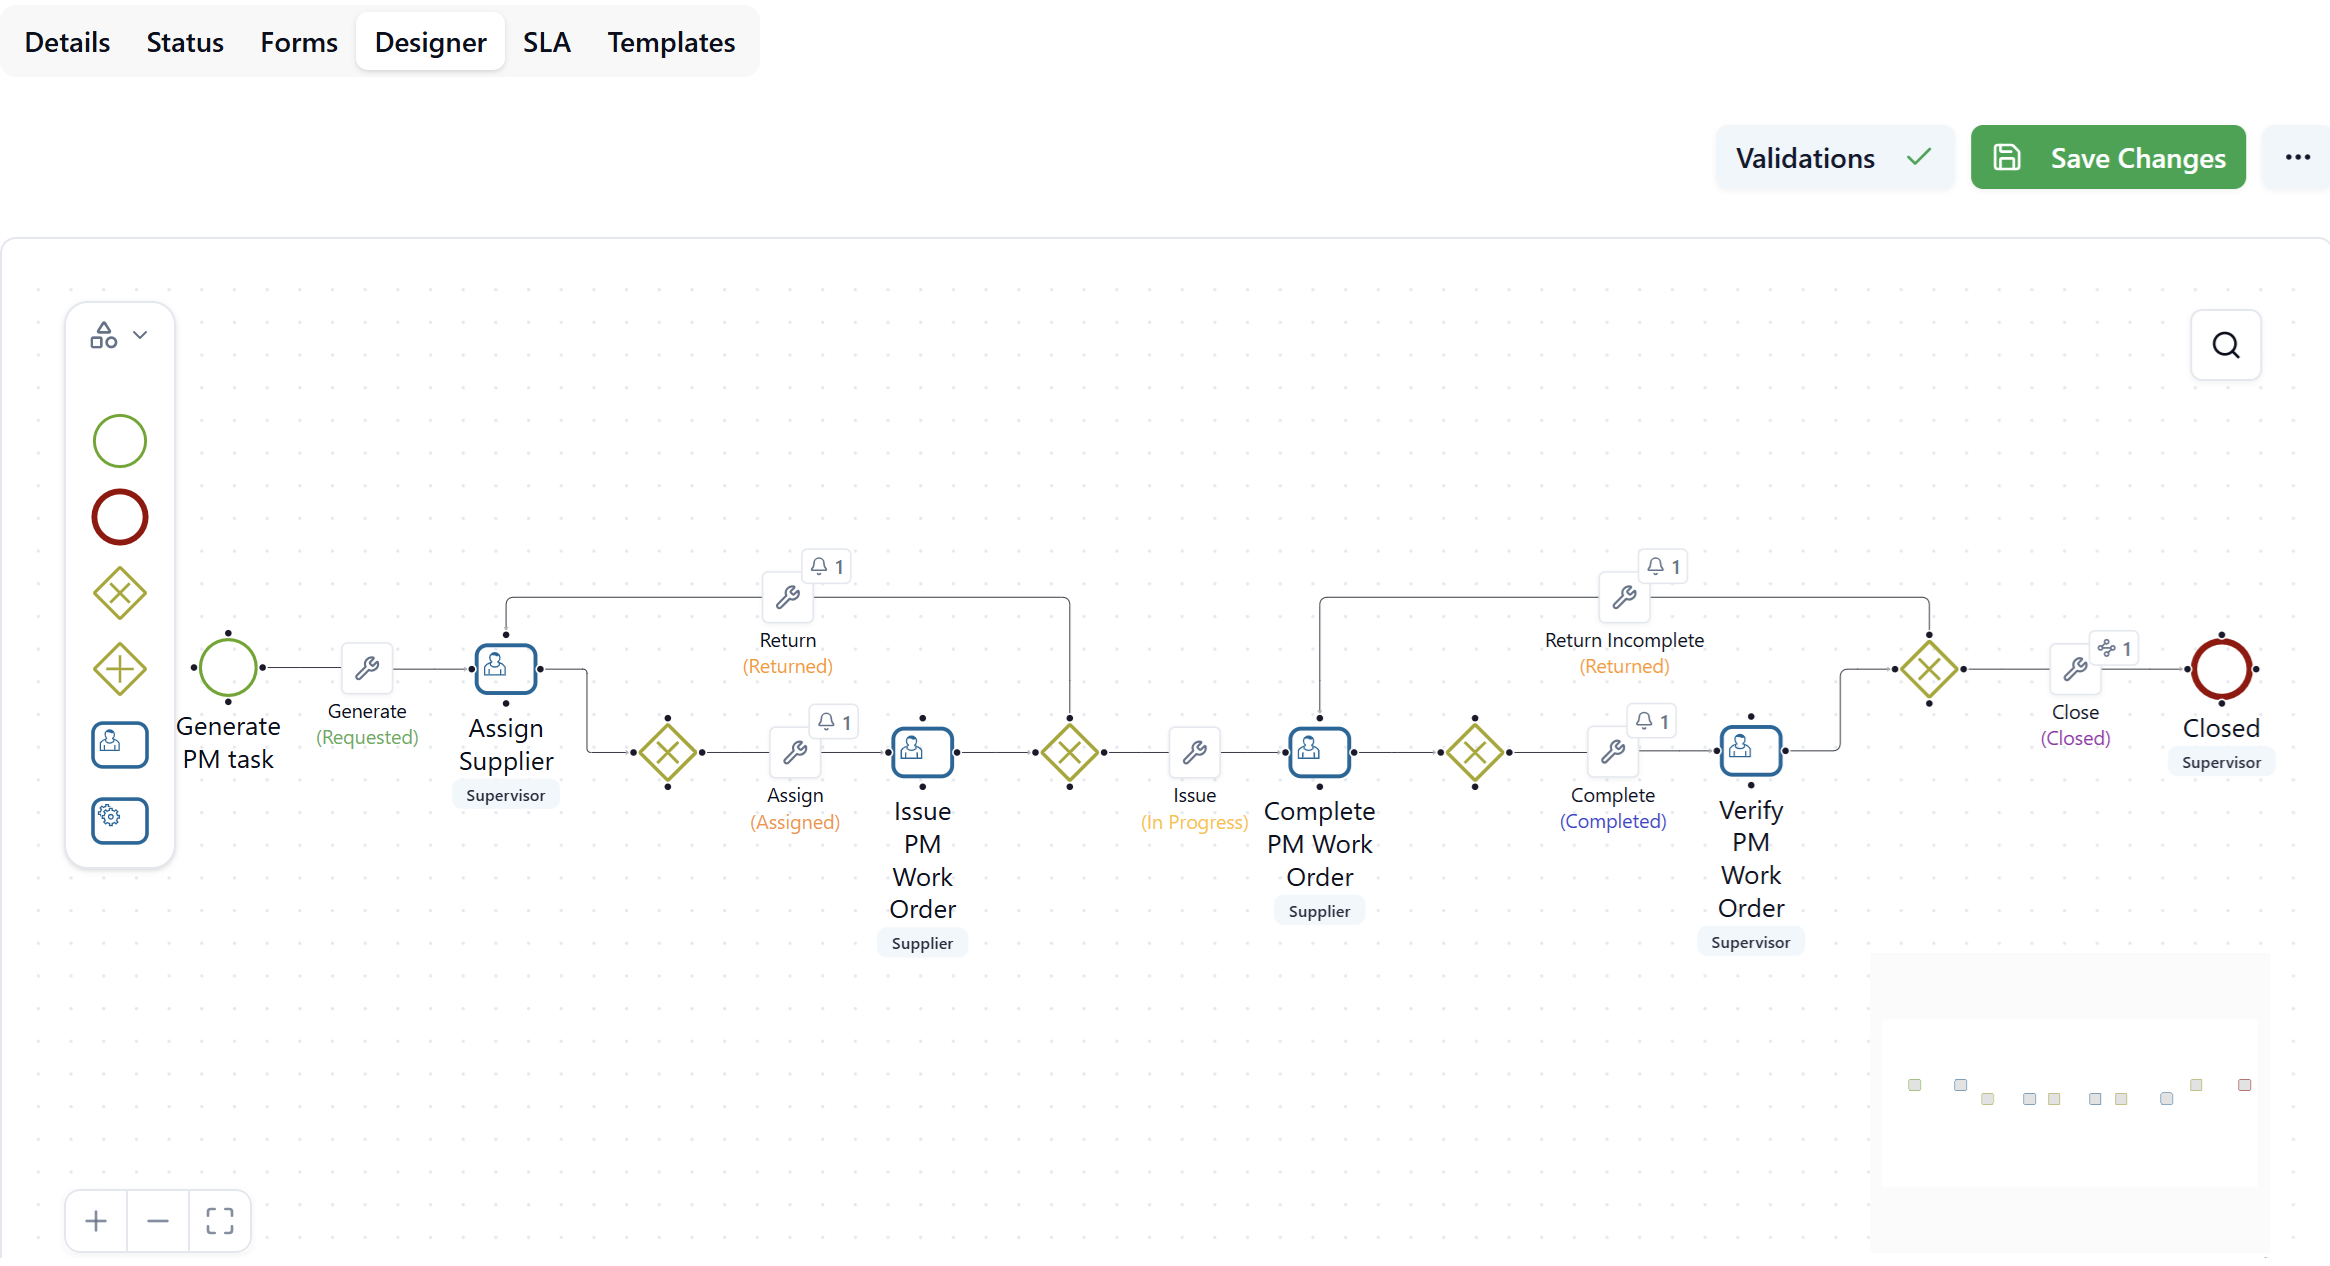
Click to view Designer interface
| Area | Description |
|---|---|
| Left panel — Palette | BPMN elements available to drag onto the canvas |
| Center canvas | The design surface where you build the workflow |
| Top toolbar | Validations, Save Changes, and additional options |
The canvas supports zoom in/out and fit-to-window controls using the +, −, and ⤢ (fit) buttons at the bottom left. A minimap in the bottom-right corner lets you pan across large diagrams.
The Designer does not auto-save. Always click Save Changes to persist your work. A red dot on the Save Changes button indicates unsaved modifications — if you navigate away without saving, all changes will be lost.
BPMN Elements
Drag elements from the left palette onto the canvas to build your process.
Start Event
The Start Event (green circle) marks the entry point of the workflow — the step where a user initiates a new request.
Properties:
| Property | Description |
|---|---|
| Description | Label shown on the canvas (e.g., "Report Incident") |
| Form | The published form presented to the user when creating the request |
| Role | Optional. If not set, all users can create this workflow type. If set, only users with this role can initiate it. |
End Event
The End Event (dark red circle with thick border) marks a terminal state of the workflow. A workflow can have multiple End Events representing different final outcomes (e.g., Closed, Cancelled, Rejected).
Properties:
| Property | Description |
|---|---|
| Description | Label shown on the canvas (e.g., "Cancelled", "Closed") |
| Show Log | When enabled, the Action Log is accessible from the request |
| Show Diagram | When enabled, users can view the Workflow Progress diagram |
| Expected duration (min) | Estimated duration in minutes (reserved for future reporting) |
| Form | Published form displayed at this terminal step |
| Role | Optional. Restricts which users can view this terminal state |
User Task
The User Task (blue rounded square with person icon) represents a step in the process that requires a human action — filling in a form and clicking an action button.
Task tab properties:
| Property | Description |
|---|---|
| Description | Label displayed on the canvas and in the request header |
| Show Log | Displays the Action Log menu item on the request so users can review history |
| Show Diagram | Displays the Workflow Progress panel showing step-by-step status history |
| All users must perform the task | When enabled, all users belonging to the assigned role must complete this task before the workflow advances. By default, completion by one user is sufficient. |
| Custom action | Reserved for future use — not yet implemented |
| Expected duration (min) | Estimated duration for this step (reserved for future reporting) |
| Form | The published form shown to the user at this step |
| Role | The role whose users are responsible for performing this task |
Template Actions tab:
Template Actions allow the designer to attach document generation buttons to the User Task. When a user opens a request at this step and clicks ···, an Export section appears with the configured action name. The user can then generate the document as PDF or DOCX.
To add a Template Action:
- Open the Template Actions tab on the User Task panel.
- Click Add Template Action.
- Enter an Action Name — this becomes the button label visible to the user.
- Select a Template from the list of templates defined in the workflow's Templates tab.
Templates are built using FreeMarker binding expressions and can include dynamic data from the request, including images such as visitor photos for badge generation.
Service Task
The Service Task (blue/green rounded square with gear icon) represents an automated step that evaluates conditions without requiring user interaction. It is used to branch the workflow based on data values (for example, routing requests differently depending on cost thresholds).
Properties:
| Property | Description |
|---|---|
| Description | Label displayed on the canvas (e.g., "Evaluate Actual Costs") |
A Service Task only requires a description. Its routing logic is configured on the Automatic actions of the Exclusive Gateway that follows it (see Automatic Actions below).
Exclusive Gateway
The Exclusive Gateway (yellow/olive diamond with X) is a decision point. The workflow follows exactly one of its output paths based on which action is triggered or which condition evaluates to true.
Usage rules:
- An Exclusive Gateway is required after every User Task.
- Each output path from the gateway becomes an action (visible on the connector as a wrench icon).
- At least one output must be configured as a Main action.
- An Exclusive Gateway placed after a Service Task uses Automatic actions with condition evaluation.
Right-click a gateway on the canvas to access Edit or Delete.
Parallel Gateway
The Parallel Gateway (yellow/olive diamond with +) splits the flow into concurrent branches that execute simultaneously. A second Parallel Gateway rejoins the branches before continuing. Connectors on parallel paths are configured as Automatic actions.
Connections and Actions
Drawing Connections
To connect two elements, hover over the source element until connection points (dots) appear on its edges, then drag from a dot to the target element. The connection becomes a connector — the line between the two elements.
Supported connection rules:
- Start Event → User Task or Service Task (no gateway required)
- User Task → Exclusive Gateway (required before branching)
- Exclusive Gateway → User Task, Service Task, or End Event
- Parallel Gateway → User Task or Service Task (concurrent branches)
- Service Task → Exclusive Gateway (for condition evaluation)
Each connector carries an action — the operation triggered when the user clicks the corresponding button on the request form. The action is represented by the wrench icon on the connector, along with notification count badges (bell icon with a number).
Connector Context Menu
Click the wrench icon on a connector to open a context menu with three options:
- Define Action — configure the action properties (name, type, status transition, validation, comments).
- Define Events — attach notifications or Rule Chain executions to this action.
- Remove Connection — delete the connector from the diagram.
Defining an Action
Select Define Action from the connector context menu to open the action configuration panel.
| Property | Description |
|---|---|
| Action type | Main, Regular, or Automatic (see below) |
| Action Name | The label displayed as a button on the request form |
| Status | The workflow status the request transitions to when this action is executed |
| Validate fields | When enabled, required fields on the form are validated before the action proceeds. If any required field is empty, the app highlights it and displays: "Cannot perform the action. Please check the form for errors." |
| Use confirmation message | When enabled, displays a confirmation dialog before executing the action |
| Confirm message | The text of the confirmation dialog (e.g., "Are you sure you want to reject this request?") |
| Use comments | Opens a comment entry popup before the action is performed; the comment is logged in the Action Log |
| Append comments | Appends the entered comment to the main table's comments field |
| Show in action bar | Reserved for future use — will display the action in Management Console bulk action toolbar |
Action Types
| Type | Description |
|---|---|
| Main | Primary action displayed as a prominent button directly on the request (e.g., "Check In", "Assign", "Approve"). At least one Main action is required per gateway. |
| Regular | Secondary action displayed in the ··· menu on the request (e.g., "Reject", "Return", "Cancel"). |
| Automatic | System-generated for parallel gateway branches, parallel joins, and Exclusive Gateway outputs after a Service Task. Configured via Validate Status (see below). |
Automatic Actions and Validate Status
Automatic actions are generated by the application — they do not appear as user-clickable buttons. They are used to route the flow programmatically based on data conditions.
To configure an Automatic action, click its wrench icon on the connector and select Validate Status. The Validate Status dialog contains:
| Setting | Description |
|---|---|
| Action Name | Fixed as AUTOMATIC |
| Status | The status the request transitions to on this path |
| Flow type | Default flow (taken when no conditions match) or Evaluate expression (taken when defined conditions are true) |
| Conditions | One or more field comparisons (Field Name, Comparison operator, Value or Binding field) connected with AND / OR |
Example: Route to Facility Manager approval when Actual Cost is greater than Estimated Cost:
- Flow type:
Evaluate expression - Condition:
Actual Cost—Greater Than—Estimated Cost(Binding enabled)
The Default flow path is taken automatically when all Evaluate expression conditions on sibling paths return false. Every Exclusive Gateway after a Service Task must have exactly one Default flow output.
Defining Events
Select Define Events from the connector context menu to open the Events panel for that action. Events are triggered automatically when the action is executed.
Click Add Event to choose the event type: Notification or Rule Chain. Multiple events of both types can be added to a single action. The bell icon on the connector shows the total count of configured events.
Notification Events
A Notification event sends an email to the users of a selected role when the action is executed.
| Property | Description |
|---|---|
| Notification | Select from the notifications defined in the workflow's Notifications tab (e.g., New Request Notification, Status Update Notification, Supplier Notification) |
| Role | The role whose users will receive the notification (e.g., Client, Assigned Supervisor, Facility Manager) |
| Conditions | Optional. Add conditions to send the notification only when specific criteria are met (uses the same field comparison logic as Validate Status) |
Multiple notifications can be configured on the same action — for example, notify both the Client and the Assigned Supervisor when a request status changes.
Rule Chain Events
A Rule Chain event triggers an automated integration process when the action is executed.
| Property | Description |
|---|---|
| Rule Chain | Select from the Rule Chains defined in the Rule Chain Console |
| Execution Type | Before action (synchronous — the UI waits for the Rule Chain to complete before the action proceeds) or After action (asynchronous — the action completes immediately and the Rule Chain runs in the background) |
| Conditions | Optional. Execute the Rule Chain only when specific field conditions are met |
Rule Chains can implement any custom business logic — for example: cloning a corrective maintenance request from a preventive one, updating stock or parts records, triggering an action in a different workflow, or exporting data via a REST call to a third-party system.
Use Before action when the Rule Chain must complete successfully before the user's action is committed (e.g., validation or data preparation). Use After action when the user should not be blocked waiting for the integration to finish (e.g., sending data to an external system).
Each event card in the Events panel displays its name, type badge (Notification or Rulechain), and the associated role. Click ··· on any event card to Edit or Delete it.
Validations
The Validations button in the top toolbar opens a dialog listing all issues identified in the current diagram. Each issue links to the affected node or connector so you can navigate directly to the problem.
Common validation errors include:
- A User Task is using a form that is not published.
- A required connection is missing.
- A gateway has no Main action defined.
All validation errors must be resolved before the workflow can be published from the Details tab. The Validations button shows a red indicator badge when issues exist.
Clicking any issue in the list highlights and centers the corresponding element on the canvas.
Canvas Options and Utilities
··· Menu (top-right)
| Option | Description |
|---|---|
| Options | Opens the View options dialog with toggles for: Show block IDs (displays the internal node identifier on each element — useful for debugging) and Animate edges (animates the connectors to show flow direction) |
| Code | Opens the View code dialog showing the complete JSON definition of the workflow diagram. The JSON can be copied to clipboard using the copy button. |
| Clear | Clears the entire diagram canvas |
Zoom and Navigation
+/−buttons (bottom-left): Zoom in and out.⤢(fit) button: Fits the entire diagram within the visible canvas area.- Minimap (bottom-right): Provides an overview of the full diagram and allows panning to any area by clicking or dragging within it.
Visual Indicators on the Canvas
Elements and connectors display small badges to communicate their configuration state at a glance:
| Indicator | Meaning |
|---|---|
| Red exclamation badge on a node | The element has a validation error that must be resolved |
| Bell icon with number on a connector | The action has that many notification or Rule Chain events configured |
| Wrench icon on a connector | The action label (shows action name and target status in parentheses below) |
| Link icon with number | The action has Rule Chain events configured |
| Green dashed border on a node | The element is currently selected |
| Action name in green on connector | The action transitions to the shown status (status displayed in parentheses) |
| Action name in purple on connector | The action uses a "Return" or "Incomplete" status |
| Action name in red on connector | The action transitions to a "Rejected" status |
Troubleshooting
Why can't I publish my workflow after designing it?
The workflow can only be published from the Details tab after all validation errors in the Designer are resolved. Click Validations in the top toolbar to see the full list of issues. Common causes include User Tasks referencing unpublished forms, gateways with no Main action, or disconnected elements. Fix each issue listed, save the changes, then return to the Details tab to publish.
I made changes and navigated away — are they saved?
No. The Designer does not auto-save. Any changes made without clicking Save Changes are permanently lost. Watch for the red dot on the Save Changes button — it indicates unsaved modifications are pending.
Can I reuse the same form across multiple User Tasks?
Yes. A published form can be assigned to as many User Tasks as needed within the same workflow or across different workflows. If you need step-specific variations, create separate forms in the Forms tab and assign them individually.
What is the difference between an Exclusive and a Parallel Gateway?
An Exclusive Gateway follows exactly one output path — the one whose action is triggered by the user or whose condition evaluates to true. A Parallel Gateway activates all output paths simultaneously, allowing multiple branches to execute concurrently. Both branches of a Parallel split must eventually converge at a second Parallel Gateway before the flow continues.