Workflow Status Tab
The Status tab allows you to define and manage the various states that requests can have as they progress through your workflow. Each status represents a specific stage or condition in your business process, providing clear visibility into the current state of each request.
Overview
Statuses are essential building blocks of your workflow that:
- Define the possible states a request can be in throughout its lifecycle
- Provide visual indicators through color coding in management consoles
- Enable workflow automation through status transitions in the Designer
- Help users quickly identify and filter requests by their current state
Path: Define → Workflows → [Select Workflow] → Status Tab
Click to view Status Tab interface
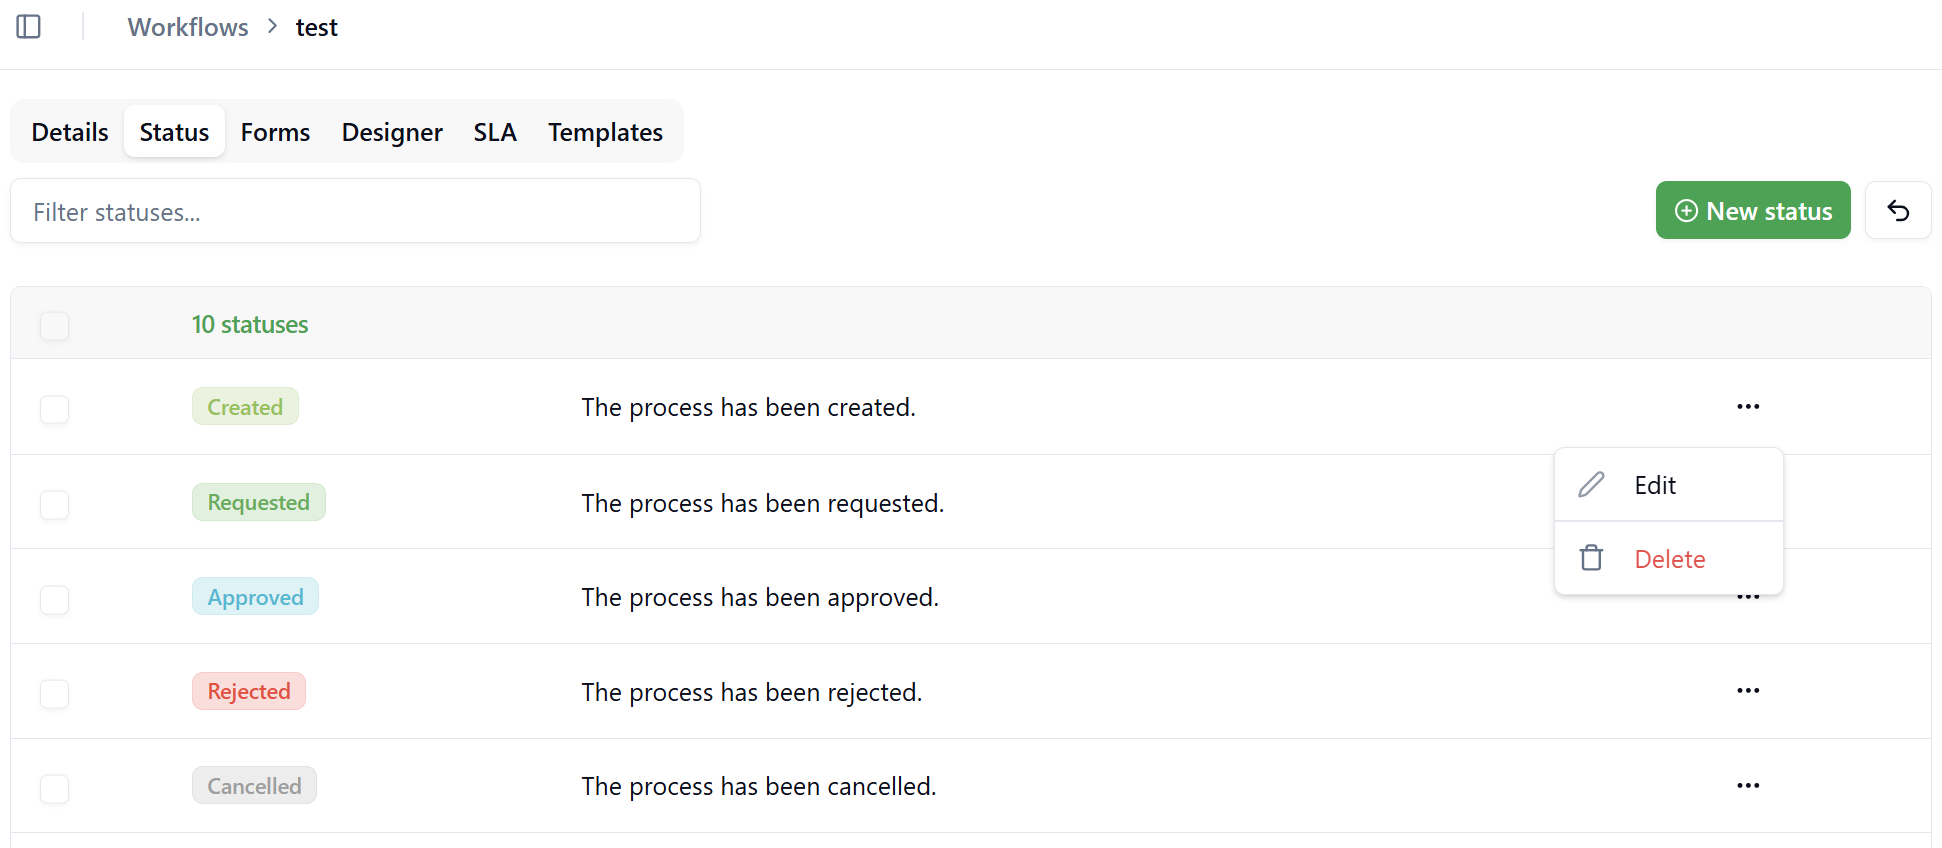
Status List View
The Status tab displays all configured statuses for the workflow in a table format with the following columns:
- Name - The status identifier displayed throughout the system
- Description - Brief explanation of what this status represents
- Color - Visual indicator shown in management consoles and workflow portal
- Actions - Edit or delete options (⋮ menu)
Default Statuses
When creating a new workflow with the Default template, the system provides 10 pre-configured statuses that cover common workflow states:
- Created - Initial status when a request is first submitted
- Requested - Request has been formally submitted for processing
- Approved - Request has received approval to proceed
- Rejected - Request has been denied
- Cancelled - Request has been withdrawn or cancelled
- In Progress - Work is actively being performed
- Returned - Request has been sent back for corrections or additional information
- Completed - All work has been finished
- On Hold - Request is temporarily paused
- Closed - Request has been finalized and archived
While these default statuses cover many common scenarios, you can modify, add, or remove statuses to match your specific business process requirements.
Creating a New Status
To add a new status to your workflow:
- Click the + New Status button in the top-right corner
- The "Edit status" panel appears on the right side
Click to view Create Status panel
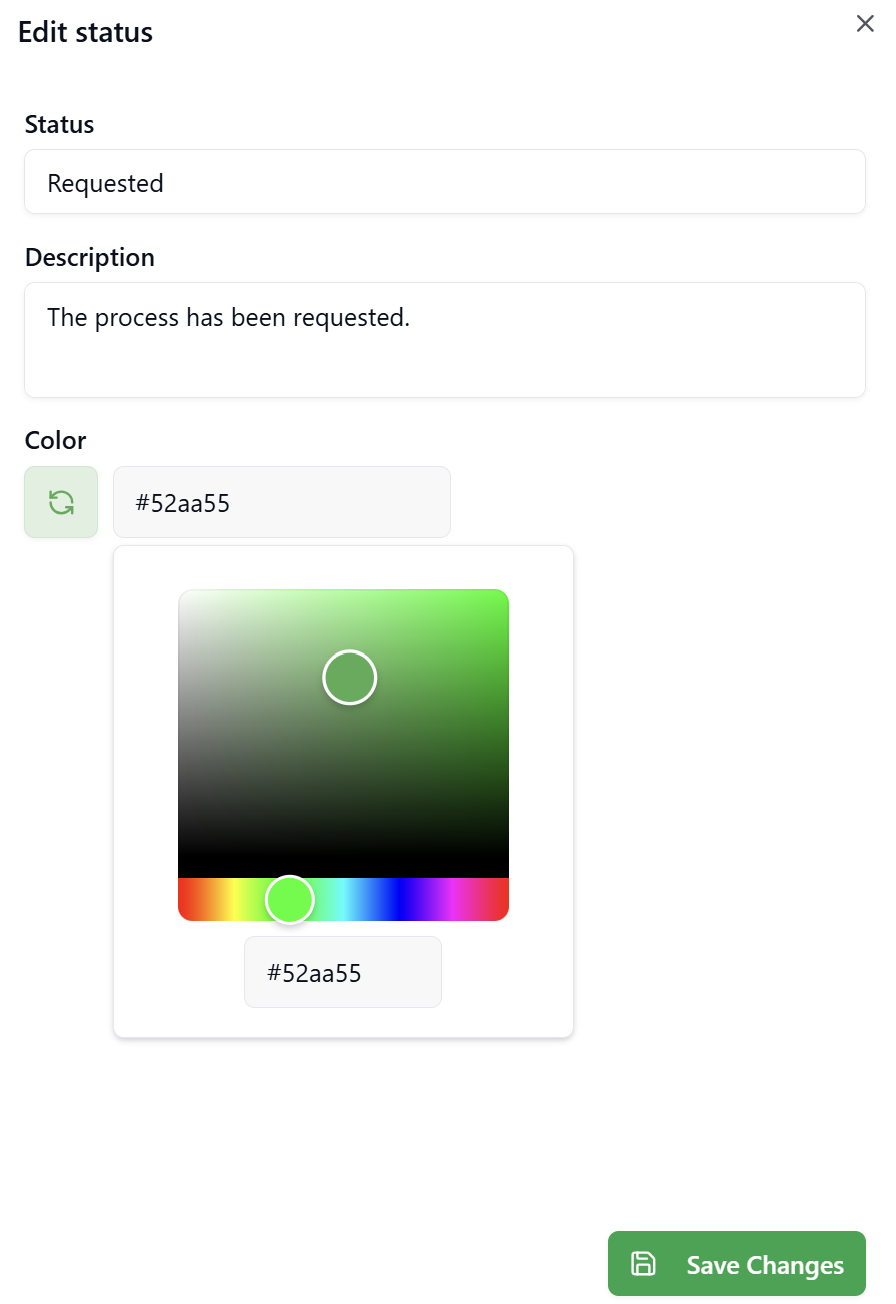
Status Configuration Fields
Name
The unique identifier for this status within the workflow.
Field Type: Text input
Validation Rules:
- Required field
- Must be unique within the workflow
- Recommended: Use clear, business-friendly names
- Case-sensitive
Examples:
- "Waiting for Approval"
- "Under Review"
- "Pending Payment"
- "Ready for Deployment"
Best Practices:
- Use present tense or past participle forms
- Keep names concise (2-3 words maximum)
- Use consistent naming conventions across all statuses
- Avoid abbreviations unless universally understood
Description
Detailed explanation of what this status represents and when it should be used.
Field Type: Multi-line text area
Validation Rules:
- Optional field
- No character limit
- Supports plain text only
Content Guidelines:
Include information such as:
- When a request enters this status
- What conditions must be met
- Who is responsible at this stage
- What actions are expected
- Any time constraints or SLA implications
Example:
Request is awaiting manager approval. The assigned manager should
review the request details and either approve or reject within
2 business days. Notifications are sent to the manager daily until
action is taken.
Purpose:
- Helps workflow designers understand status usage
- Provides context for users viewing requests
- Documents business process logic
- Assists with training and onboarding
Color
Visual indicator used to represent this status in the user interface.
Field Type: Color picker
Selection Process:
- Click the color box
- Choose from predefined color palette, or
- Enter a custom hex color code
Color Usage:
The selected color appears in:
- Management console request tables (status badges)
- Workflow portal request lists
- Request detail views
- Status filters and legends
- Reports and dashboards
Color Selection Guidelines:
Semantic Color Meanings:
- Green - Positive completion states (Completed, Approved, Closed)
- Blue - Informational or in-progress states (In Progress, Under Review)
- Yellow/Orange - Warning or attention needed (On Hold, Pending, Waiting)
- Red - Negative or blocking states (Rejected, Cancelled, Failed)
- Gray - Neutral or initial states (Created, Draft)
- Purple - Special or custom states
Best Practices:
- Use consistent color schemes across workflows
- Ensure sufficient contrast for readability
- Consider color-blind users (use patterns in addition to color when possible)
- Avoid using too many similar colors
- Test visibility on both light and dark backgrounds
While colors provide quick visual recognition, the status name is always displayed alongside the color to ensure accessibility for all users.
Save and Cancel
- Save - Creates the new status and adds it to the workflow
- Cancel - Discards changes and closes the panel
After saving, the new status becomes available for use in:
- Form configurations
- Designer actions
- Status filters in management consoles
- Workflow automation rules
Editing an Existing Status
To modify a status:
- Click the context menu (⋮) next to the status
- Select Edit
- The "Edit status" panel appears with current values
- Make desired changes to Name, Description, or Color
- Click Save to apply changes
What You Can Edit:
- ✅ Name (ensure no active requests depend on the old name)
- ✅ Description (safe to change anytime)
- ✅ Color (visual change only, no functional impact)
If the workflow is Published, changing status names may affect active requests and existing Designer configurations. Test thoroughly before making changes to production workflows.
Deleting a Status
To remove a status from the workflow:
- Click the context menu (⋮) next to the status
- Select Delete
- Confirm the deletion in the dialog
Deletion Rules:
You can delete a status at any time, but be aware of the potential impact:
Deleting a status can affect your workflow if:
- ⚠️ Designer blocks have actions that set this status - these actions will become invalid
- ⚠️ Active requests are currently in this status - these requests will be affected
- ⚠️ The status is referenced in workflow automation rules - these rules may fail
If you need to modify statuses in a published workflow that has active requests, the best practice is to:
- Create a new version of the workflow
- Make your status changes in the new version
- Publish the new version
This approach protects existing requests from being affected by status changes. Deleting statuses in a production workflow (one with active requests) can break those requests and disrupt ongoing processes.
Before deleting a status:
- Check the Designer tab for any actions using this status
- Review active requests to ensure none are in this status
- Update or remove dependencies first
- Then proceed with deletion
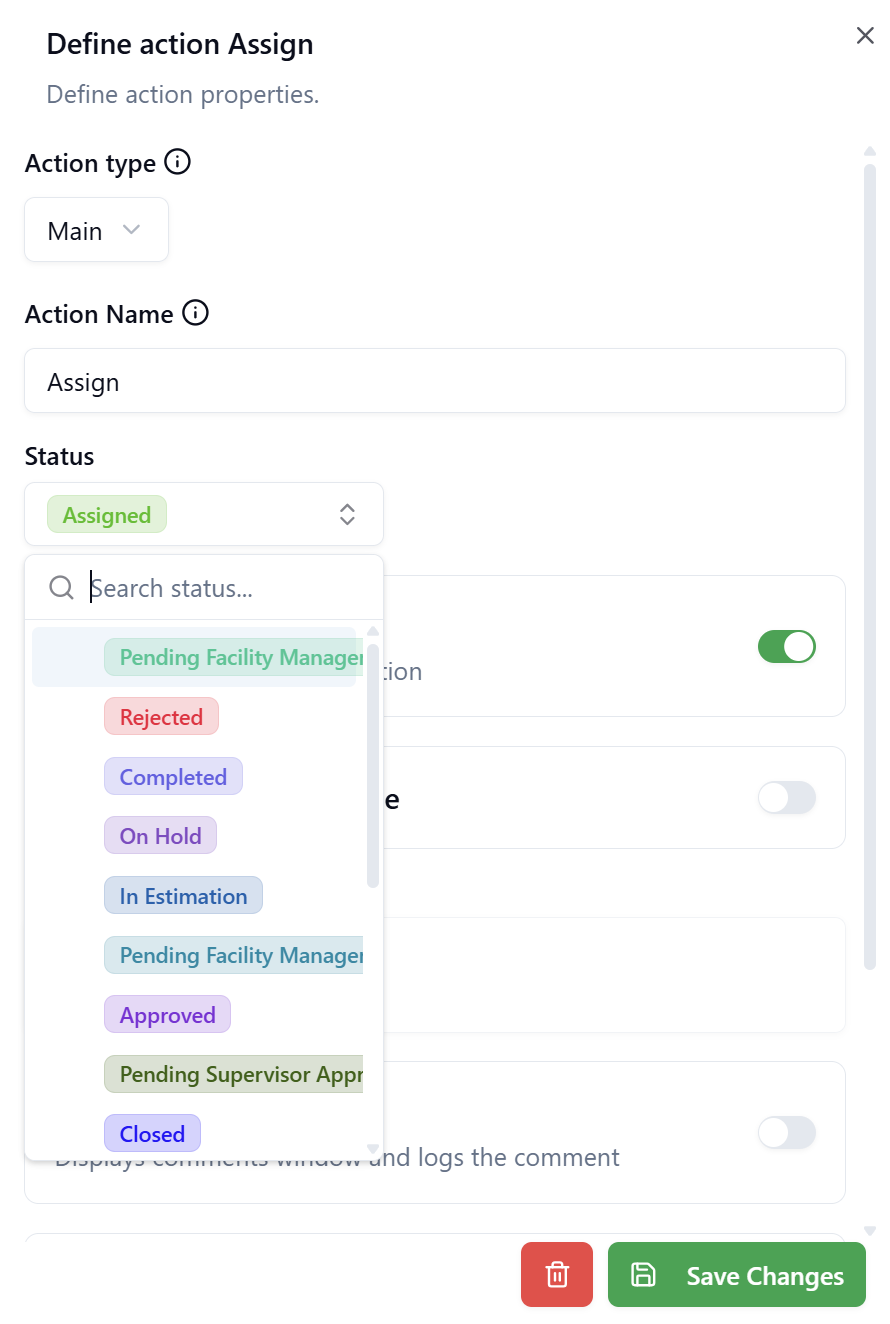
Using Statuses in the Designer
Statuses become functional components of your workflow through the Designer tab. When you define actions on workflow tasks, you can specify which status the request should transition to.
Status Transitions in Actions
When configuring a User Task or Service Task in the Designer:
- Click on the task block
- Select the Actions tab in the properties panel
- Define an action (e.g., "Approve", "Reject", "Submit")
- In the action configuration, select the Status field
- Choose which status the request should transition to when this action is executed
Click to view Define Action with Status
Example Scenarios:
Approval Task:
- Action: "Approve" → Status: "Approved"
- Action: "Reject" → Status: "Rejected"
- Action: "Return" → Status: "Returned"
Work Task:
- Action: "Start Work" → Status: "In Progress"
- Action: "Complete Work" → Status: "Completed"
- Action: "Put On Hold" → Status: "On Hold"
Review Task:
- Action: "Submit for Review" → Status: "Under Review"
- Action: "Revisions Needed" → Status: "Returned"
- Action: "Accept" → Status: "Approved"
Status Change Behavior
When a user performs an action that has a status configured:
- User clicks the action button (e.g., "Approve")
- System validates the action is permitted
- Request status changes to the configured status
- Status change is recorded in request history
- Notifications may be triggered based on status change
- Workflow progresses to the next step
- Management console updates with new status and color
Status changes triggered by actions are immediate and automatic. Users don't need to manually select a status - the workflow handles this based on the Designer configuration.
Status Display in Management Consoles
Statuses provide critical visibility in the management consoles where users monitor and manage requests.
Click to view Management Console Status Display
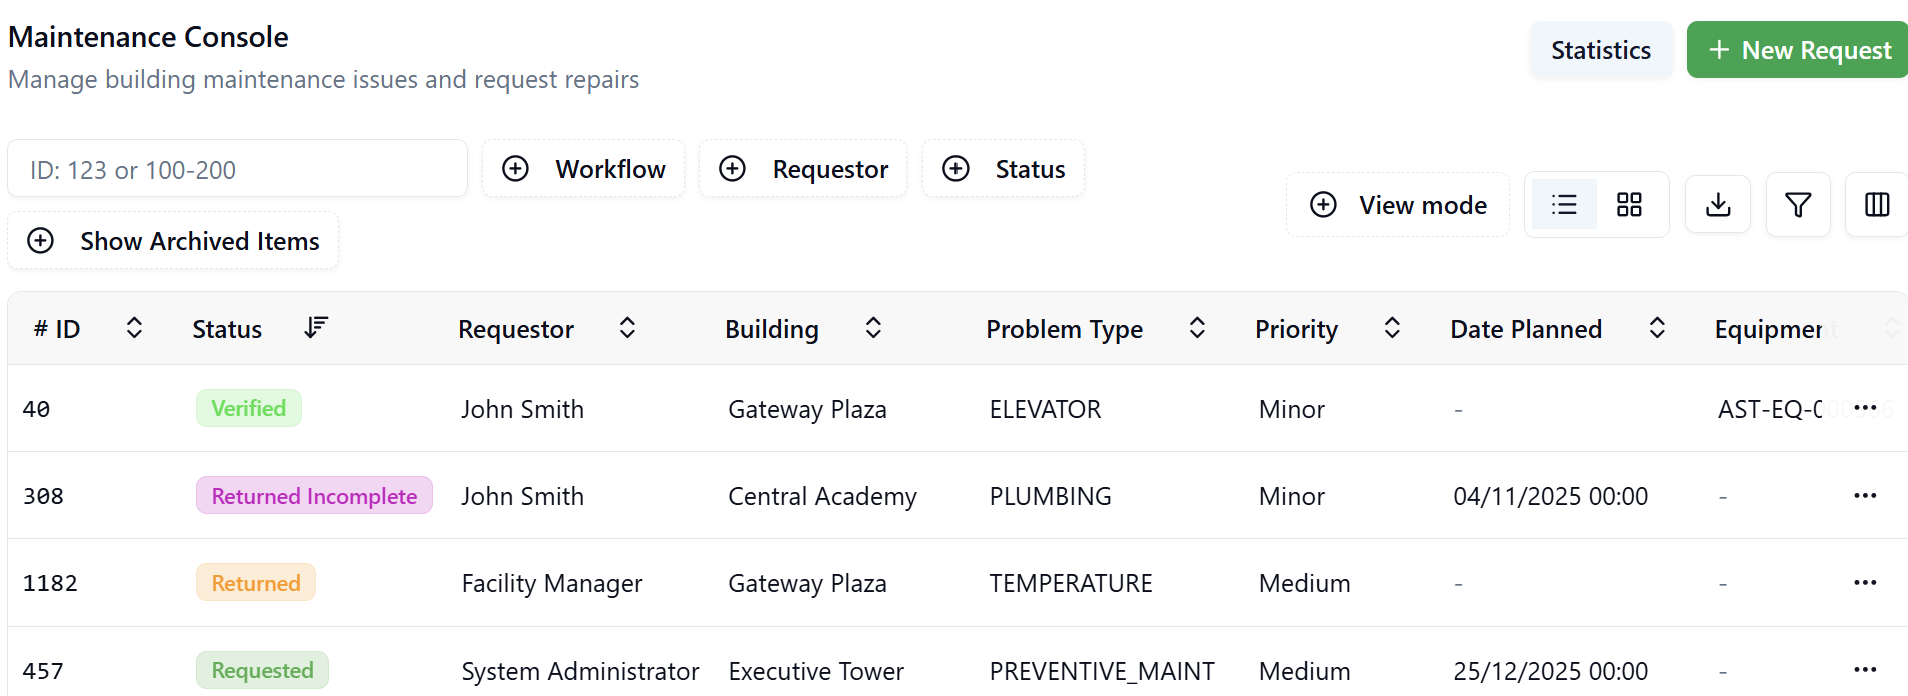
Status Column
In the management console request table:
- Status Badge - Displays status name with configured color background
- Visual Indicator - Color-coded for quick recognition
- Sortable - Click column header to sort by status
- Filterable - Use status filter to show specific statuses only
Status Filtering
Users can filter requests by status:
- Click the Status filter dropdown
- Select one or multiple statuses
- Table updates to show only matching requests
- Active filters display as chips
- Click (X) to remove filter
Filter Features:
- Multi-select - View requests in any of several statuses
- Combine with other filters - Status + Date Range + Assignee
- Save filter presets - Create quick-access filtered views
- Export filtered results - Generate reports based on status
Status in Request Details
When viewing a specific request:
- Current status displayed prominently in header
- Status history shows all previous status changes
- Timeline indicates when each status change occurred
- User who triggered the status change is recorded
Status Workflow Patterns
Linear Progression
Simple sequential workflow where requests move forward through statuses:
Created → Requested → In Progress → Completed → Closed
Use Cases:
- Simple approval workflows
- Document review processes
- Basic task tracking
Branching Approval
Workflow with approval/rejection branches:
Created → Requested → [Approved | Rejected]
                       ↓           ↓
                   In Progress   Closed
                       ↓
                   Completed
                       ↓
                     Closed
Use Cases:
- Purchase approvals
- Change requests
- Access requests
Iterative Review
Workflow supporting revisions and resubmission:
Created → Submitted → Under Review → [Approved | Returned]
             ↑                            ↓         ↓
             └────────────────────────────┘     Closed
                    (Revise)
Use Cases:
- Document approval with revisions
- Design review processes
- Quality assurance workflows
Multi-Stage Processing
Complex workflow with multiple processing stages:
Created → Requested → [Approved | Rejected]→ Scheduled → In Progress → Completed → Verified → Closed
                                     ↓                        ↓    ↑
                                   Closed                     On Hold
Use Cases:
- Maintenance workflows
- Project delivery
- Multi-step service requests
Best Practices
Status Design
✅ Do:
- Create statuses that represent actual business states
- Use clear, descriptive names that users understand
- Limit total number of statuses
- Ensure each status has a clear purpose
- Document status meanings in descriptions
- Choose intuitive colors that match status meaning
- Design status progression logically
❌ Don't:
- Create duplicate or overlapping statuses
- Use technical jargon or codes as status names
- Create statuses for every minor state change
- Use similar colors for different statuses
- Change status names in published workflows without careful planning
- Delete statuses that are referenced in Designer
Color Selection
✅ Do:
- Use green for positive/completion states
- Use red for negative/blocking states
- Use blue for neutral/in-progress states
- Use yellow/orange for warning/attention states
- Maintain consistent color meanings across workflows
- Test color visibility and contrast
- Consider accessibility for color-blind users
❌ Don't:
- Use too many different colors
- Choose colors randomly
- Use low-contrast color combinations
- Rely solely on color without labels
- Change colors frequently
Status Progression
✅ Do:
- Design clear forward progression paths
- Include terminal statuses (Completed, Closed, Cancelled)
- Support exception handling (Rejected, Returned, On Hold)
- Allow for parallel paths when needed
- Consider status history and audit requirements
- Plan for workflow reporting needs
❌ Don't:
- Create circular status loops without exit conditions
- Allow too many possible transitions from each status
- Skip logical intermediate steps
- Create dead-end statuses with no forward path
Maintenance and Updates
✅ Do:
- Review status usage periodically
- Remove unused statuses
- Document status changes in version notes
- Test status changes in non-production environments first
- Communicate status meaning to users
- Train users on status definitions
❌ Don't:
- Change statuses in published workflows without testing
- Delete statuses without checking dependencies
- Modify status names that appear in reports
- Remove statuses that active requests depend on
Troubleshooting
Status Not Appearing in Designer
Issue: Newly created status doesn't show in Designer action dropdown
Solution:
- Save the status in the Status tab
- Click Save Changes in the Status tab
- Navigate to Designer tab
- Refresh the page if needed
- Status should now appear in dropdown
Color Not Displaying Correctly
Issue: Status color appears different in management console
Possible Causes:
- Browser caching
- Theme or styling overrides
- Display settings
Solution:
- Clear browser cache
- Refresh the page (Ctrl+F5 or Cmd+Shift+R)
- Check color selection in Status tab
- Verify color hex code is valid
Status Changes Not Saving
Issue: Modified status reverts to previous values
Solution:
- Ensure you clicked Save in the edit panel
- Check for validation errors
- Verify status name is unique
- Check network connection
- Review browser console for errors
- Try again or refresh page
Integration with Other Tabs
Status and Forms
- Forms can display current status as a read-only field
- Form visibility rules can be based on status
- Form validation can vary by status
Status and Designer
- Actions trigger status transitions
- Service tasks can set status programmatically
- Status history tracked in action log
Status and SLA
- SLA Time Measurement: SLA track duration between an Initial Status (where timing starts) and a Final Status (where timing stops)
- On Hold Status: Optionally pause SLA counting when requests are in designated statuses (e.g., "Waiting for Client")
- SLA Events: Status transitions can trigger automated events such as notifications to roles or rule chain executions
- Reporting: Track time spent in each status and monitor SLA compliance metrics
Status and Notifications
- Status changes can trigger notifications
- Different statuses can notify different user groups
- Notification templates can reference current status
- Escalations can occur when status doesn't change within timeframe
Summary
The Status tab provides essential workflow state management capabilities:
- Define statuses that represent business process stages
- Configure appearance with names, descriptions, and colors
- Enable automation through Designer action integration
- Provide visibility in management consoles and reports
Key Takeaways:
- Statuses represent distinct states in your business process
- Each status has a name, description, and color for identification
- Statuses are assigned through Designer actions when users perform tasks
- Management consoles display status with color coding for quick recognition
- Design thoughtful status progressions that match your business logic
- Use semantic colors that match status meanings
- Document status meanings for user understanding
- Test status changes before applying to production workflows
- Statuses integrate with Forms, Designer, SLA, and Notifications
- Maintain a clean, minimal set of statuses for clarity
Well-designed statuses improve workflow visibility, enable effective automation, and enhance the user experience across the entire request lifecycle.